How to create and access a Linux-based cloud server via an SSH key
To access a Linux-based server via an SSH key, you need to generate a key pair. The private part of the key is stored on the PC you connect from, and the public part is placed on the cloud server. You can generate the key pair on your PC and place the public part in the Customer Portal, or generate a key directly at portal.servers.com — in which case you will be given the private part of the key to save on your PC. Both options are described below.
Creating a key pair in OS
1.1. Guide for Windows users
Download the Putty SSH client and the PuTTYgen private key generator. Start PuTTYgen, select SSH-2 RSA, click Generate, and move the mouse until the progress bar is full.
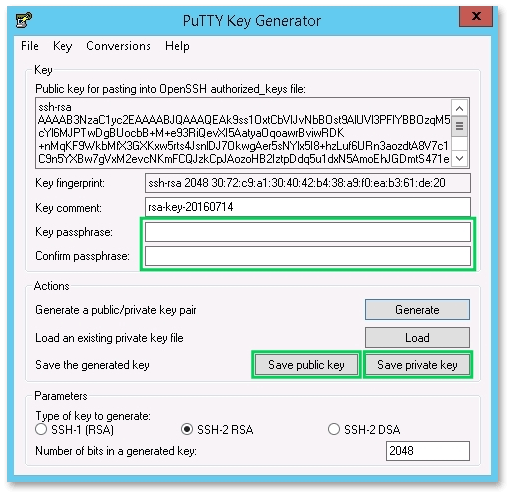
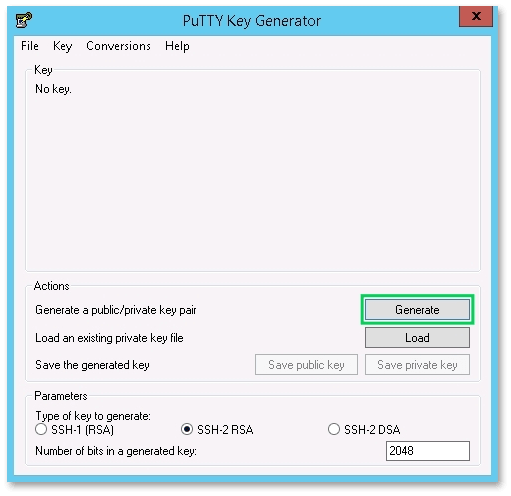 Enter and confirm a password. Save the key files in a safe place.
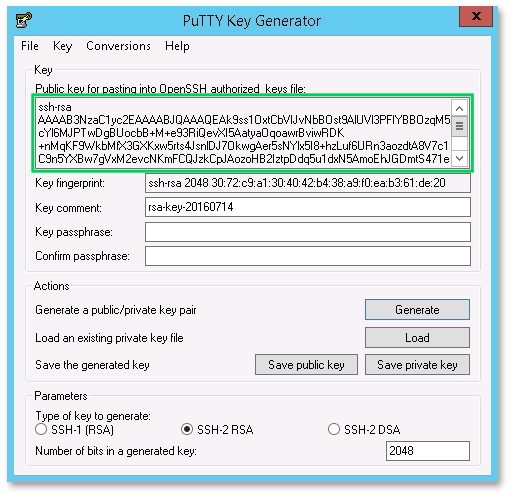
 Select and copy the text of the public key as shown in the picture. For more information on how to add this key via your account at portal.servers.com, see Adding the previously created key to portal.servers.com.
1.2. Guide for macOS and Linux users
To generate an SSH RSA key pair, open the Terminal and run the following command:
ssh-keygen -t rsa -b 4096Specify the path where you want to save your private SSH key, for example:
/home/youruser/.ssh/rsa_keyThen enter and confirm your password. While entering it you will not see the characters — this is expected:
Enter passphrase (empty for no passphrase):
Enter same passphrase again:
You should get a result similar to the following:
Your identification has been saved in /home/youruser/.ssh/rsa_key
Your public key has been saved in /home/youruser/.ssh/rsa_key.pub
The private key file rsa_key must be stored on your local computer.
To view the contents of your public key, run:
cat /home/youruser/.ssh/rsa_key.pubA text similar to the following will appear on your screen:
ssh-rsa AAAAB3NzaC1yc2EAAAADAQABAAACAQ...Copy this text for the next step. For more information on how to add this key via your account at portal.servers.com, see Adding the previously created key to portal.servers.com.
Adding the previously created key to portal.servers.com
Log in to your account at portal.servers.com. Go to Identity and Access → SSH & GPG keys. In the upper right corner, click Create. Enter any name for your public key, tick the option Use public SSH key, paste the text of your public key in the field, and click Create.
Creating a new key in your personal account
Log in to your account at portal.servers.com. Go to Identity and Access → SSH & GPG keys. Enter any name for your key, tick the option Generate new SSH key, and click Create. In the new window, copy the private key and store it on your PC in a safe place. You will need this key to connect to the cloud server in the future. Click Return to the list.
Creating a Linux-based cloud server with SSH key access
Go to Cloud Servers → Instances. Click Create server. Choose the region, choose the appropriate Linux distribution, enter the name for your server. In Authentication method, select SSH key, select the previously created SSH key, and click Create Cloud Server at the bottom of the page.
Connecting to a Linux-based cloud server with SSH key access
5.1. Guide for Windows users
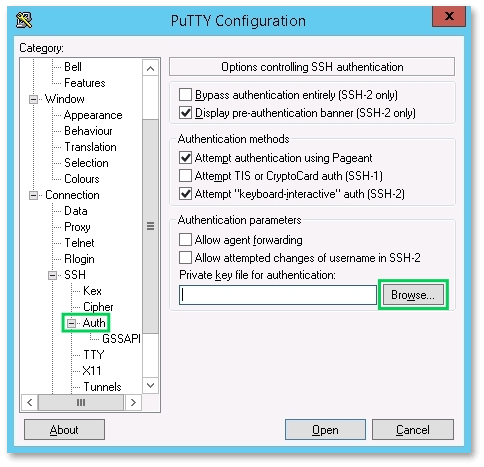
Open the Putty SSH client. Go to Connection → SSH → Auth and select your private key file.
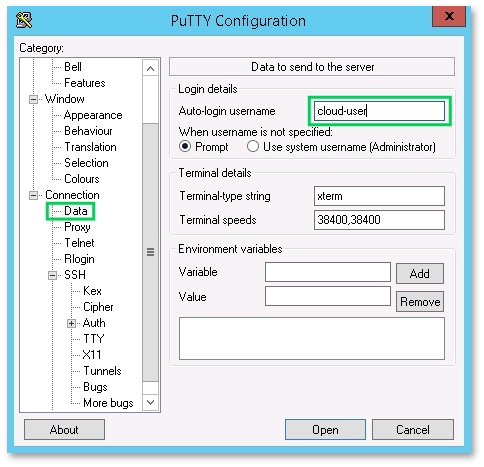
 Go to Connection → Data. In the Auto-login username field, enter
 cloud-user (note that Linux usernames are case-sensitive).
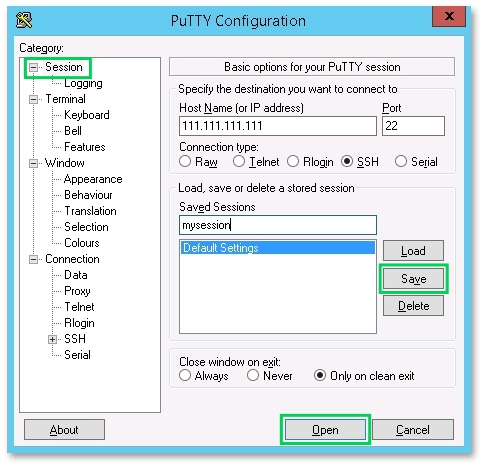
 Go to the Session tab. In the Host Name field, enter the external IP of your virtual machine. Select port 22, which is the default port for SSH. Enter a session name and click Save. To connect, click Open.
 Enter the password for your key.
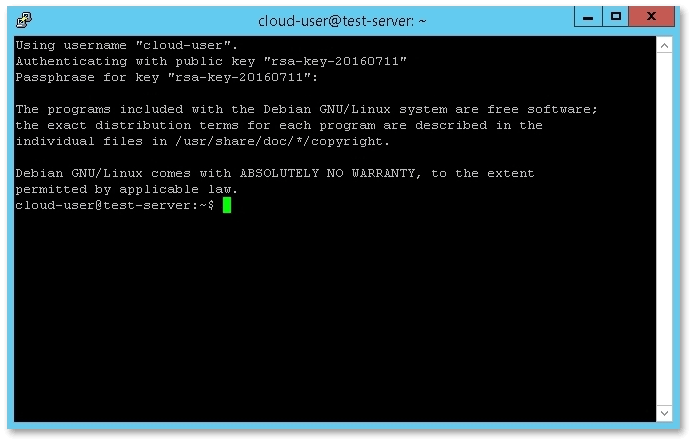 To get root user privileges, type:
sudo su -5.2. Guide for macOS and Linux users
To connect from a macOS or Linux machine, open the Terminal and enter the following command:
ssh cloud-user@external_ip_of_machine -i /home/youruser/.ssh/rsa_keyReplace external_ip_of_machine with the external IP of your cloud server and /home/youruser/.ssh/rsa_key with the path to your private key.
To obtain root user privileges, type:
sudo su -