How to prepare your own Windows image and deploy it on a cloud server
You can deploy a cloud server from your own Windows image. This is useful when you need a preconfigured Windows environment with your own software, services, and system settings.
This guide covers how to prepare a Windows virtual machine (VM) image so it runs correctly in our OpenStack-based cloud, upload it to the Customer Portal, and deploy a cloud server from it.
Use this guide if:
- You already have a Windows VM and need to prepare it for deployment
- You need to create a new Windows VM from an installation ISO and prepare it for deployment
Prerequisites
- Customer Portal account
- Local machine (Windows, Linux, or macOS)
- Installed virtualization software (we use QEMU in examples)
- Windows installation ISO (required only if you are creating a new VM)
Image requirements
Ensure your Windows VM meets the following requirements:
- Architecture: x64 OS
- Boot firmware: Only BIOS (UEFI is not supported)
- Windows 11 is not currently supported
- Local virtual disk in
qcow2format (recommended) - DHCP enabled; no static network configuration
- VirtIO drivers installed
- Cloudbase-Init installed and configured
- Image generalized using Sysprep
Prepare a Windows image
Create a VM and install Windows
Use this section only if you are creating a new VM. If you already have a configured Windows VM, skip ahead to Configure the Windows VM.
Install QEMU
QEMU is a free and open-source cross-platform virtualization environment.
Windows (PowerShell, run as administrator)
-
Enable Windows Hypervisor Platform:
Enable-WindowsOptionalFeature -FeatureName HypervisorPlatform -Online -
Install QEMU:
winget install SoftwareFreedomConservancy.QEMUOr use a ready-made installer for Windows.
-
Restart Windows.
Ubuntu/Linux
sudo apt-get install qemu-systemFedora
sudo dnf install qemu qemu-kvm
# or
sudo dnf install @virtualization
Red Hat/CentOS
sudo yum install qemu qemu-kvmSUSE
zypper install qemuArch Linux
sudo pacman -S qemumacOS (Homebrew)
brew install qemumacOS (MacPorts)
sudo port install qemuCreate a local virtual disk
When installing Windows from an ISO, you must first create a virtual disk to install Windows on. Choose a <disk-size> that fits your OS installation requirements (for example, 30G).
Creating a virtual disk does not mount it anywhere. You mount it to the VM later with the -drive file=… option.
Windows (from %ProgramFiles%\qemu)
.\qemu-img.exe create -f qcow2 C:\path-to\windows-virtual-disk.qcow2 <disk-size>Linux / macOS
qemu-img create -f qcow2 windows-virtual-disk.qcow2 <disk-size>Download VirtIO drivers
Windows does not detect VirtIO disks by default during installation, so you must load the driver manually from an ISO.
Download the prebuilt VirtIO drivers from the Fedora stable-virtio repository (for example, virtio-win.iso).
Launch the VM
Start the VM with your Windows installation ISO and the VirtIO driver ISO attached.
Use -m and -smp to set memory and vCPUs to match the configuration you plan to use on the cloud server.
Windows (PowerShell, run as administrator, from %ProgramFiles%\qemu)
.\qemu-system-x86_64.exe `
  -accel whpx `
  -m 4096 -smp 2 `
  -drive file=C:\path-to\windows-virtual-disk.qcow2,if=virtio,format=qcow2 `
  -drive file=C:\path-to-virtio-win.iso,media=cdrom `
  -cdrom C:\path-to-windowsOS.iso `
  -device virtio-net-pci,netdev=n1 `
  -netdev user,id=n1 `
  -boot order=d `
  -display default
Linux
qemu-system-x86_64 \
  -enable-kvm \
  -m 4096 -smp 2 \
  -drive file=windows-virtual-disk.qcow2,format=qcow2,if=virtio \
  -drive file=/path-to-virtio-win.iso,media=cdrom \
  -cdrom /path-to-windowsOS.iso \
  -device virtio-net-pci,netdev=n1 \
  -netdev user,id=n1 \
  -boot order=d \
  -display default
macOS
qemu-system-x86_64 \
  -accel tcg,thread=multi \
  -m 4096 -smp 2 \
  -drive file=windows-virtual-disk.qcow2,format=qcow2,if=virtio \
  -drive file=/path-to-virtio-win.iso,media=cdrom \
  -cdrom /path-to-windowsOS.iso \
  -device virtio-net-pci,netdev=n1 \
  -netdev user,id=n1 \
  -boot order=d \
  -display default
Install and configure Windows
Use this section only if you are preparing a new image from a Windows installation ISO. If you already have a preconfigured Windows system, skip ahead to Configure the Windows VM.
-
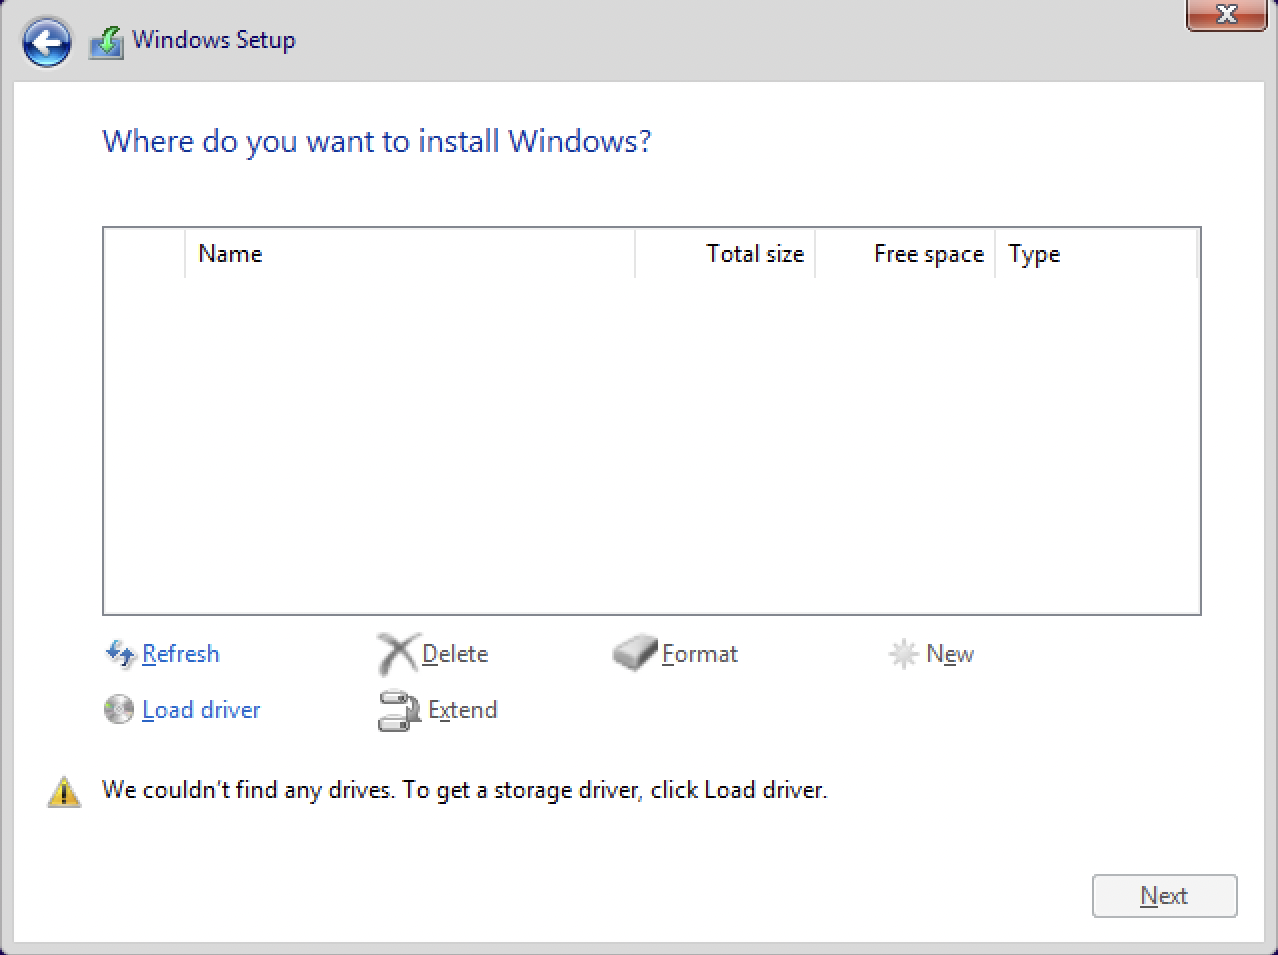
Start the installation. At the disk selection step, the list of available disks is empty.
-
Click Load driver.
-
Browse to the VirtIO ISO (for example,
CD Drive (D:) virtio-win-0.1.285).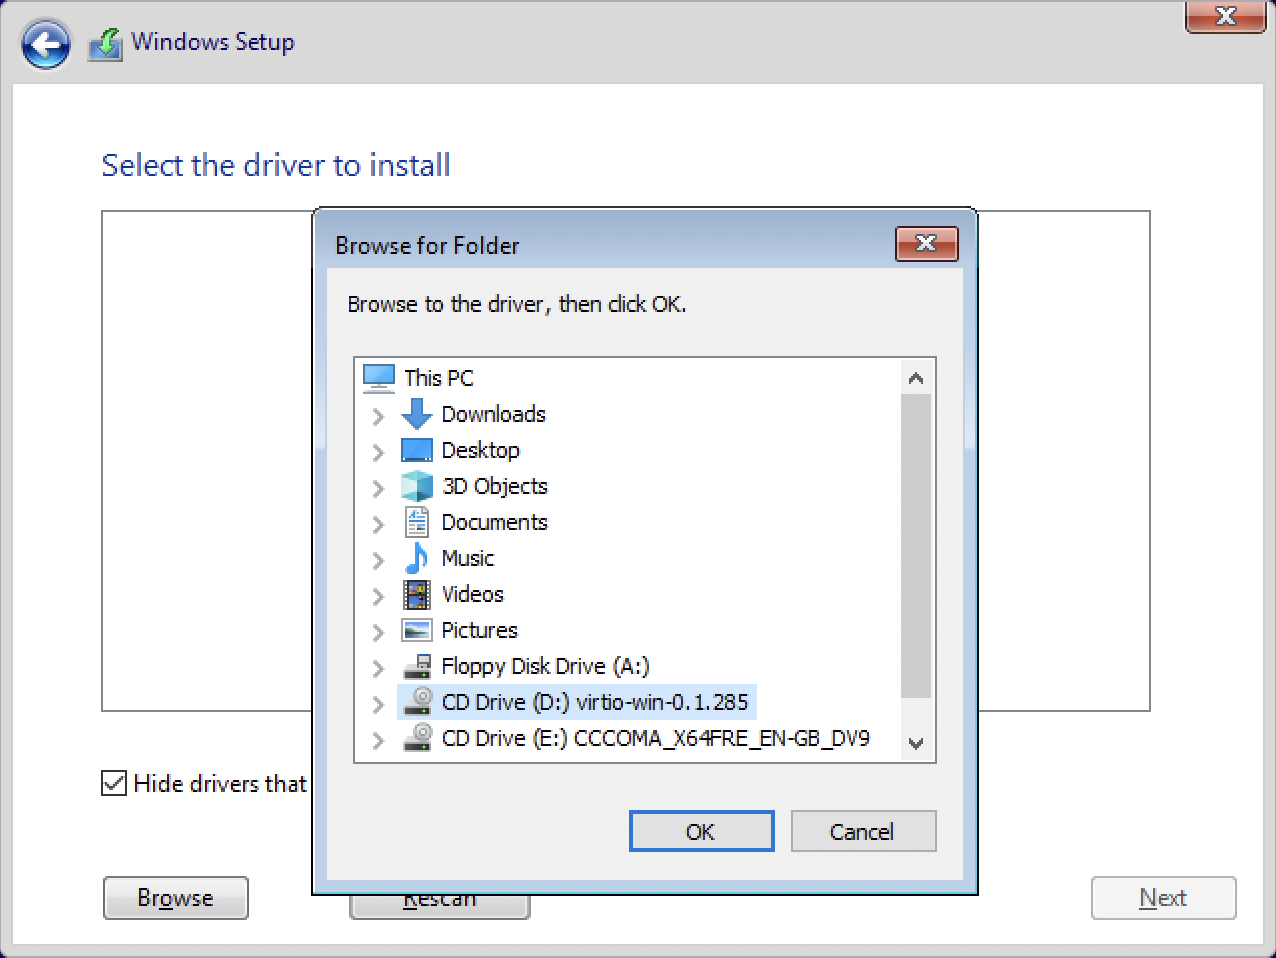
-
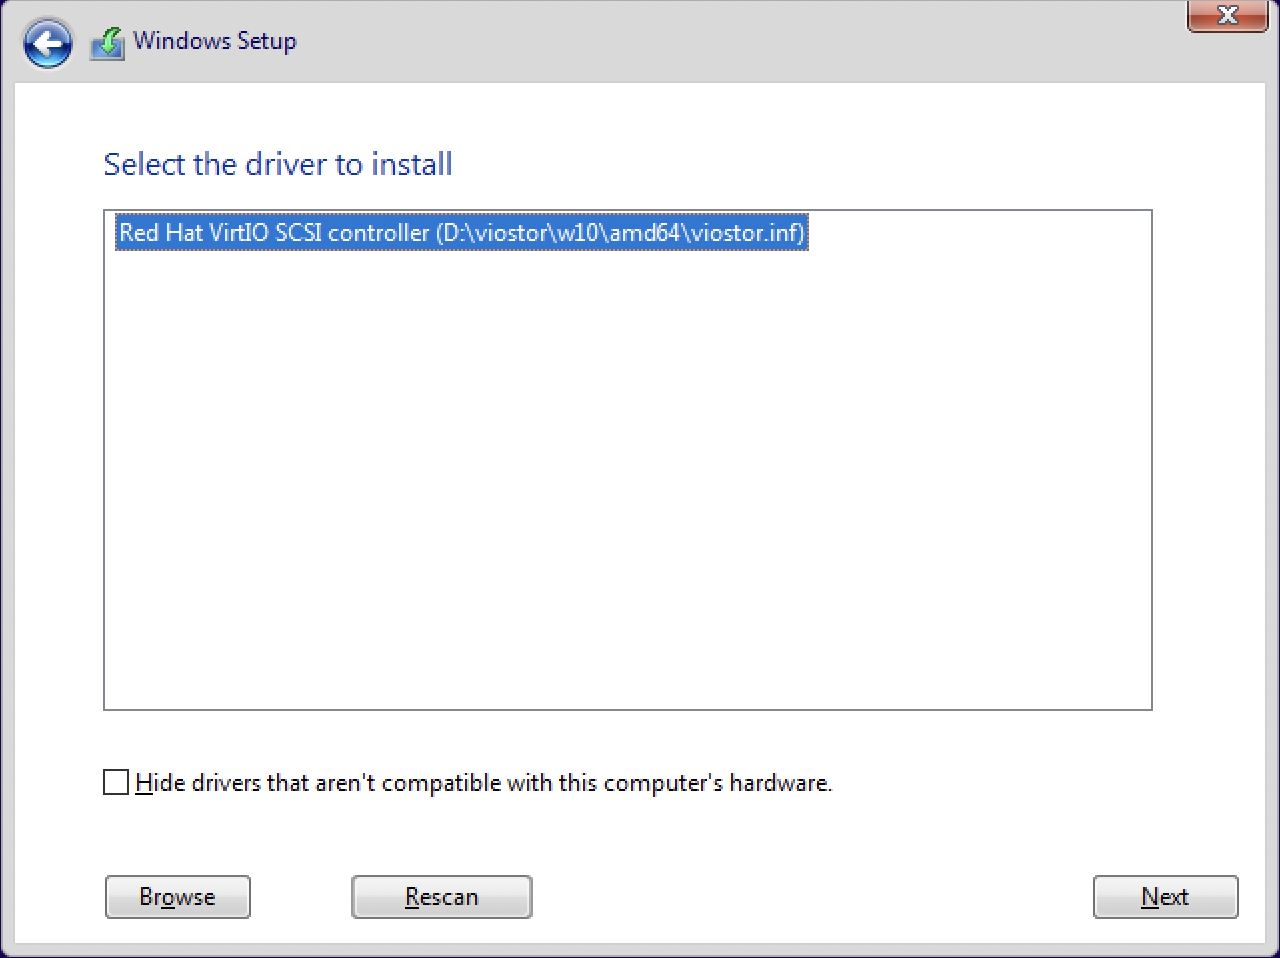
Browse to the VirtIO storage driver directory that matches your Windows version and architecture (for example,
viostor\w10\amd64). -
Select the detected VirtIO SCSI controller driver, then click Next.
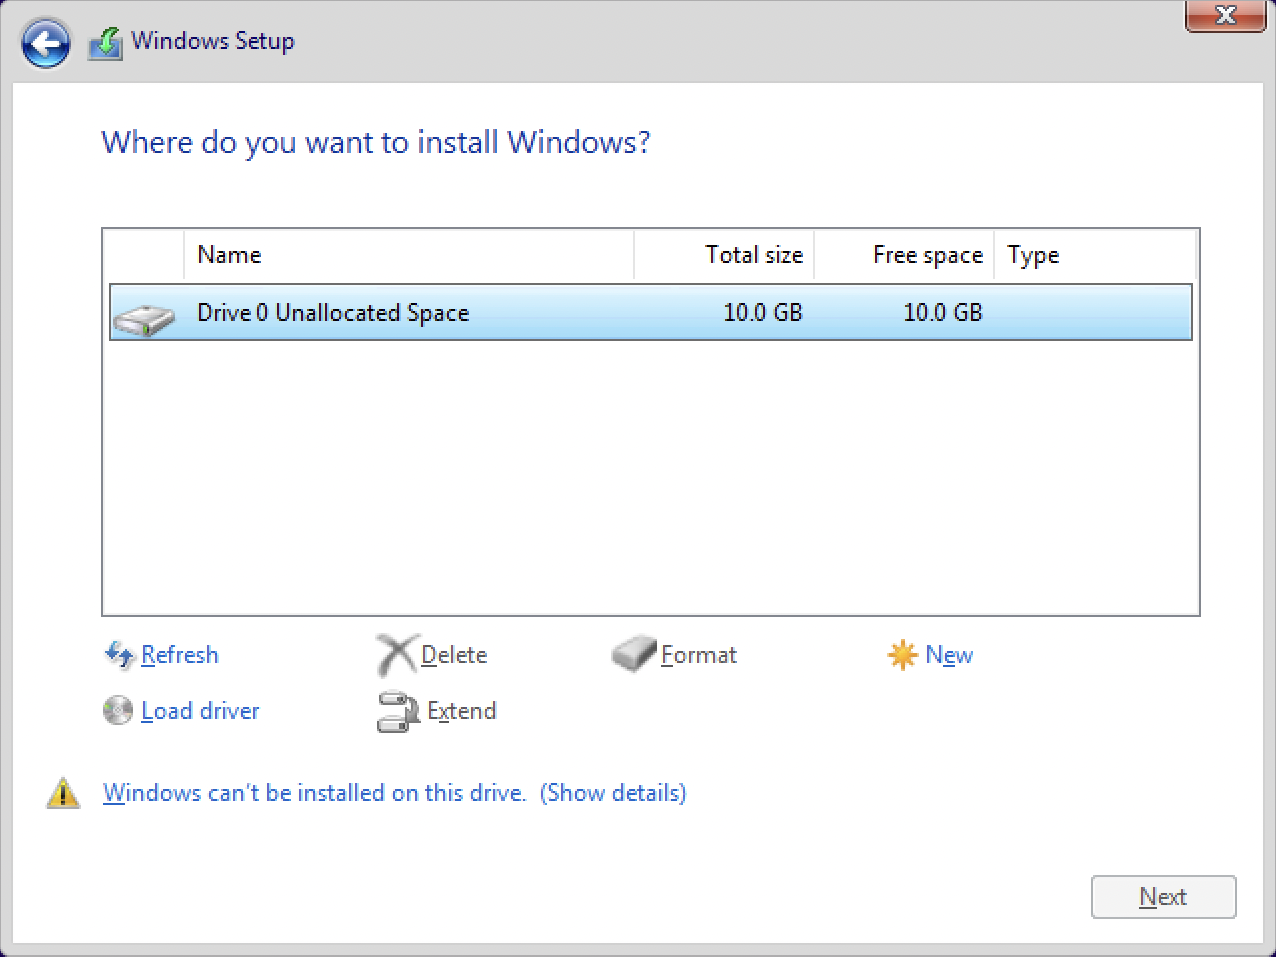
You return to the disk selection screen. The disk is now available.
-
Continue the installation. Use the built-in Administrator account to ensure compatibility with Cloudbase-Init and standard Windows behavior.
-
After the reboot, wait for the installation to finish.
-
At the final installation step, click I don't have Internet. Networking is not available yet because the VirtIO network driver is not installed.
-
Click Continue with limited setup.
Configure the Windows VM
Install and configure any applications, services, and system settings required for your environment before preparing the image.
Install VirtIO drivers
- Download the VirtIO drivers.
- Open or mount the VirtIO driver ISO.
- From the root of the ISO, run
virtio-win-guest-tools.exe. - Verify that the network is available and that Device Manager shows no unknown devices.
Install Cloudbase-Init
Before creating an instance in the Customer Portal, choose the password authentication method. After the instance is created, a temporary auto-generated password is sent to the email addresses of account contacts with a Primary or Technical role.
-
Download the installer from cloudbase.it.
-
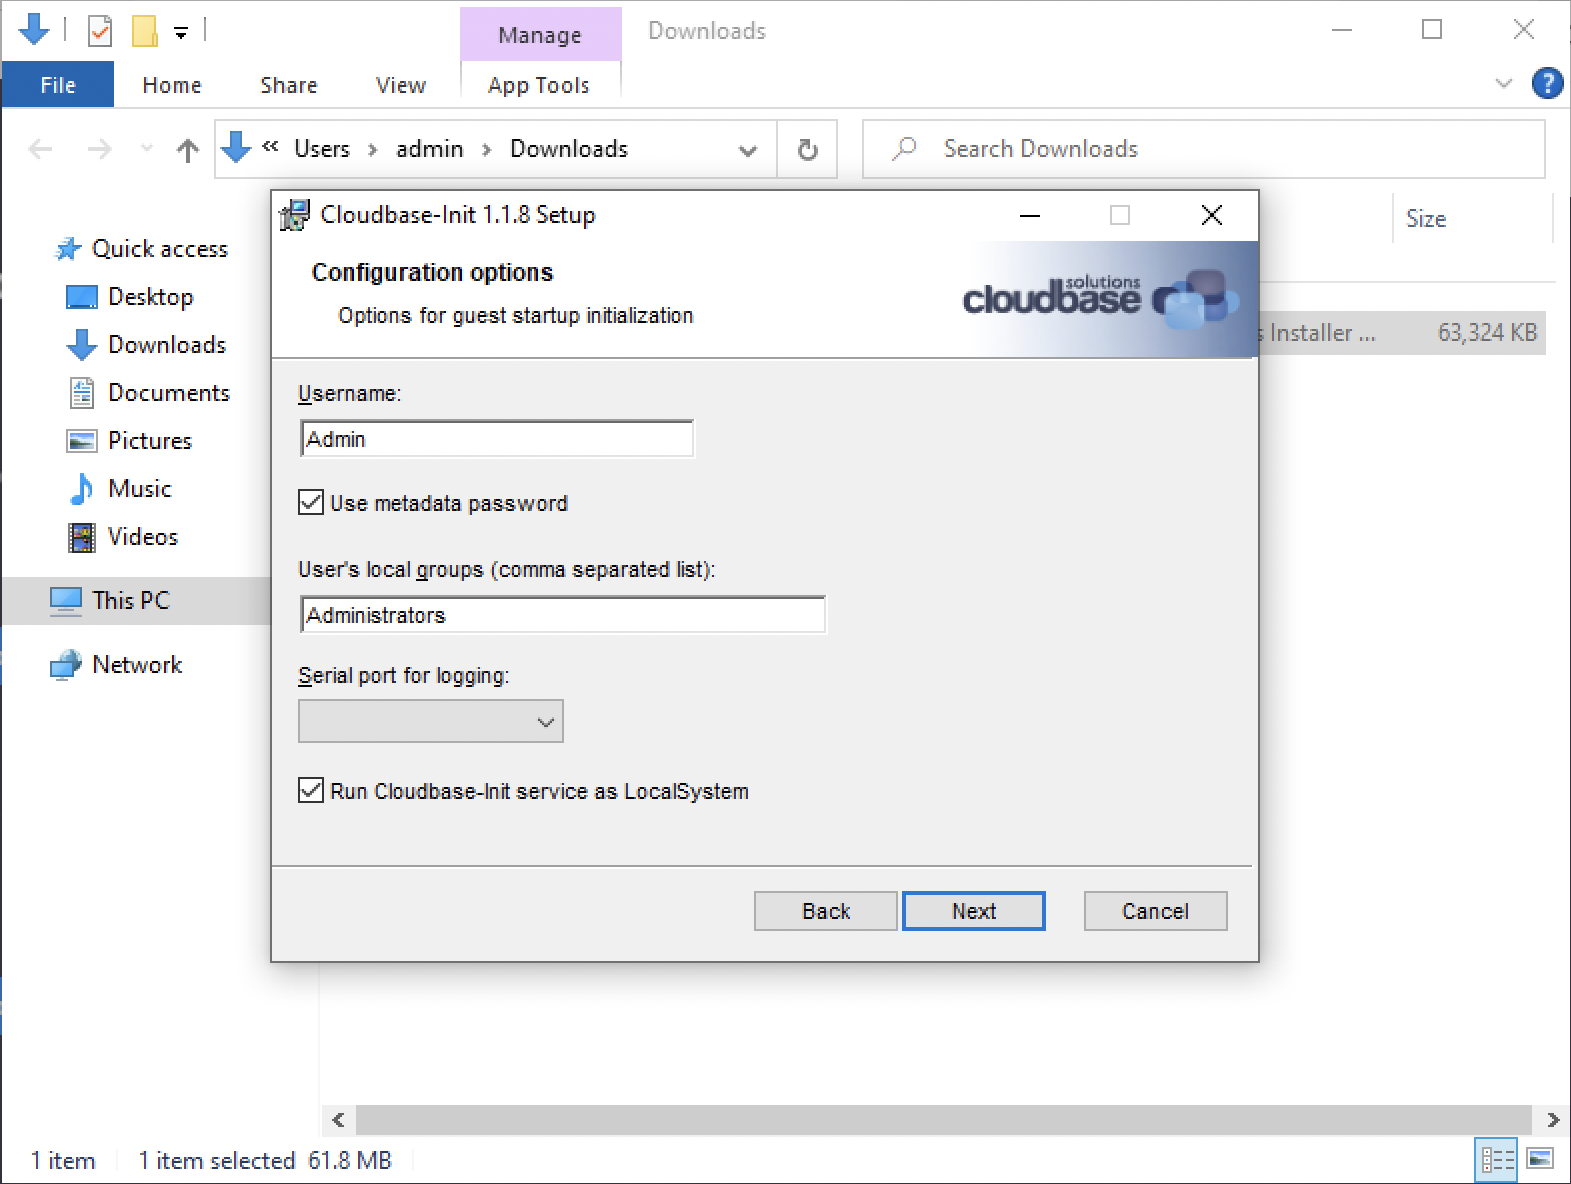
During installation, enable:
- Use metadata password
- Run Cloudbase-Init service as LocalSystem
Configure Cloudbase-Init
Cloudbase-Init retrieves instance metadata from OpenStack during the first boot and uses it to apply system and network configuration.
-
Open the configuration file:
%ProgramFiles%\Cloudbase Solutions\Cloudbase-Init\conf\cloudbase-init.conf -
Add the following line at the end:
metadata_services=cloudbaseinit.metadata.services.configdrive.ConfigDriveService,cloudbaseinit.metadata.services.httpservice.HttpService
Validate configuration and clean up
- Remove temporary files (for example, with the
cleanmgrutility) - Ensure DHCP is enabled
- Ensure no static IP configuration is present
Run Sysprep
Do not start the VM again after running Sysprep — doing so may corrupt the image.
-
Open PowerShell as an administrator, navigate to the Sysprep directory (
%SystemRoot%\System32\Sysprep), and run:.\sysprep.exe -
Select:
- Enter System Out-of-Box Experience (OOBE)
- Generalize
- Shutdown
The VM powers off. The image is ready for upload.
OOBE is required for the deployment flow described in this guide. Fully unattended Windows deployments can use different Sysprep and Cloudbase-Init configurations and typically do not require enabling OOBE.
Uploading the image to the Customer Portal
Upload the qcow2 image and use it to deploy a cloud server. Because Windows images are typically large, use Option 2: Upload by cURL or Option 3: Via the OpenStack API instead of drag and drop (see How to upload your own image).
When you first connect to the provisioned cloud server, the Windows OOBE setup starts. Follow the on-screen prompts to finish the system initialization.
Related articles
- How to prepare your own OS image and deploy it on a cloud server (Linux, Unix, or BSD)