



Dedicated server management
Setting up and managing dedicated servers
How to set up a group of dedicated servers
In the customer portal, users have the option to consolidate selected dedicated servers into groups and request a pending invoice for each group. This is very convenient for tracking and planning expenses. The pending invoice will include only a specific group of dedicated servers and directly associated services (additional IPs, OS, etc.).
Before selecting the dedicated servers, you need to create the group if it doesn't already exist.
To create the group, complete the following steps:
-
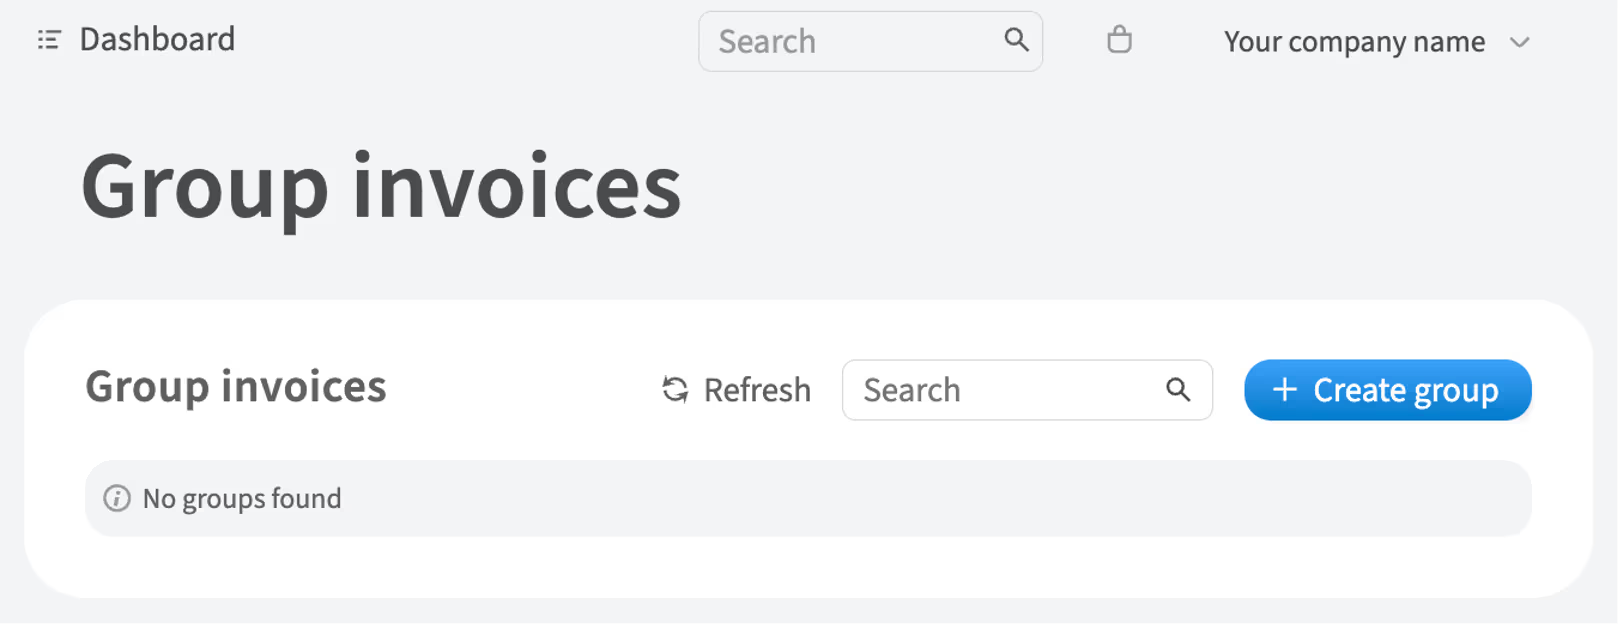
In the left-hand menu, navigate to Billing → Group invoices
-
Click Create group
-
Fill the form with information about the created group and click Create
To add a dedicated server to the group, complete the following steps:
-
In the left-hand menu, navigate to Dedicated Servers → Manage
-
Choose the server and click Details
-
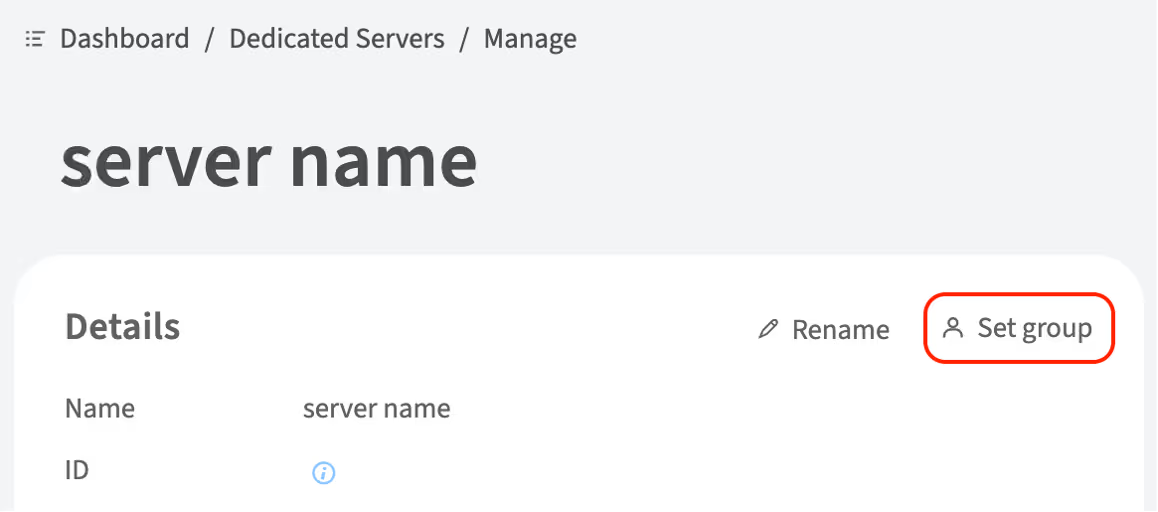
Click Set group
-
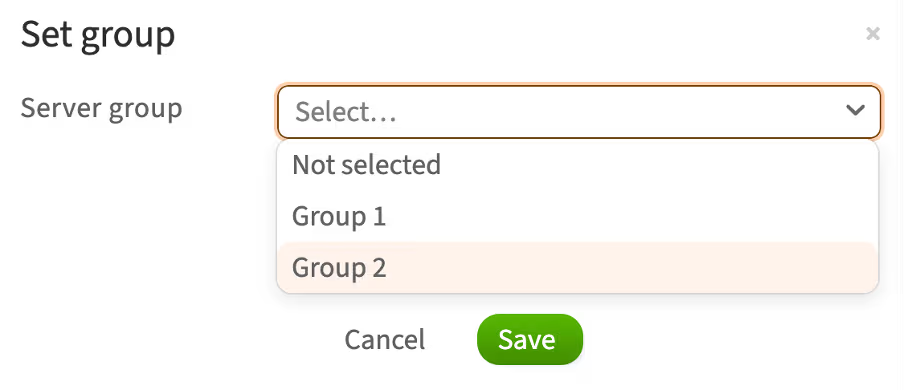
Select a group from the list and click Save
How to upgrade RAM
You can upgrade the RAM of an already ordered dedicated server. To do this, complete the following steps:
-
In the left-hand menu, navigate to Dedicated Servers → Manage
-
Choose the server and click Details
-
Next to the Upgrade RAM item, click Upgrade

-
Select the available RAM configuration
-
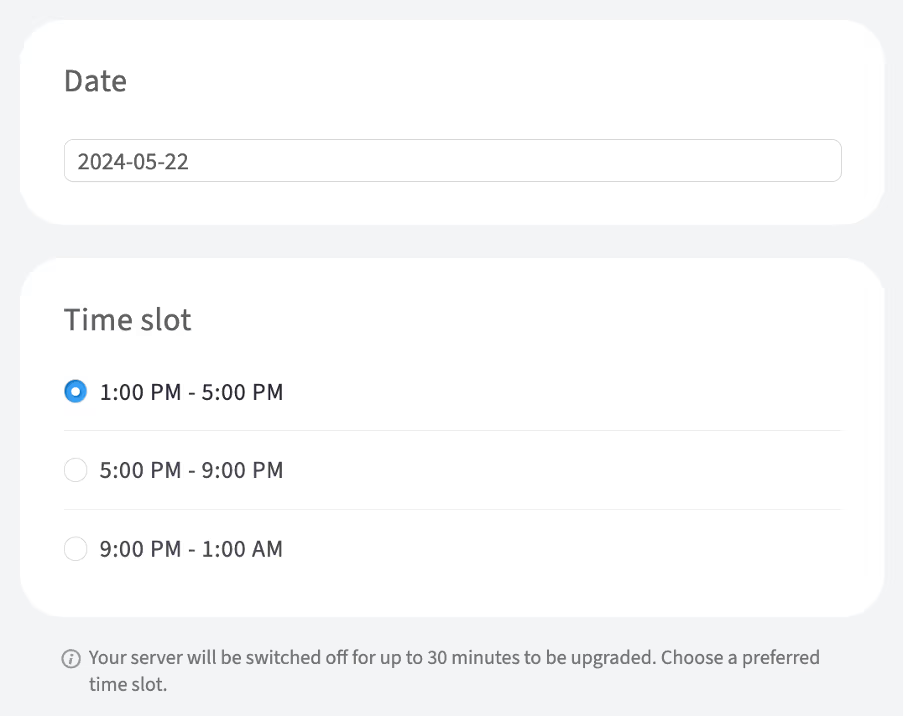
Since the RAM upgrade requires shutting down the server, choose a preferred date and time slot for the upgrade
-
Click Save
-
To confirm this action, enter your account password in the pop-up window and click Continue
How to upgrade storage drives
You can upgrade storage drives to an already ordered dedicated server. To do this, complete the following steps:
-
In the left-hand menu, navigate to Dedicated Servers → Manage
-
Choose the server and click Details
-
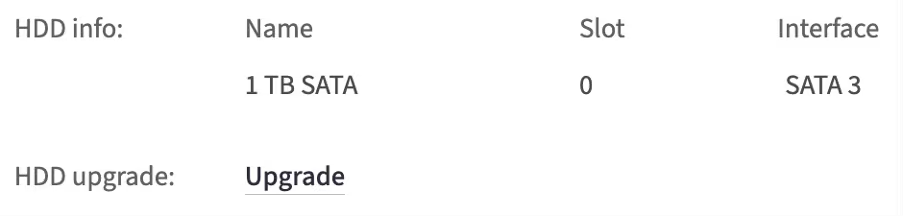
Next to the Disk upgrade item, click Upgrade
-
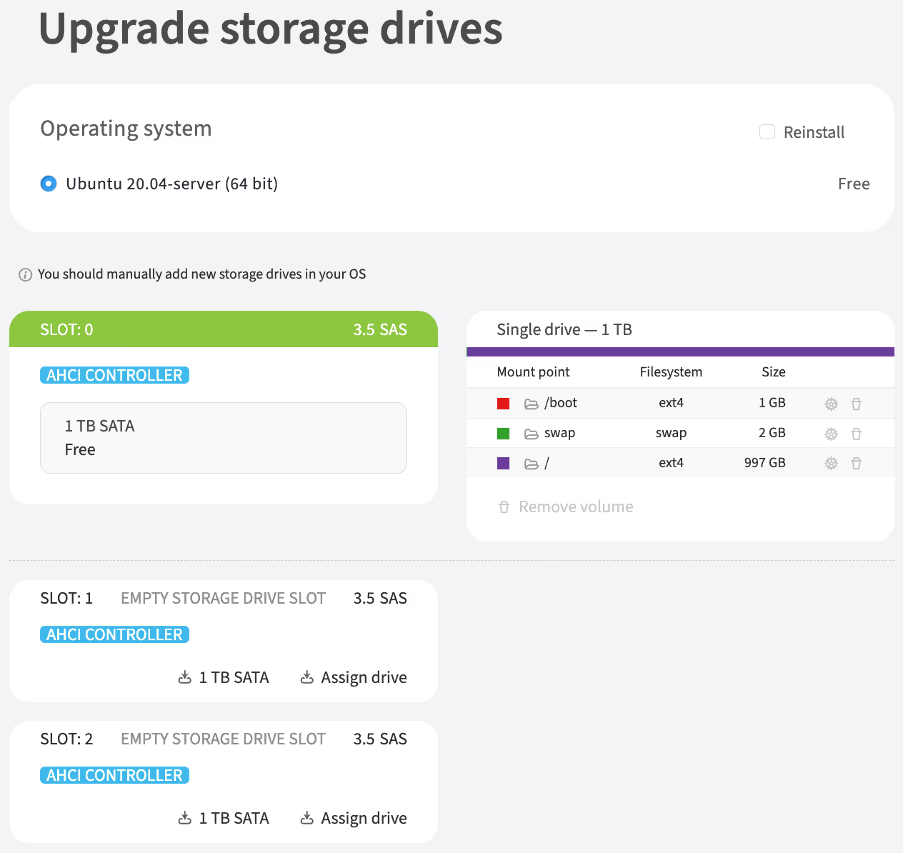
In the opened window, choose an empty storage drive slot and click Assign drive to select available HDD/SDD drives or select the default option, which in this example is the 1TB SATA
-
Choose a preferred date and time slot for the upgrade
-
Click Order upgrade
-
To confirm this action, enter your account password in the pop-up window and click Continue
Replacing a disk in software RAID (mdadm)
mdadm is the primary command for managing software RAID in Linux, allowing you to perform tasks like disk replacement and RAID recovery. It also enables you to create, add, remove, and manage RAID arrays.
Before performing mdadm command, it's essential to check the current RAID array status and identify any failed disks. The cat /proc/mdstat command is used for this purpose. It helps determine if the RAID is active, the status of the disks, and the overall health of the array. This step is critical before replacing a disk or recovering the RAID.
How to determine the current state of an array using mdstat
The /proc/mdstat file contains information about configured and functioning virtual disks.
-
To determine the current state of an array, run the command:
cat /proc/mdstatFor a well-functioning disk array, the command output will look like this:
cat /proc/mdstat
Personalities : [raid1] [linear] [multipath] [raid0] [raid6] [raid5] [raid4] [raid10]
md1 : active raid1 sda3[0] sdb3[1]
      976139264 blocks super 1.2 [2/2] [UU]
      bitmap: 8/8 pages [32KB], 65536KB chunk

md0 : active raid1 sda2[0] sdb2[1]
      487424 blocks super 1.2 [2/2] [UU]

unused devices: <none>
The
[2/2] [UU]mark next to each virtual disk indicates that the array is operational and that all physical disks are detected. EachUletter represents one of the drives in the array. -
Check the current partitioning of disks by using the
lsblkcommandlsblk NAME MAJ:MIN RM SIZE RO TYPE MOUNTPOINT sda 8:0 0 111.8G 0 disk ├─sda1 8:1 0 1M 0 part ├─sda2 8:2 0 477M 0 part │ └─md0 9:0 0 476M 0 raid1 /boot └─sda3 8:3 0 111.3G 0 part └─md1 9:1 0 111.3G 0 raid1 ├─U1554374860I0-rootfs 253:0 0 109.4G 0 lvm / └─U1554374860I0-swap 253:1 0 1.9G 0 lvm [SWAP] sdb 8:16 0 111.8G 0 disk ├─sdb1 8:17 0 1M 0 part ├─sdb2 8:18 0 477M 0 part │ └─md0 9:0 0 476M 0 raid1 /boot └─sdb3 8:19 0 111.3G 0 part └─md1 9:1 0 111.3G 0 raid1 ├─U1554374860I0-rootfs 253:0 0 109.4G 0 lvm / └─U1554374860I0-swap 253:1 0 1.9G 0 lvm [SWAP]In the command output, you will see physical disks, such as
sdaandsdb, as well as the logical partitions of the OS. This can be useful for subsequent diagnostics and partition copying.
Replacing a failed disk in RAID1
If a disk in the array fails, the server will continue to operate because it is configured with RAID. However, the disk should be replaced.
-
To check the current state of the array, run the command:
cat /proc/mdstatFor a malfunctioning disk array, the command output will look like this:
cat /proc/mdstat
Personalities : [linear] [multipath] [raid0] [raid1] [raid6] [raid5] [raid4] [raid10]
md1 : active raid1 sda3[1]
      116663296 blocks super 1.2 [2/1] [_U]
      bitmap: 1/1 pages [4KB], 65536KB chunk

md0 : active raid1 sda2[1]
      487424 blocks super 1.2 [2/1] [_U]

unused devices: <none>
The output will indicate that the array and the disk in slot #0 are not detected. This can be identified by the values
[2/1]and[_U]in the output.This can also be checked using the
lsblkcommand:lsblk NAME MAJ:MIN RM SIZE RO TYPE MOUNTPOINT sda 8:0 0 111.8G 0 disk ├─sda1 8:1 0 1M 0 part ├─sda2 8:2 0 477M 0 part │ └─md0 9:0 0 476M 0 raid1 /boot └─sda3 8:3 0 111.3G 0 part └─md1 9:1 0 111.3G 0 raid1 ├─U1554374860I0-rootfs 253:0 0 109.4G 0 lvm / └─U1554374860I0-swap 253:1 0 1.9G 0 lvm [SWAP]One of the disks is missing and undetectable.
-
Initiate disk replacement by contacting support
-
After disk replacement, run the command
lsblkto check whether the drive is detected and to verify the state of the arraylsblk sda 8:0 0 223.6G 0 disk sdb 8:16 0 111.8G 0 disk ├─sdb1 8:17 0 1M 0 part ├─sdb2 8:18 0 477M 0 part │ └─md0 9:0 0 476M 0 raid1 /boot └─sdb3 8:19 0 111.3G 0 part └─md1 9:1 0 111.3G 0 raid1 ├─U1554374860I0-rootfs 253:0 0 109.4G 0 lvm / └─U1554374860I0-swap 253:1 0 1.9G 0 lvm [SWAP]The output will show that the new disk is defined as
sdawithout partitioning and is not included in the array. -
Run
mdstatcommand and check the output. There will be an indication thatsdais not included in the arraycat /proc/mdstat md0 : active raid1 sdb2[1] 487424 blocks super 1.2 [2/1] [_U] md1 : active raid1 sdb3[1] 116663296 blocks super 1.2 [2/1] [_U] bitmap: 1/1 pages [4KB], 65536KB chunk unused devices: <none> -
Copy the partitioning from the
sdbdisk tosdausing the following command:sfdisk -d /dev/sdb |sfdisk --force /dev/sdaAfter copying the partitions, the output of
lsblkcommand will look like this:lsblk NAME MAJ:MIN RM SIZE RO TYPE MOUNTPOINT sda 8:0 0 223.6G 0 disk ├─sda1 8:1 0 1M 0 part ├─sda2 8:2 0 477M 0 part └─sda3 8:3 0 111.3G 0 part sdb 8:16 0 111.8G 0 disk ├─sdb1 8:17 0 1M 0 part ├─sdb2 8:18 0 477M 0 part │ └─md0 9:0 0 476M 0 raid1 /boot └─sdb3 8:19 0 111.3G 0 part └─md1 9:1 0 111.3G 0 raid1 ├─U1554374860I0-rootfs 253:0 0 109.4G 0 lvm / └─U1554374860I0-swap 253:1 0 1.9G 0 lvm [SWAP] -
Add a new disk to the array using the following commands:
mdadm --manage /dev/md0 --add /dev/sda2mdadm --manage /dev/md1 --add /dev/sda3 -
To ensure that everything is copied and that the disk is added to the array, use the command
lsblk. Data synchronization will start automatically.lsblk NAME MAJ:MIN RM SIZE RO TYPE MOUNTPOINT sda 8:0 0 223.6G 0 disk ├─sda1 8:1 0 1M 0 part ├─sda2 8:2 0 477M 0 part │ └─md0 9:0 0 476M 0 raid1 /boot └─sda3 8:3 0 111.3G 0 part └─md1 9:1 0 111.3G 0 raid1 ├─U1554374860I0-rootfs 253:0 0 109.4G 0 lvm / └─U1554374860I0-swap 253:1 0 1.9G 0 lvm [SWAP] sdb 8:16 0 111.8G 0 disk ├─sdb1 8:17 0 1M 0 part ├─sdb2 8:18 0 477M 0 part │ └─md0 9:0 0 476M 0 raid1 /boot └─sdb3 8:19 0 111.3G 0 part └─md1 9:1 0 111.3G 0 raid1 ├─U1554374860I0-rootfs 253:0 0 109.4G 0 lvm / └─U1554374860I0-swap 253:1 0 1.9G 0 lvm [SWAP]The output will indicate that
sdais included in the array and synchronization is in progresscat /proc/mdstat Personalities : [raid1] [linear] [multipath] [raid0] [raid6] [raid5] [raid4] [raid10] md0 : active raid1 sda2[2] sdb2[1] 487424 blocks super 1.2 [2/2] [UU] md1 : active raid1 sda3[2] sdb3[1] 116663296 blocks super 1.2 [2/1] [_U] [>....................] recovery = 4.6% (5477632/116663296) finish=9.4min speed=195629K/sec bitmap: 1/1 pages [4KB], 65536KB chunk unused devices: <none> -
To track the progress of data synchronization, use the following command:
watch cat /proc/mdstat -
Install the loader to allow the system to boot from both disks in the future:
-
For Ubuntu:
grub-install /dev/sda update-grub -
For CentOS:
/sbin/grub2-install /dev/sda
update-grub
-
Replacing disks with ones of bigger size in RAID1
You can replace the disks with larger ones and retain the data on them. In addition to replacing the disk, you will need to expand the partitions one by one.
The process will be as follows:
-
Check the state of an array
-
Initiate the first disk replacement by contacting support
-
Synchronize the array and install the loader on the first disk
-
Initiate the second disk replacement by contacting support
-
Synchronize the array and install the loader on the second disk
-
Make sure that the OS is loaded from both disks (optionally)
Replacing the first disk
-
Once you have checked that the disks are in good condition, initiate the replacement of one of the disks by contacting support
-
Check the current state of the array using the
mdstatcommand:cat /proc/mdstat Personalities : [raid1] [linear] [multipath] [raid0] [raid6] [raid5] [raid4] [raid10] md1 : active raid1 sda3[0] sdb3[1] 976139264 blocks super 1.2 [2/1] [U_] bitmap: 8/8 pages [32KB], 65536KB chunk md0 : active raid1 sda2[0] sdb2[1] 487424 blocks super 1.2 [2/1] [U_] unused devices: <none>The output shows the arrays and indicates that the disk in slot #1 is not added to the array. This can be identified by the values
[2/1]and[_U]in the output. -
This can be further confirmed by using the
lsblkcommand:lsblk NAME MAJ:MIN RM SIZE RO TYPE MOUNTPOINT sda 8:0 0 931.5G 0 disk ├─sda1 8:1 0 1M 0 part ├─sda2 8:2 0 477M 0 part │ └─md0 9:0 0 476M 0 raid1 /boot └─sda3 8:3 0 931G 0 part └─md1 9:1 0 930.9G 0 raid1 ├─U1557477497I0-rootfs 253:0 0 929G 0 lvm / └─U1557477497I0-swap 253:1 0 1.9G 0 lvm [SWAP] sdb 8:16 0 1.8T 0 diskThe output will show that the
sdbdisk does not have any partitions. -
Copy the partitioning from
sdatosdbusing the following command:sfdisk -d /dev/sda |sfdisk --force /dev/sdbAfter copying the partitioning, the output of the
lsblkcommand will look as follows:lsblk NAME MAJ:MIN RM SIZE RO TYPE MOUNTPOINT sda 8:0 0 931.5G 0 disk ├─sda1 8:1 0 1M 0 part ├─sda2 8:2 0 477M 0 part │ └─md0 9:0 0 476M 0 raid1 /boot └─sda3 8:3 0 931G 0 part └─md1 9:1 0 930.9G 0 raid1 ├─U1557477497I0-rootfs 253:0 0 929G 0 lvm / └─U1557477497I0-swap 253:1 0 1.9G 0 lvm [SWAP] sdb 8:16 0 1.8T 0 disk ├─sdb1 8:17 0 1M 0 part ├─sdb2 8:18 0 477M 0 part └─sdb3 8:19 0 931G 0 partThe partitioning has been successfully copied, but the size of the
sdb3partition is 931GB instead of the maximum available 1.8TB. -
To fix it, delete this partition and recreate it using the following command:
fdisk /dev/sdb # - indicate which disk to work with d # - deleting 3 # - choosing the partition to be deleted n # - creating a new partition p # - indicate that it will be the primary partition Select the standard parameters for the partition size and enter the "t" command to change the partition type. The partition code is 8e. w # - save changes -
Check the partitioning again to make sure that
sdb3has expanded to 1.8TB using thelsblkcommandlsblk NAME MAJ:MIN RM SIZE RO TYPE MOUNTPOINT sda 8:0 0 931.5G 0 disk ├─sda1 8:1 0 1M 0 part ├─sda2 8:2 0 477M 0 part │ └─md0 9:0 0 476M 0 raid1 /boot └─sda3 8:3 0 931G 0 part └─md1 9:1 0 930.9G 0 raid1 ├─U1557477497I0-rootfs 253:0 0 929G 0 lvm / └─U1557477497I0-swap 253:1 0 1.9G 0 lvm [SWAP] sdb 8:16 0 1.8T 0 disk ├─sdb1 8:17 0 1M 0 part ├─sdb2 8:18 0 477M 0 part └─sdb3 8:19 0 1.8T 0 part -
Add a new disk to the array:
mdadm --manage /dev/md0 --add /dev/sdb2mdadm --manage /dev/md1 --add /dev/sdb3
Synchronizing an array and installing the loader on the first disk
-
To ensure that everything is copied and the disk is added to the array, run the
lsblkcommand. Data synchronization will start automaticallylsblk NAME MAJ:MIN RM SIZE RO TYPE MOUNTPOINT sda 8:0 0 931.5G 0 disk ├─sda1 8:1 0 1M 0 part ├─sda2 8:2 0 477M 0 part │ └─md0 9:0 0 476M 0 raid1 /boot └─sda3 8:3 0 931G 0 part └─md1 9:1 0 930.9G 0 raid1 ├─U1557477497I0-rootfs 253:0 0 929G 0 lvm / └─U1557477497I0-swap 253:1 0 1.9G 0 lvm [SWAP] sdb 8:16 0 1.8T 0 disk ├─sdb1 8:17 0 1M 0 part ├─sdb2 8:18 0 477M 0 part │ └─md0 9:0 0 476M 0 raid1 /boot └─sdb3 8:19 0 1.8T 0 part └─md1 9:1 0 930.9G 0 raid1 ├─U1557477497I0-rootfs 253:0 0 929G 0 lvm / └─U1557477497I0-swap 253:1 0 1.9G 0 lvm [SWAP]After checking the
mdstatcommand output, it will indicate thatsdais included in the array and synchronization is in progresscat /proc/mdstat Personalities : [linear] [multipath] [raid0] [raid1] [raid6] [raid5] [raid4] [raid10] md1 : active raid1 sdb3[2] sda3[0] 976139264 blocks super 1.2 [2/1] [U_] [============>........] recovery = 61.7% (602340928/976139264) finish=47.9min speed=129920K/sec bitmap: 5/8 pages [20KB], 65536KB chunk md0 : active raid1 sdb2[2] sda2[0] 487424 blocks super 1.2 [2/2] [UU] unused devices: <none> -
To track the progress of data synchronization, use the following command:
watch cat /proc/mdstat -
Install the boot loader to allow the system to boot from both disks in the future:
-
For Ubuntu:
grub-install /dev/sda update-grub -
For CentOS:
/sbin/grub2-install /dev/sda
update-grub
-
Replacing the second disk
-
After the arrays are synchronized, initiate the second disk replacement (in this case, the
sdadisk) -
After the replacement, copy the partitioning from
sdbtosda:sfdisk -d /dev/sda |sfdisk --force /dev/sdb -
Add the
sdadisk to the array using the following commands:mdadm --manage /dev/md0 --add /dev/sda2mdadm --manage /dev/md1 --add /dev/sda3 -
Run the
lsblkcommand. The output will show that thesda3partition now also has a size of 1.8TB:lsblk NAME MAJ:MIN RM SIZE RO TYPE MOUNTPOINT sda 8:0 0 1.8T 0 disk ├─sda1 8:1 0 1M 0 part ├─sda2 8:2 0 477M 0 part │ └─md0 9:0 0 476M 0 raid1 /boot └─sda3 8:3 0 1.8T 0 part └─md1 9:1 0 930.9G 0 raid1 ├─U1557477497I0-rootfs 253:0 0 929G 0 lvm / └─U1557477497I0-swap 253:1 0 1.9G 0 lvm [SWAP] sdb 8:16 0 1.8T 0 disk ├─sdb1 8:17 0 1M 0 part ├─sdb2 8:18 0 477M 0 part │ └─md0 9:0 0 476M 0 raid1 /boot └─sdb3 8:19 0 1.8T 0 part └─md1 9:1 0 930.9G 0 raid1 ├─U1557477497I0-rootfs 253:0 0 929G 0 lvm / └─U1557477497I0-swap 253:1 0 1.9G 0 lvm [SWAP] -
Expand the virtual disks, ensuring that the disk has been successfully added to the array using the following commands:
mdadm --grow --size=max /dev/md0 pvresize /dev/md0 mdadm --grow --size=max /dev/md1 pvresize /dev/md1 -
Define LVM partitions using
lvscancommandACTIVE '/dev/U1557477497I0/ ACTIVE '/dev/U1557477497I0/rootfs' -
Expand the
rootfspartition to the maximum using following command:lvextend -l +100%FREE /dev/U1557477497I0/rootfs
Synchronizing an array and installing the loader on the second disk
To ensure that the system can boot from both disks, install the bootloader:
-
For Ubuntu:
grub-install /dev/sda update-grub -
For CentOS:
/sbin/grub2-install /dev/sda
update-grub
Wait for array synchronization.
How to reinstall OS
To reinstall OS on a dedicated server, complete the following steps:
-
In the left-hand menu, navigate to Dedicated Servers → Manage
-
Choose the server and click Details
-
Under the Disk upgrade item, click Reinstall
-
Select the authentication methods: SSH key and/or Password
-
SSH key: in the SSH key section, tick the box next to the existing SSH keys that will be used for authentication. If there are no SSH keys listed, generate a new one by clicking + Generate new SSH key or add an existing public SSH key by clicking + Add existing SSH key
-
Password: after the OS reinstallation, the access credentials will be sent to the contacts with primary and technical roles via email
-
-
Select the OS from the list and click Reinstall
-
A warning will appear in a confirmation pop-up window stating that all data will be lost during the OS reinstallation. If you are sure, click I'm sure, reinstall OS
-
To confirm this action, enter your account password in the pop-up window and click Continue
The OS reinstallation process will begin. The status of the process will be displayed in the Details section of the dedicated server.
How to boot a bare-metal server into a custom ISO image remotely using iDRAC
iDRAC is Dell's out-of-band management interface. You can use it to access the Dell server console remotely and boot the server from virtual media, even if the operating system is not installed or is not booting.
This guide describes the steps for iDRAC 7, 8 and 9.
Before you begin:
- Get the iDRAC credentials. For instructions, see How to Access the Dell Server Out-of-Band Management Interface.
- If you plan to use an ISO image from a remote file share, use an IPv4 address in the image path. Do not use a DNS hostname.
- The OOB network of iDRAC is isolated from public access and from the Internet by default. To allow iDRAC to access an external file share, enable temporary public access for iDRAC. See How to Access the Dell Server Out-of-Band Management Interface.
- Depending on the iDRAC version and configuration, remote virtual media may support CIFS (SMB) only, or CIFS (SMB), HTTP, and HTTPS.
iDRAC 9
Use the iDRAC Virtual Media feature to boot the server from a bootable ISO image stored on your local machine or a remote file share.
Enable Virtual Media
-
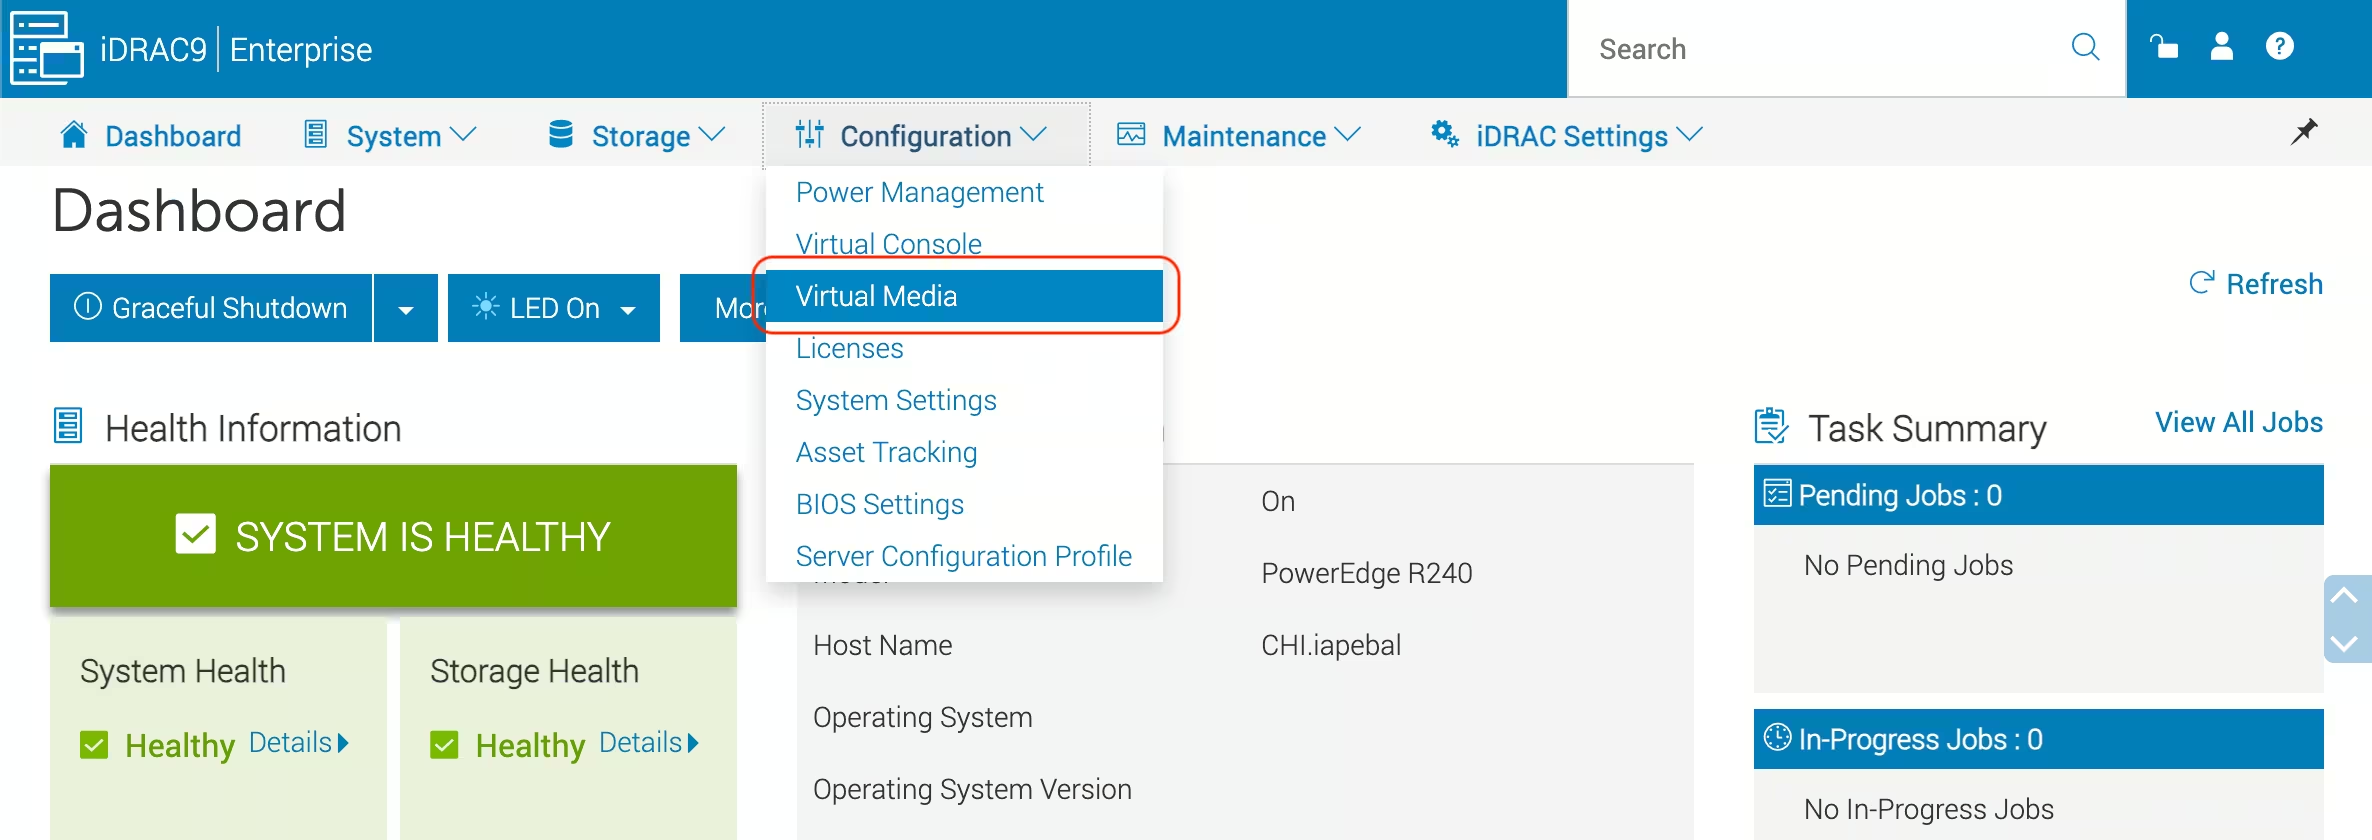
In the iDRAC web interface, go to Configuration → Virtual Media
-
On the Virtual Media page, set the following:
- Enabled: Enabled
- Attach Mode: Attached
- Boot Once: Enabled
With Boot Once enabled, the server boots from the attached virtual media only once. After that, it returns to the normal boot order.
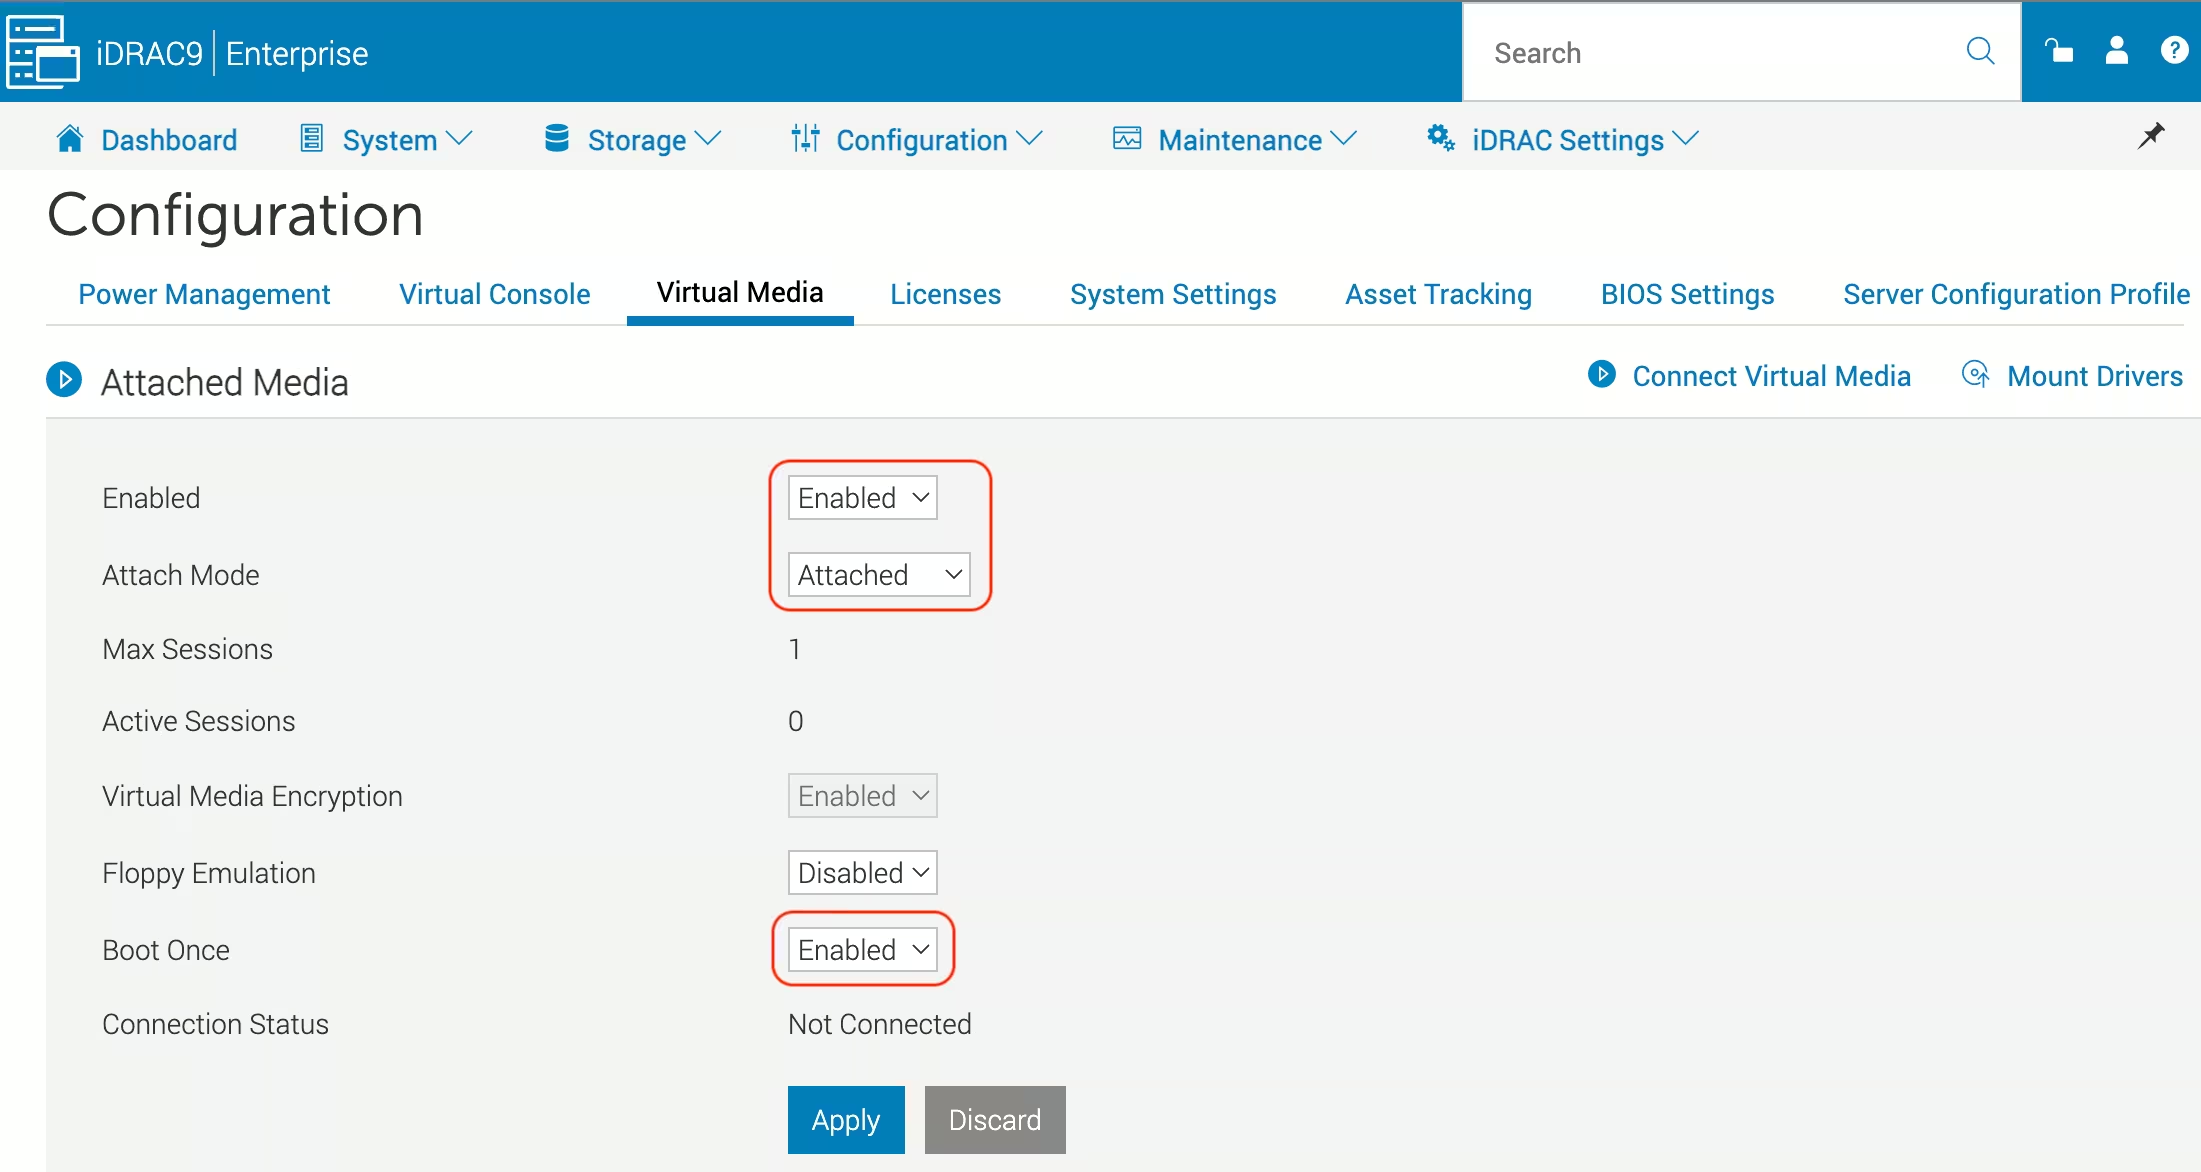
Click Apply
Connect an ISO image
You can connect the ISO image from your local machine or a remote file share.
From a local machine
- Click Connect Virtual Media
- Select a bootable ISO image from your local machine, and then click Map Device
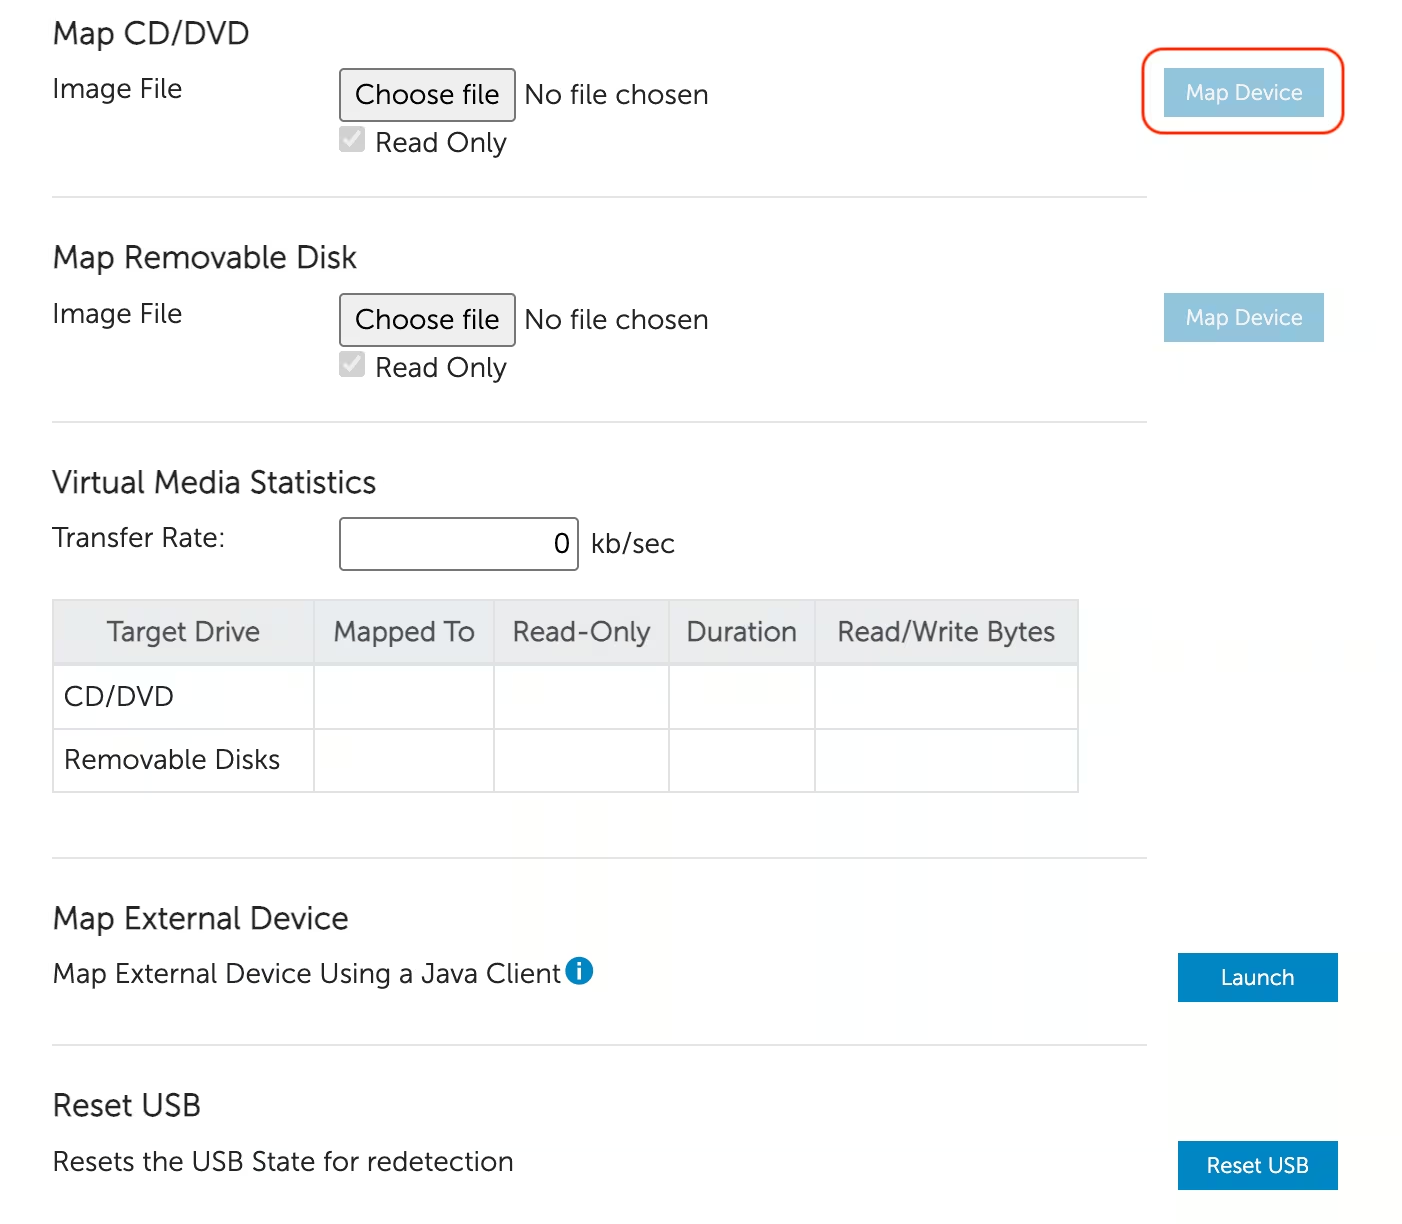
After you click Map Device, you can close the file selection window.
From a remote file share
Specify the path to the bootable ISO image, and then click Connect
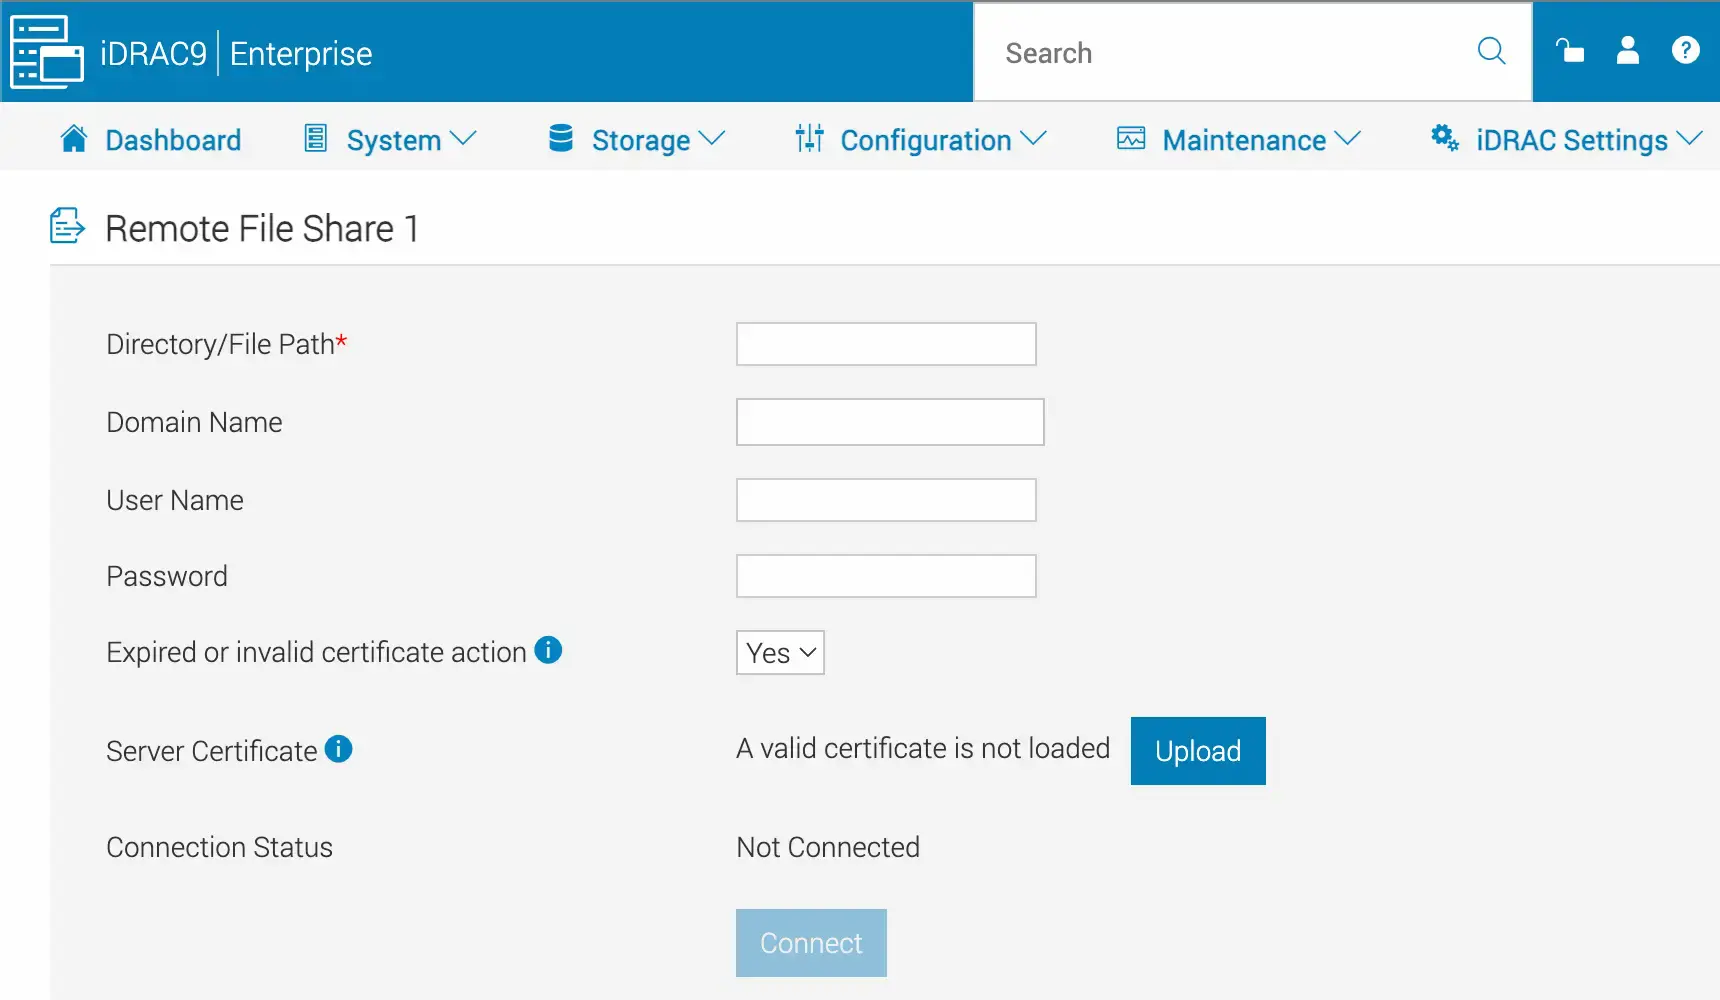
Where:
- Directory/File Path: enter the full path to the ISO image using an IPv4 address
- Domain Name, User Name, and Password: enter these values if the remote file share requires authentication
- Server Certificate: configure this option only if required by your remote file share
Boot the server from the ISO
Do not unmount the ISO or end the Virtual Media session until the server starts booting from the image.
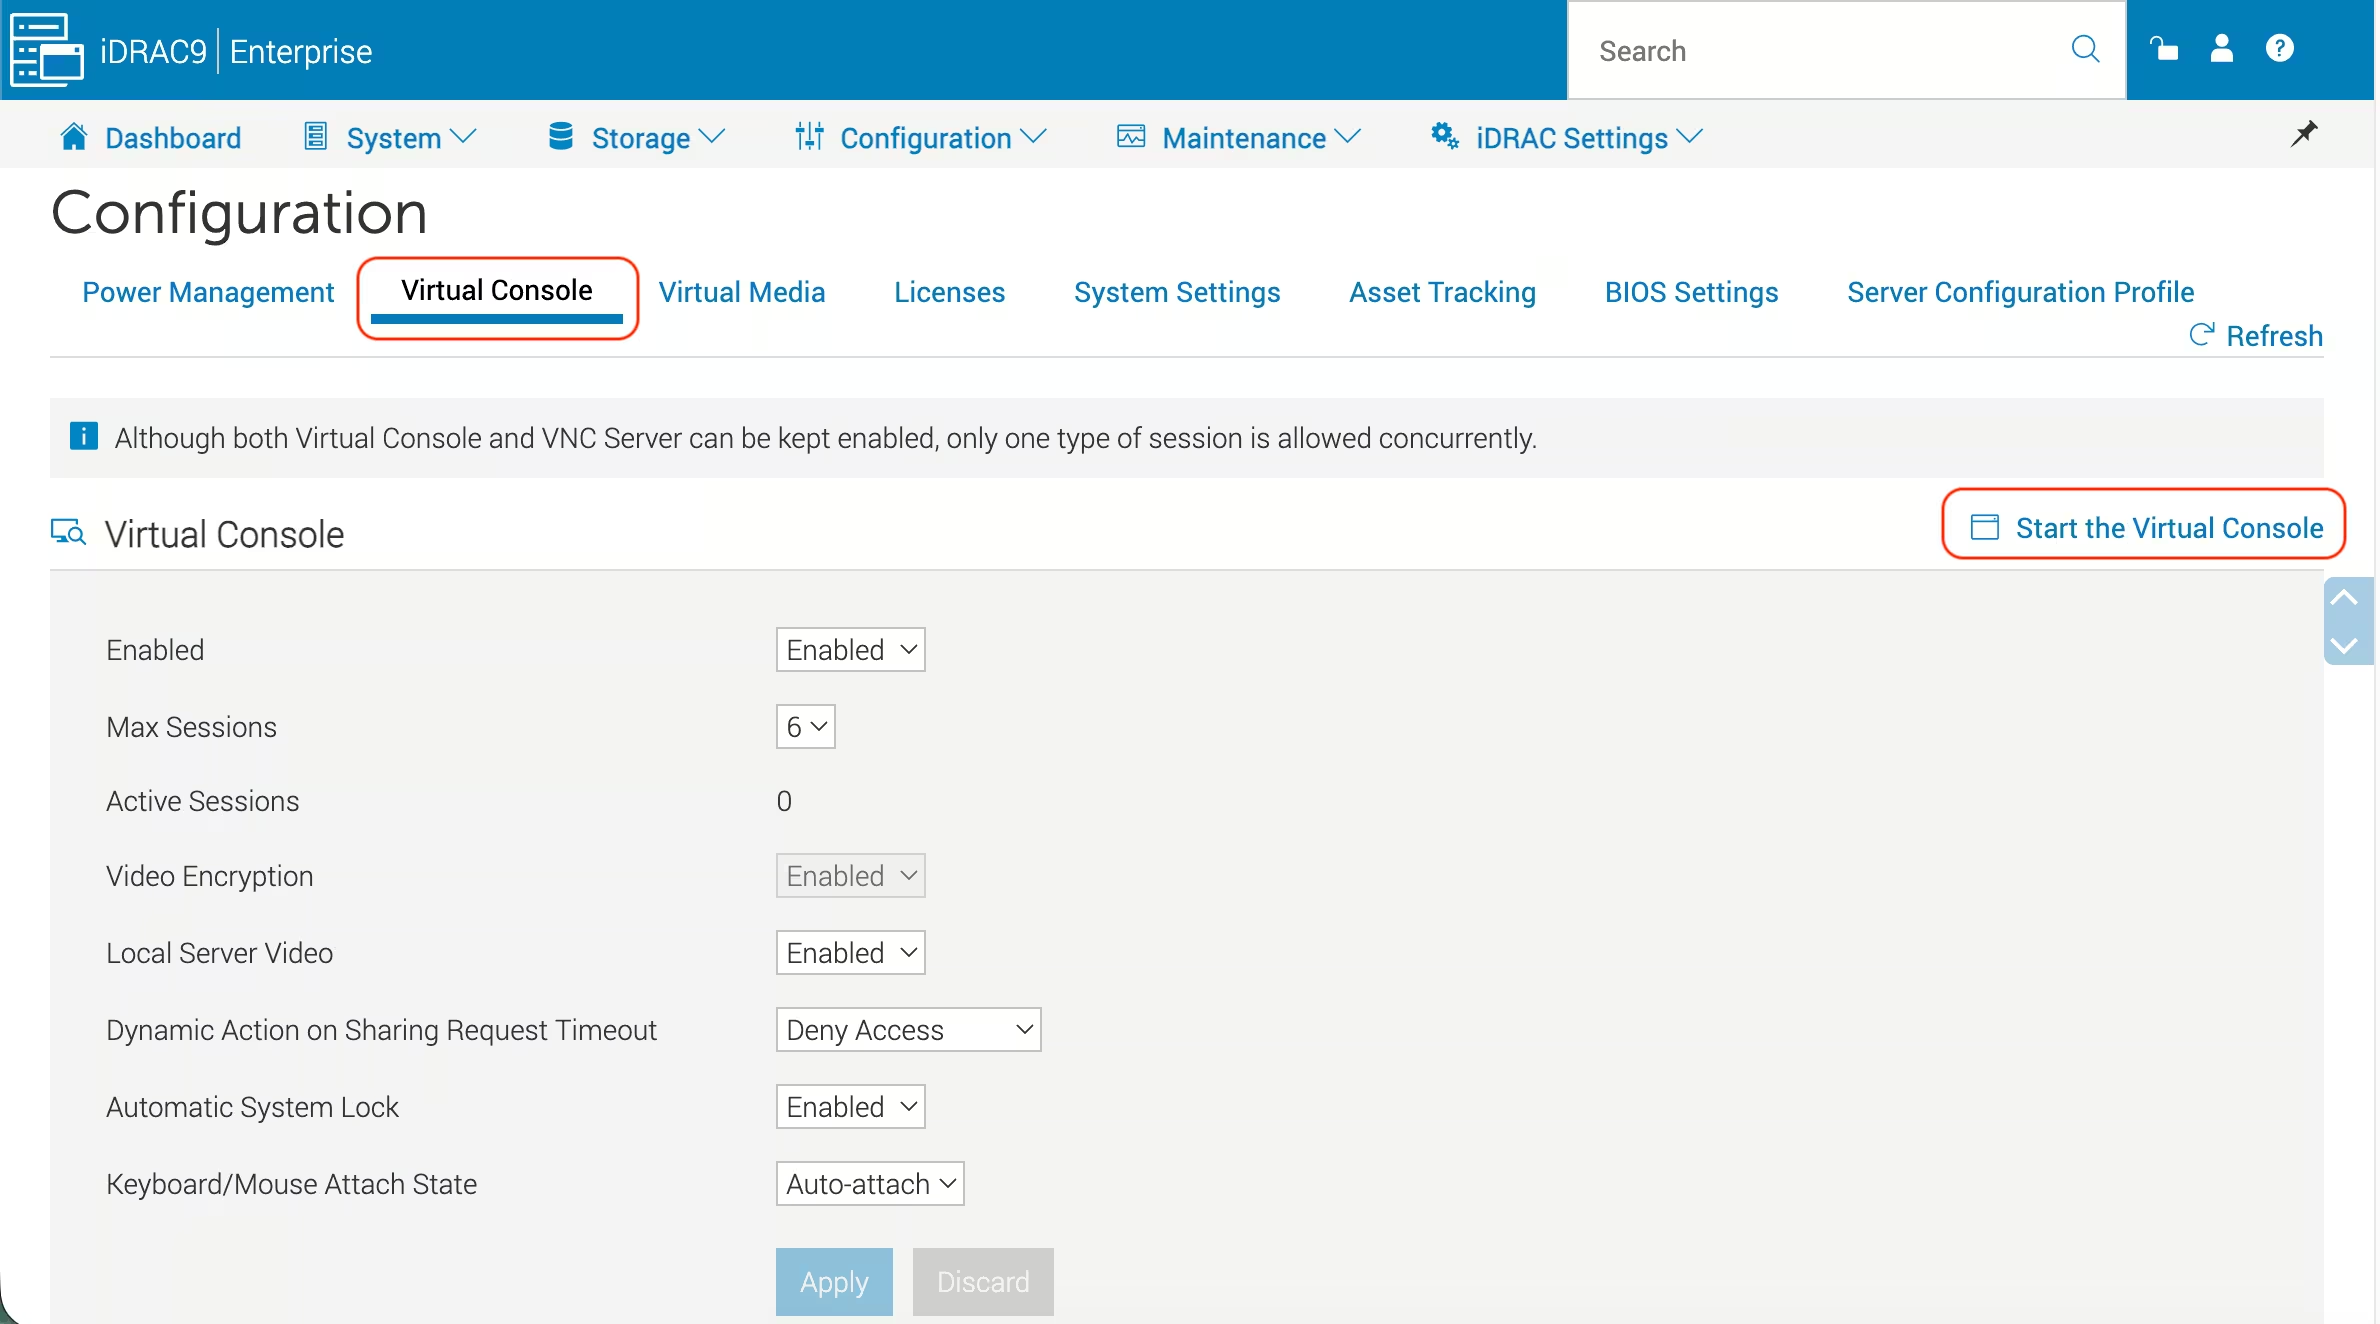
- Go to the Virtual Console tab and click Start the Virtual Console
-
In Virtual Console, click Boot, and then select Virtual CD/DVD/ISO:
- If the server starts booting from the ISO, continue in Virtual Console
- Otherwise, click Power, and then select Power Cycle System (cold boot)
- If the server still does not boot from the ISO, press F11 during startup and select the virtual optical drive
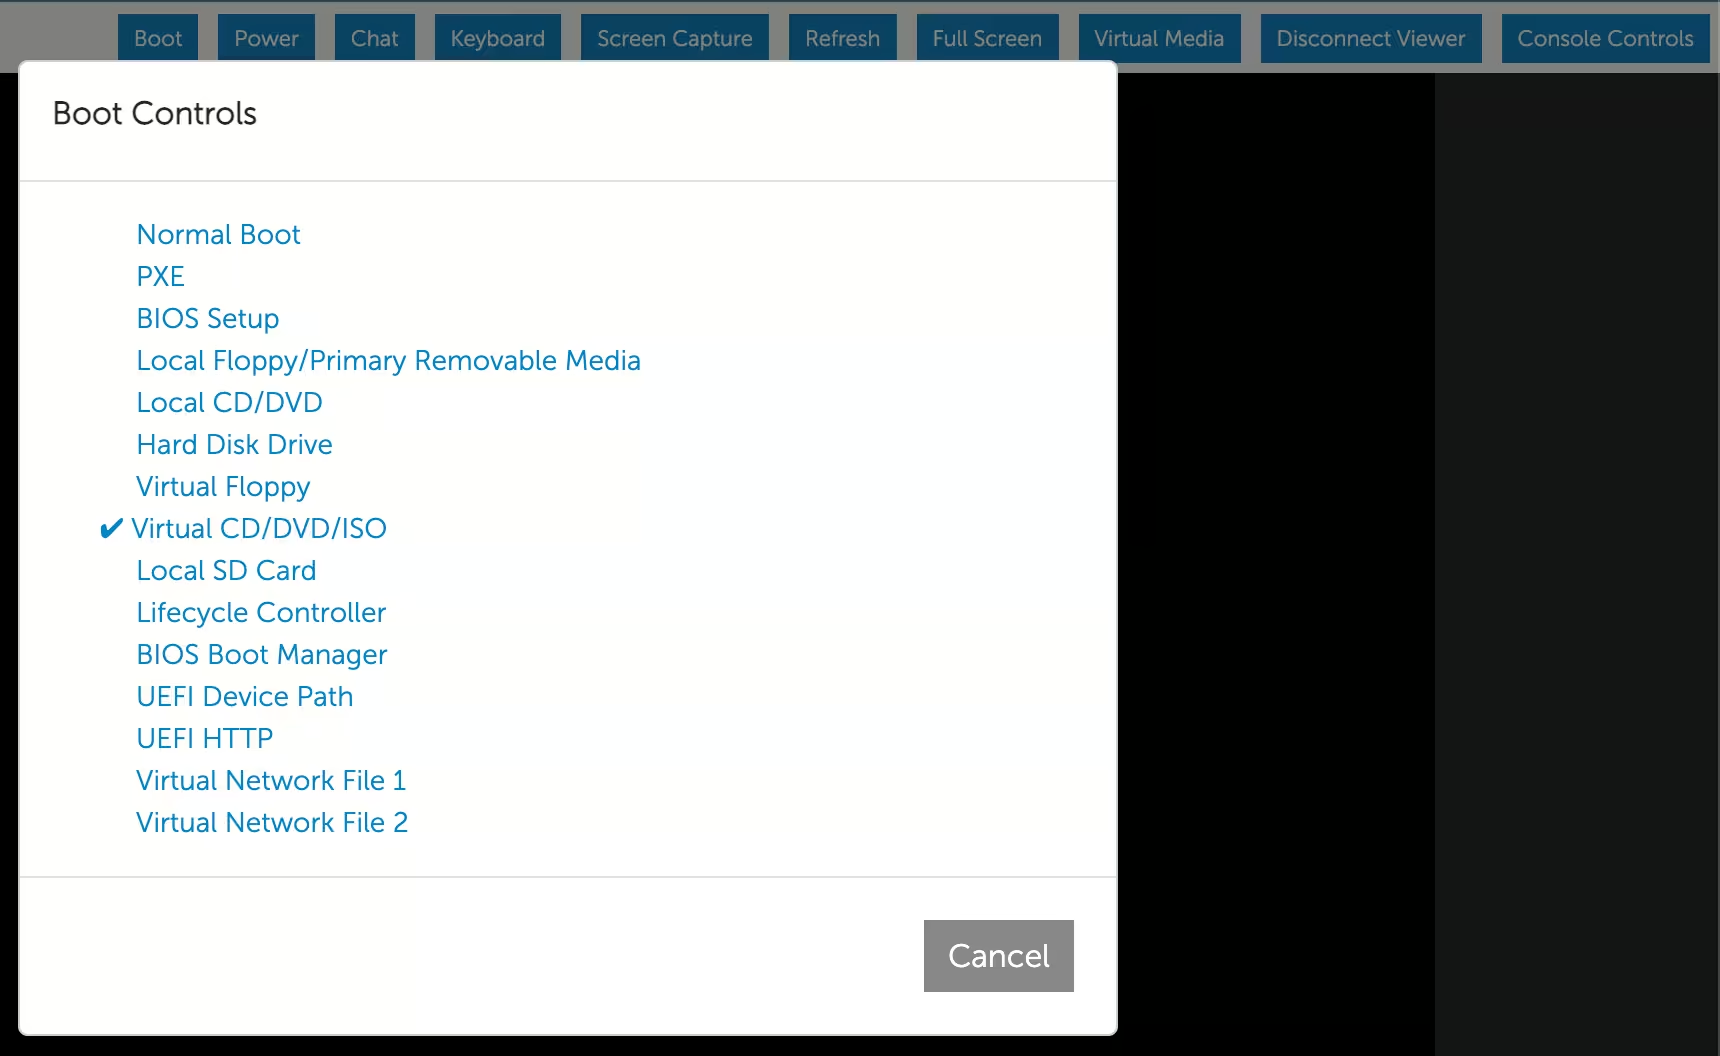
After you complete the installation or recovery, disconnect or unmap the ISO in Virtual Media.
iDRAC 7 and 8
Use the iDRAC Virtual Media feature to boot the server from a bootable ISO image stored on your local machine. Some iDRAC 7 and 8 configurations also support ISO images on a remote file share.
Starting with firmware version 2.30.30.30, iDRAC 7 and 8 support the HTML5-based Virtual Console. If HTML5 Virtual Console is enabled, use it instead of the legacy Java-based console. See How to configure iDRAC to use the HTML5 plug-in for virtual console.
Enable Attached Media
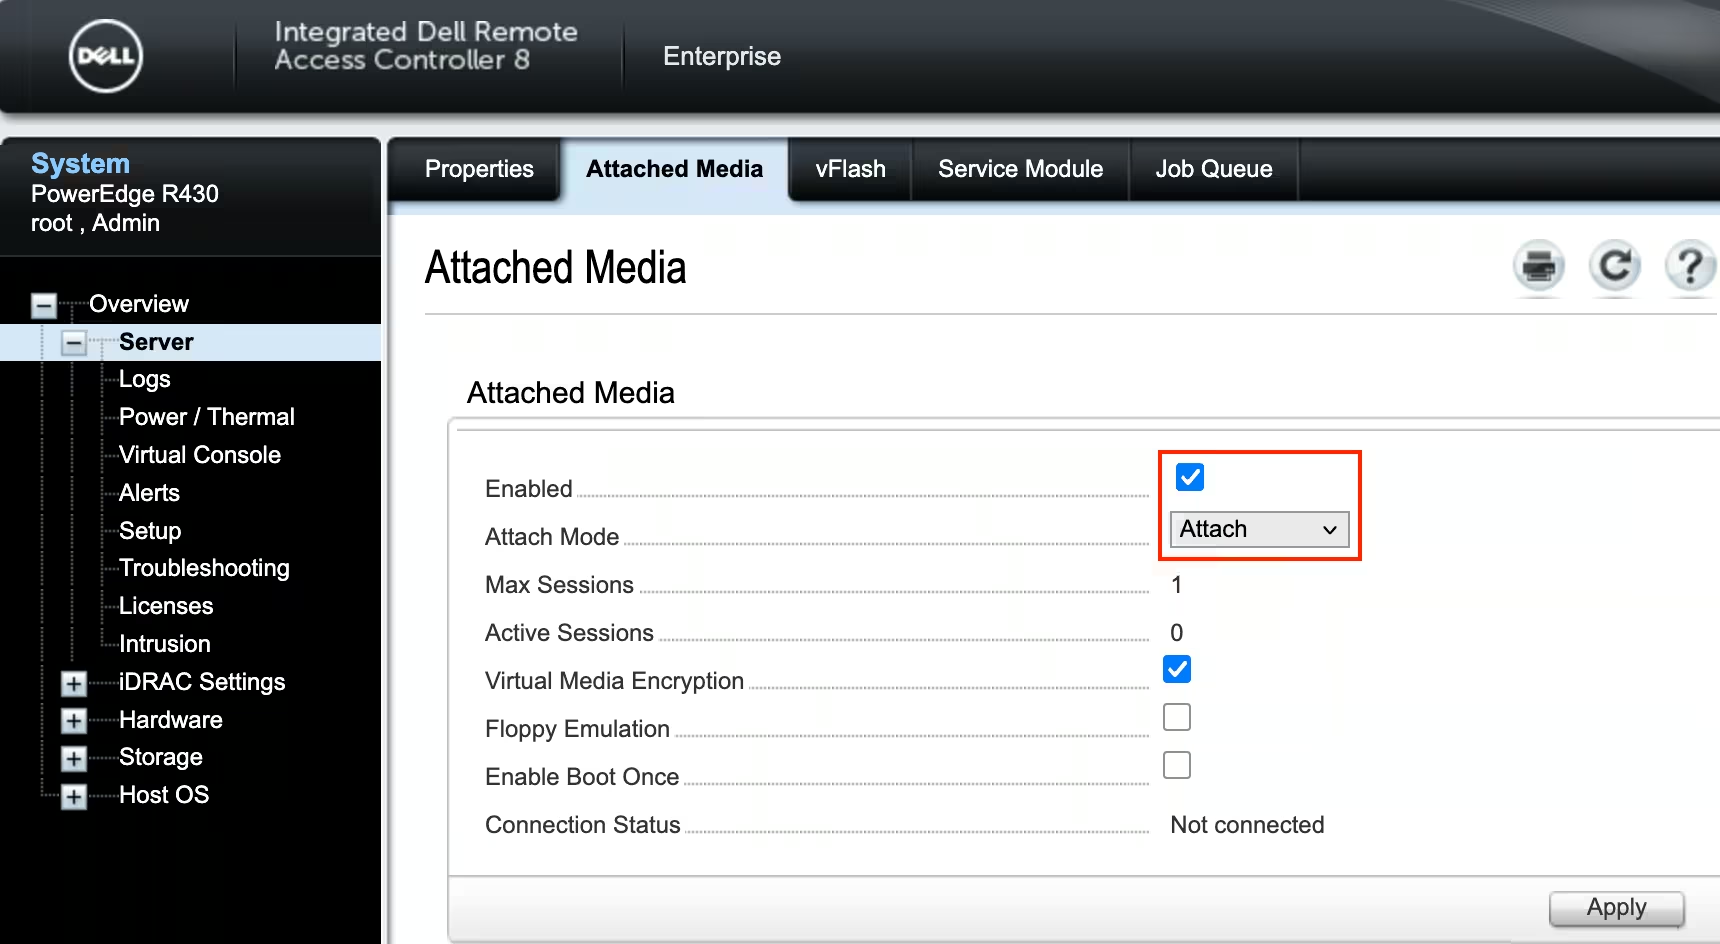
In the iDRAC web interface, go to Overview → Server → Attached Media
On this page:
- Select Enabled
- Set Attach Mode to Attach
- Click Apply
Connect an ISO image
You can connect the ISO image from your local machine or a remote file share.
From a local machine
-
Open Virtual Console: go to Overview → Virtual Console Preview → Launch
- If HTML5 Virtual Console is available and enabled, launch it
- Otherwise, launch the legacy Java-based console
- In Virtual Console, go to Virtual Media and click Browse
- Select a bootable ISO image from your local machine, and then click Map Device to mount the ISO
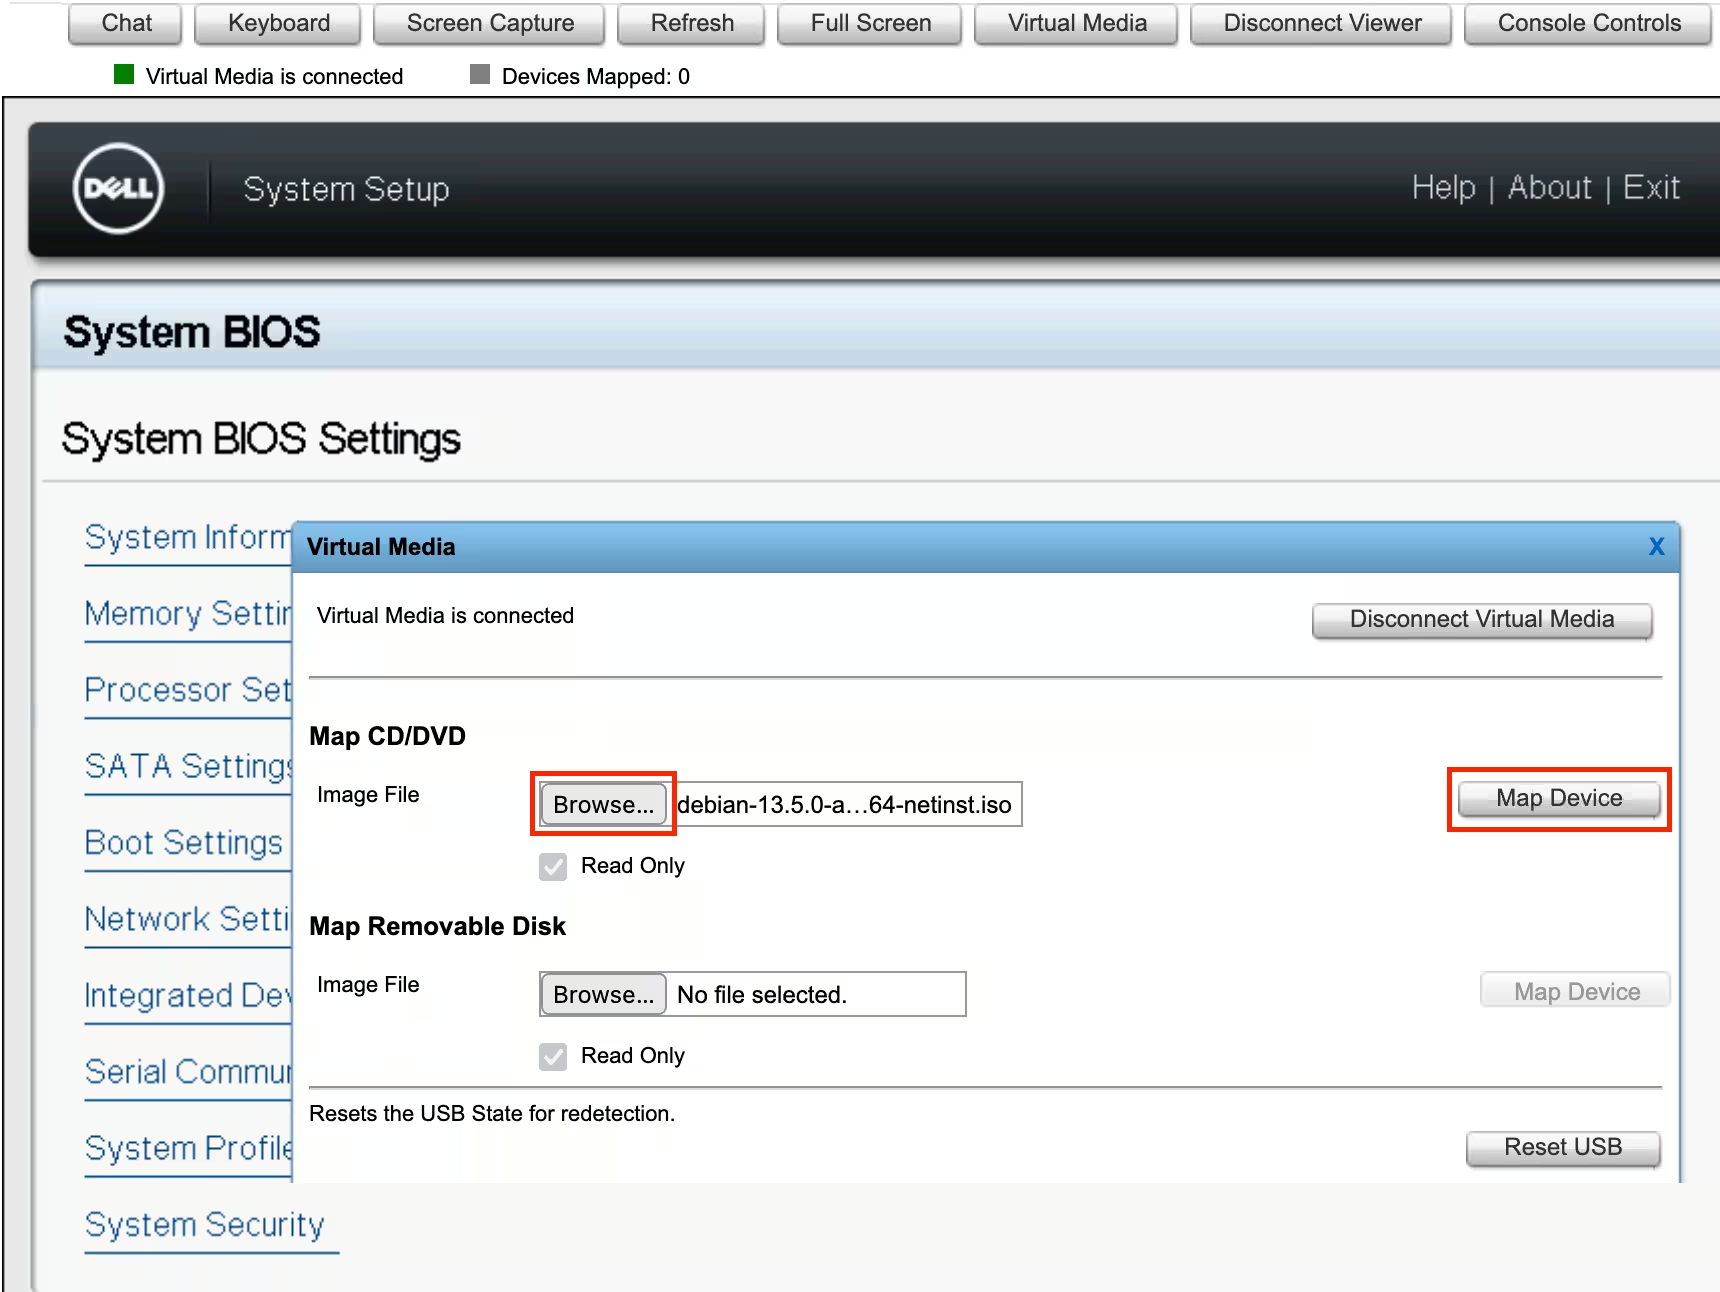
After you click Map Device, you can close the file selection window.
From a remote file share
Go to the Attached Media tab
Specify the path to the bootable ISO image in the Remote File Share section
Click Connect
For details, see iDRAC 7/8 - Managing remote file share and Configuring remote file share using the web interface
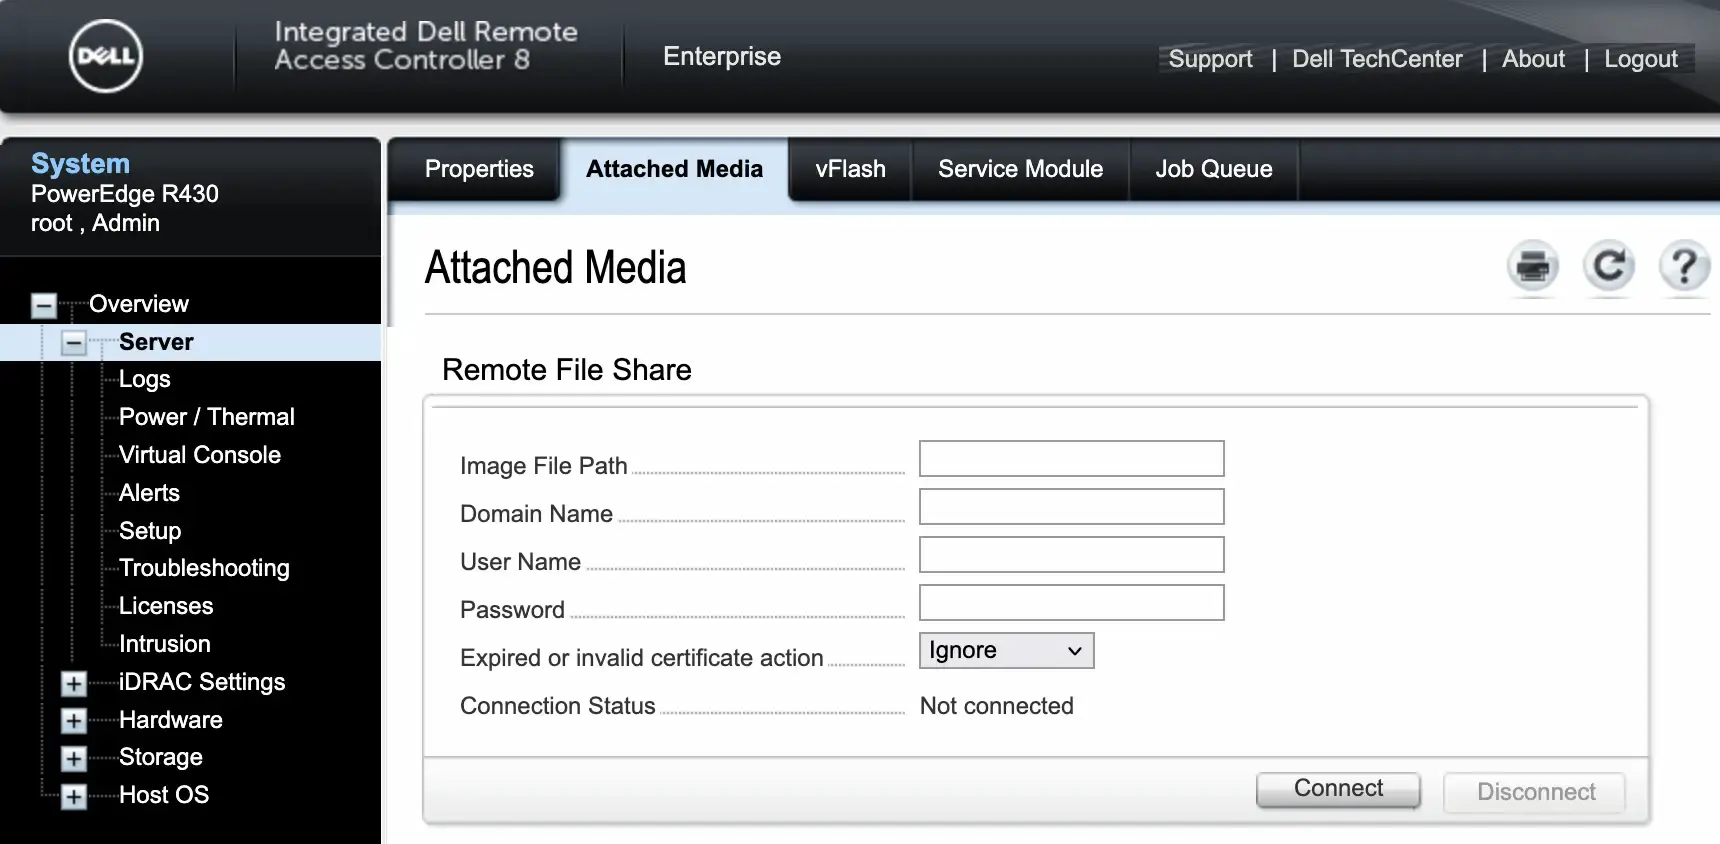
Where:
- Image File Path: enter the full path to the ISO image. Use an IPv4 address
- Domain Name, User Name, and Password: enter these values if the remote file share requires authentication
- Certificate: configure this option only if required by your remote file share
Boot the server from the ISO
Do not unmount the ISO or end the Virtual Media session until the server starts booting from the image.
- If Virtual Console is not already open, launch it from Overview → Virtual Console Preview → Launch
-
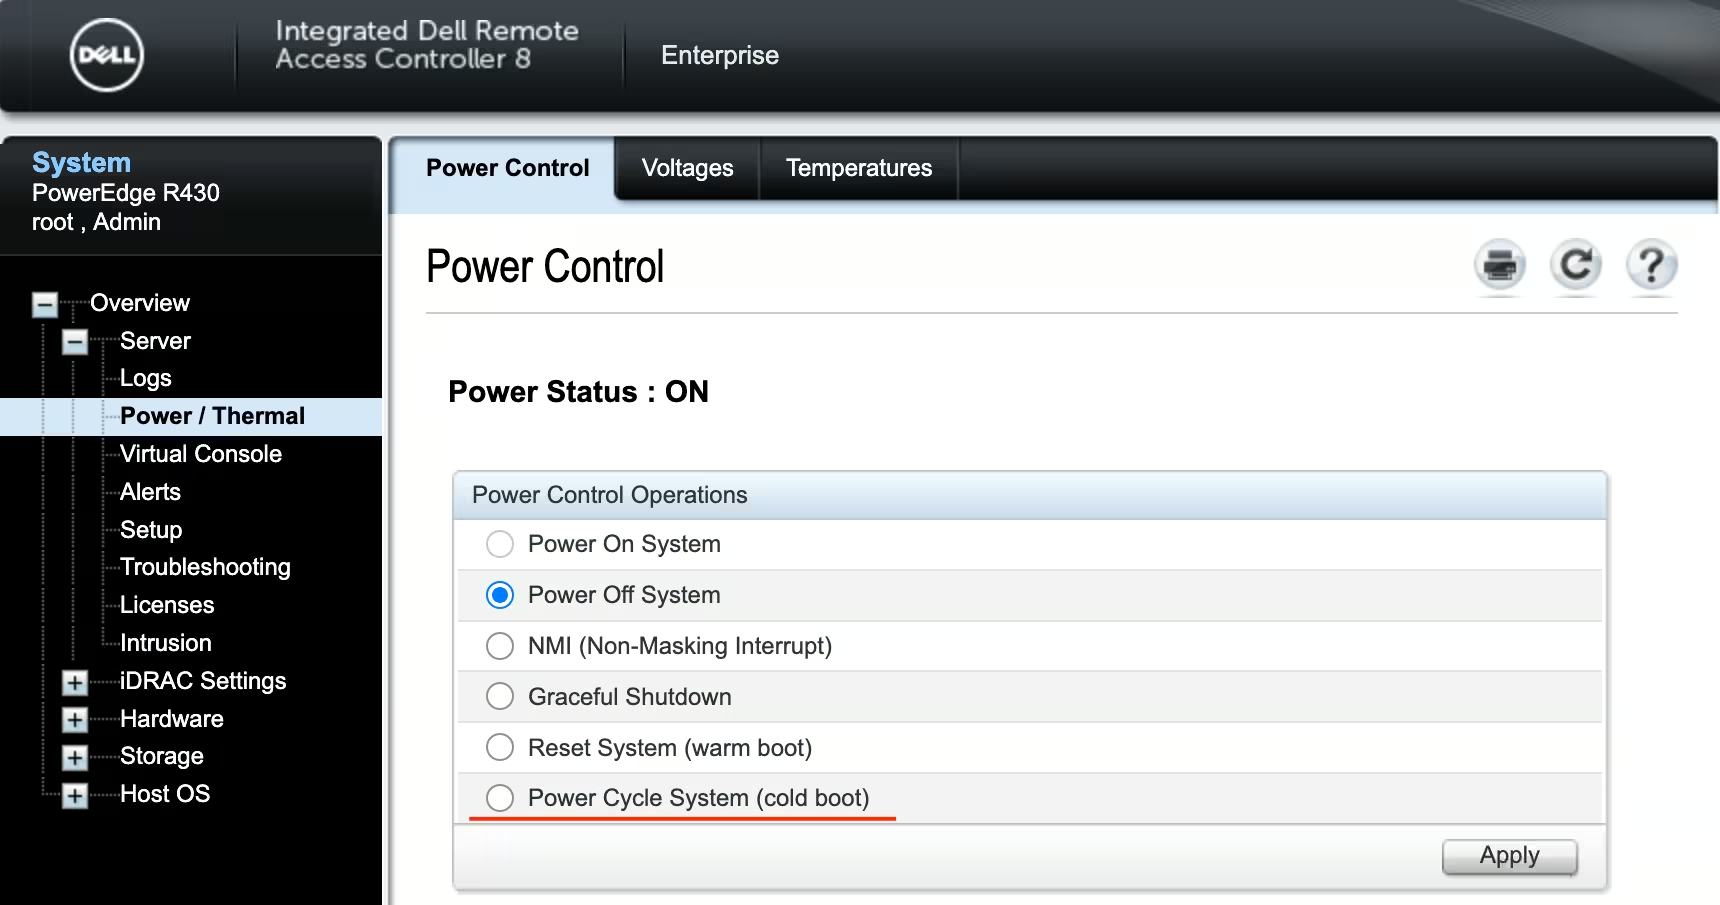
Restart the server using one of these methods:
- Go to Overview → Server → Power / Thermal, select Power Cycle System (cold boot), then click Apply
- In Virtual Console, go to Console Controls → Keyboard Macros: Ctrl-Alt-Del, then click Apply
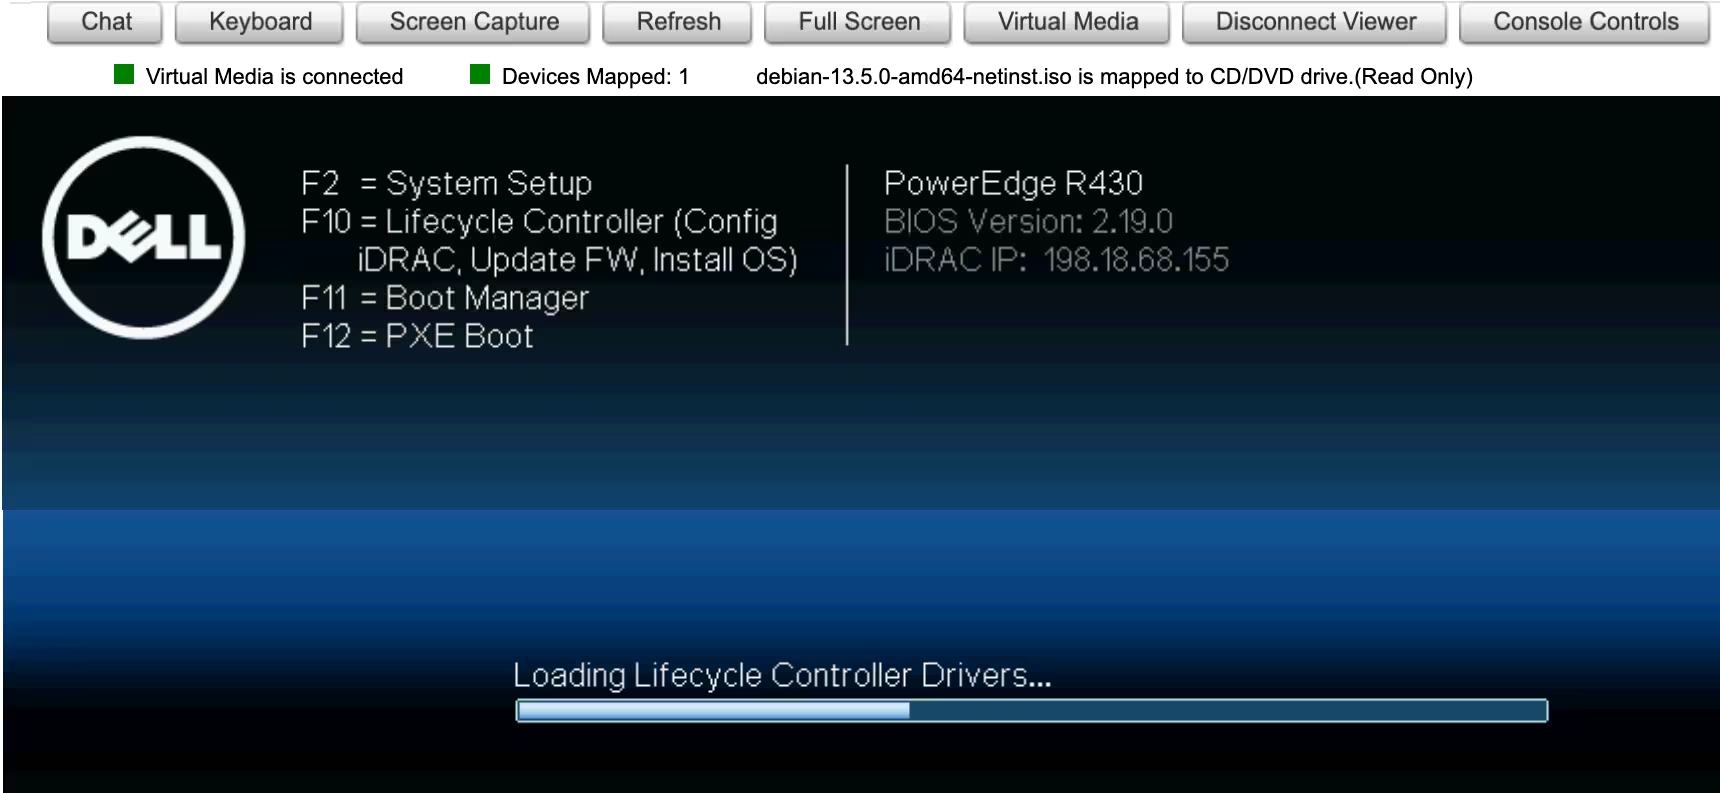
During startup, press F11 to open Boot Manager
-
Select One-shot UEFI Boot Menu to boot from the ISO once
-
Select Virtual Optical Drive
After you complete the installation or recovery, disconnect or unmap the ISO in Virtual Media.
Security and access
Authentication methods
For remote access to the server, the customer portal offers two authentication methods.
SSH key
An SSH key is a pair of cryptographic keys used for authentication. An SSH key pair consists of a private key and a public key. The private part of the key is stored on the local machine from which the user connects to the server. The public part is stored on the server. It is recommended to use SSH keys in most cases, especially if you need maximum security.
Advantages include a high level of security, and no need to enter a password for each connection.
Password
A password can be used for quick access or in situations where using SSH keys is difficult or impractical. It is also suitable for temporary access or for users who are not familiar with setting up SSH keys. The password for server access will be sent to the contacts with primary and technical roles via email.
Advantages: easy to set up and use, and does not require additional tools for SSH key generation.
How to create an SSH key
Generate keys via the customer portal
-
In the left-hand menu of the customer portal, navigate to Identity and Access and select SSH & GPG keys
-
Click Create
-
Specify the SSH key name in the Name field, select Generate new SSH key and click Create
A new private SSH key will be generated.
Carefully copy the key to ensure all characters are accurately transferred and pasted into a file on your local machine. Make sure to save the SSH key on your local machine in a secure location. Use this key when ordering new dedicated servers or reinstalling the OS on an existing server by selecting SSH key from the list created in the customer portal. The public part will be automatically generated and added to the dedicated server.
Generate keys on a local machine
You can also generate a new SSH key pair directly on your local machine. To do so, refer to the article How to create a new SSH key pair.
How to add an existing SSH key to the server
To connect to the server via SSH, you must have a public key on the server. Adding an SSH key to the server via the customer portal is only possible during the installation or reinstallation of the OS. In all other cases, this can be done via the console.
Linux based systems
-
Open a terminal on your local machine
-
Copy the public key to the server using the following command:
ssh-copy-id -i path_to_file/id_rsa.pub username@server_ipReplace:
-
path_to_id_rsa.pubwith the full path to theid_rsa.pubkey on your local computer -
usernamewith your actual username on the server -
server_ipwith the server's IP address
-
-
Press Enter and type the password
Your public key will be added to the server.
Windows
To add an existing SSH key to a Windows-based server, complete the following steps:
-
Open the command prompt on your local computer
-
Copy the public key to the server by using the following command:
scp path_to_file\your_key.pub username@server_ip:C:\Users\username\.ssh\authorized_keysReplace:
-
path_to_file\your_key.pubwith the full path to the public key on the local computer -
usernamewith your actual username on the server -
server_ipwith the server's IP address
-
-
Press Enter and type the password
Your public key will be added to the server.
To check the permissions, complete the following steps:
-
Connect to the server via RDP or other remote access methods
-
Open a PowerShell on the server
-
Retrieve the access control list (ACL) of the
authorized_keysfile:Get-Acl C:\Users\<username>\.ssh\authorized_keys | Format-List -
To display the file permissions for the
authorized_keysfile, use this command:icacls C:\Users\<username>\.ssh\authorized_keysReplace
<username>with the actual username for which you want to check the SSH file permissions
How to connect to the server
There are various ways to remotely connect to a dedicated server, using SSH, RDP (for Windows), or VNC.
SSH
SSH is a cryptographic network protocol that allows users to securely access a server over an unsecured network. This protocol refers to the utilities that implement the SSH protocol and is available on most operating systems. It supports various authentication methods, such as password, public and private keys.
To authenticate on the server using the generated SSH key, you must first add it to the server. Instructions are provided here.
To connect to a remote server via SSH, use the SSH utility on your local machine. On macOS and Linux, you can access this utility via the Terminal. On Windows, use PowerShell.
Before connecting to the server, you will need its IP address and login credentials:
-
IP address: public and private IP addresses can be found on the server details page in the customer portal. Use the public IP address of your server if you're connecting via the internet
-
Credentials: username and password, or username and private key. If you have not provided a public key when ordering a server, an automatically generated password will be sent to you via email. For a newly provisioned dedicated server, the username is
root
Password authentication
To authenticate using a password, run the following command and enter the password sent to your email.
ssh username@server_ip_addressKey-based authentication
To authenticate using a key, use the private key from the pair that corresponds to the public key you set up for the server.
Usually, SSH keys are stored in the .ssh subdirectory of the user's home directory. Assuming the key file is named id_rsa, the command will look like this:
ssh -i ~/.ssh/id_rsa username@server_ip_addressNote that id_rsa is a default file name for a private key when you generate key pair with the ssh-keygen utility. Your actual key may have another name.
When using the key for the first time on your local machine, the console will display a warning that the key is being used for the first time and will ask if you want to proceed with the given fingerprint.
Are you sure you want to continue connecting (yes/no/[fingerprint])?Type yes and press Enter.
You will gain access to the server without being prompted for a password.
"Permissions too open" error
When using a key file for the first time, you might encounter an error from SSH stating:
Permissions for [the key file] are too openUse the following command to set more restrictive file permissions for the key file under macOS and Linux:
chmod 600 ~/.ssh/id_rsaUse the following series of commands to change file permissions in Windows PowerShell:
#Extracts username of the current user
[String] ${stUserDomain},[String] ${stUserAccount} = [System.Security.Principal.WindowsIdentity]::GetCurrent().Name.split("\")

#Grants full permissions to the current user
icacls $home/.ssh/id_rsa /grant:r ${stUserAccount}:F

#Removes inherited permissions
icacls $home/.ssh/id_rsa /inheritance:r
How to connect to the server via SSH on a Windows-based system
You can use SSH clients like PuTTY or the built-in OpenSSH Client (available with Windows 10 and later).
-
Prepare connection details and ensure you have the server's IP address or domain name, username, and password (or a private key for authentication).
-
Launch the SSH client
If using the Putty client, ensure the connection type is set to SSH and the port is 22. Then click Open
-
Use the following command:
ssh username@server_ipReplace:
-
usernamewith your actual username on the server -
server_ipwith the server's IP address or domain name
-
-
Complete authentication:
-
If using a password, enter it when prompted
-
If using SSH keys, specify the path to the private key with the
-ioption:ssh -i path_to_your_private_key username@hostname_ip
-
-
If you trust the connection, confirm the connection by typing
yesand pressing Enter
Once connected, you can run commands on the server through the terminal.
VNC console
A VNC (Virtual Network Computing) console is a remote management tool that allows users to access and control their servers' graphical interface remotely over the internet. This enables users to perform server maintenance tasks, install updates and software, and resolve issues even if the operating system does not boot or is not installed.
Dell servers use the Integrated Dell Remote Access Controller (iDRAC). In the customer portal, there is a VNC console that provides access to the server's console using VNC technology, independent of the Java/HTML5 console provided directly by iDRAC.
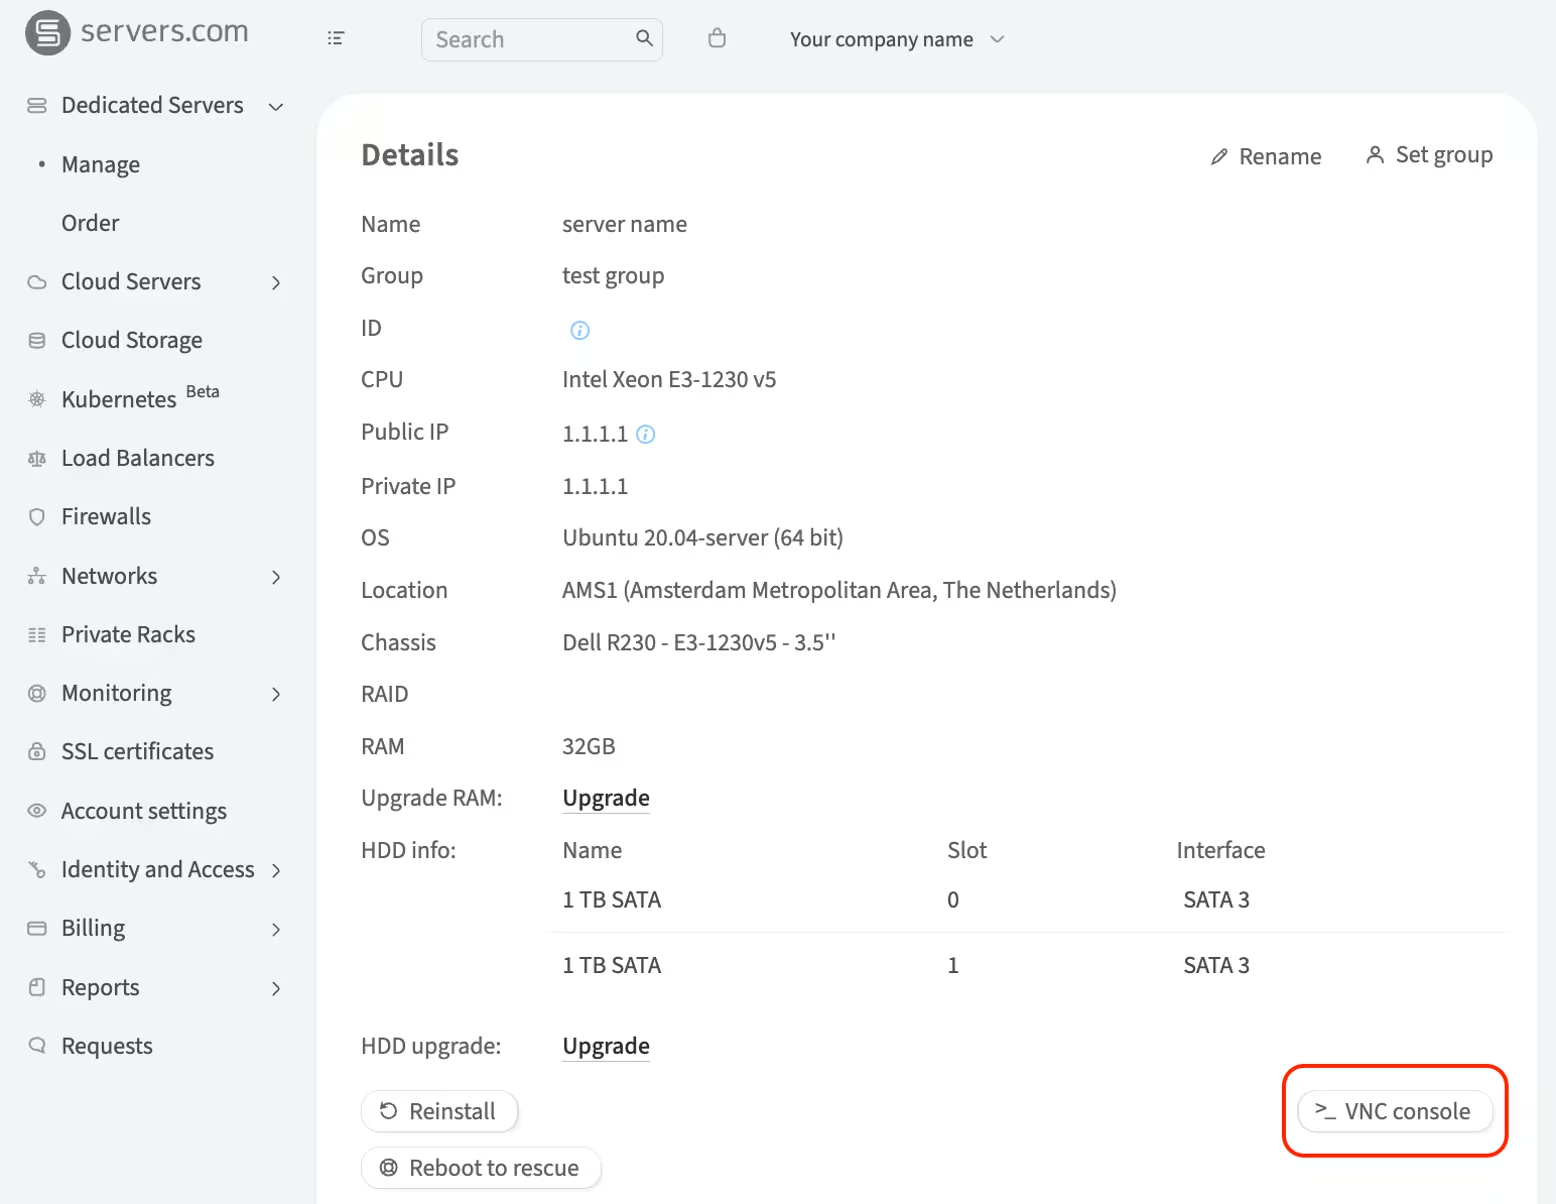
To connect to the server using VNC, complete the following steps:
-
In the left-hand menu, navigate to Dedicated Servers → Manage
-
In the My servers section, choose the server and click Details
-
Click VNC console
-
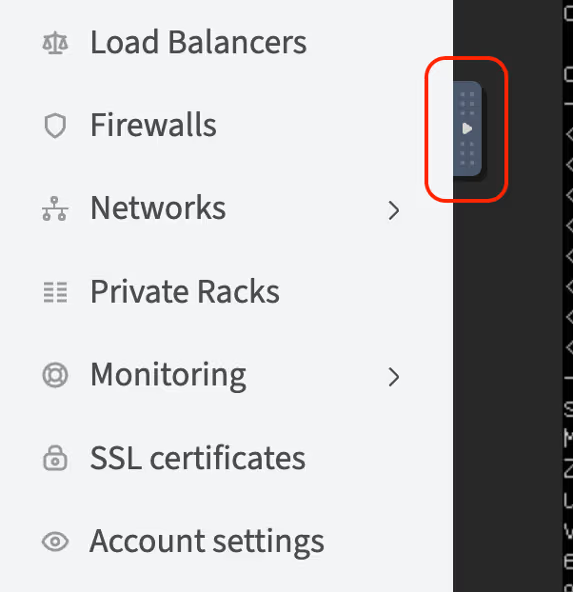
Enter your account password in the pop-up window and click Continue. A screen with the console will open. Use the icon ▹ to open a sidebar with VNC console control elements.
RDP
RDP (Remote Desktop Protocol) from Microsoft is designed for remote access to the graphical interface of Windows systems. It is used for remote administration, technical support, and working with applications.
To connect to the server via RDP, click here.
User data
What is user data?
User data refers to the user-specific configuration parameters of the server's operating system. The primary use of user data is to automate server settings. These parameters are defined during the operating system installation phase and are specified as cloud-config scripts in a text file with YAML syntax or as bash scripts. While cloud-config scripts are primarily used for Linux-based systems, Windows-based systems can achieve similar automation using PowerShell scripts. More detailed information can be found in the cloud-init documentation and Microsoft PowerShell documentation.
The scripts are automatically encoded in Base64 and sent to the server, where they are executed by the cloud-init agent upon the first boot of the operating system. They are not re-applied on subsequent reboots of the same server.
In the scripts, you can specify both individual configuration parameters of the operating system and entire sequences of parameters. For example:
-
Script 1: Sets the timezone and locale
Cloud-config
#cloud-config
# Sets the timezone to UTC
timezone: "Etc/UTC"

# Verifies the change
runcmd:
  - timedatectl set-timezone UTC

# Sets the system locale to en-US
locale: "en_US.UTF-8"
Bash script
#!/bin/bash # Sets the timezone to UTC timedatectl set-timezone UTC # Verifies the change timedatectl # Sets the system locale to en-US localectl set-locale LANG=en_US.UTF-8 localectl set-keymap us -
Script 2: Installs a set of packages
Cloud-config
#cloud-config

#Updates the package list
package_update: true

#Upgrades all installed packages
package_upgrade: true

#Installs specified packages, in this case,
#nginx, mysql-server, and apache2
packages:
- nginx
- mysql
- apache2


#Sets up a basic page for an Apache web server
write_files:
  - path: /var/www/html/index.html
    content: |
      <html>
      <head><title>Welcome</title></head>
      <body><h1>Welcome to your dedicated server!</h1>.</body>
      </html>


#Executes commands after package installation to start
#and enable services at system boot.
runcmd:
  - systemctl start nginx
  - systemctl enable nginx
  - systemctl start mysql
  - systemctl enable mysql
  - systemctl enable apache2
  - systemctl start apache2
Bash script
#!/bin/bash # Updates the package list apt-get update # Upgrades all installed packages apt-get -y upgrade # Installs specified packages apt-get install -y nginx mysql-server apache2 # Sets up a basic page for an Apache web server cat <<EOF > /var/www/html/index.html <html> <head><title>Welcome</title></head> <body><h1>Welcome to your dedicated server!</h1>.</body> </html> EOF #Executes commands after package installation to start #and enable services at system boot systemctl start nginx systemctl enable nginx systemctl start mysql systemctl enable mysql systemctl start apache2 systemctl enable apache2 -
Script 3: Configures the system
Cloud-config
#cloud-config

# Sets the hostname
hostname: my-dedicated-server

# Creates users and adds SSH keys
users:
# User 1
  - name: username
    sudo: ['ALL=(ALL) NOPASSWD:ALL']
    groups: sudo
    home: /home/username
    shell: /bin/bash
    lock_passwd: false
    passwd: $6$rounds=4096$abcdefghijklmnopqrstuv...
    ssh-authorized-keys:
      - ssh-rsa AAAAB3NzaC1yc2EAAAABIwAAAQEA7...

# User 2
  - name: new_username
    sudo: ['ALL=(ALL) NOPASSWD:ALL']
    groups: sudo
    home: /home/new_username
    shell: /bin/bash
    lock_passwd: false
    passwd: $6$rounds=4096$abcdefghijklmnopqrstuv...
    ssh-authorized-keys:
      - ssh-rsa AAAAB3NzaC1yc2EAAAABIwAAAQEA7...
Bash script
#!/bin/bash # Sets the hostname hostnamectl set-hostname my-dedicated-server # Creates users and sets up SSH keys # User 1 username1="username" password1="your_hashed_password1" ssh_key1="ssh-rsa AAAAB3NzaC1yc2EAAAABIwAAAQEA7..." #-m: Creates a home directory for the user. #-s /bin/bash: Sets the shell for the user. useradd -m -s /bin/bash $username1 echo "$username1:$password1" | chpasswd -e usermod -aG sudo $username1 mkdir -p /home/$username1/.ssh echo $ssh_key1 > /home/$username1/.ssh/authorized_keys chown -R $username1:$username1 /home/$username1/.ssh chmod 700 /home/$username1/.ssh chmod 600 /home/$username1/.ssh/authorized_keys # User 2 username2="new_username" password2="your_hashed_password2" ssh_key2="ssh-rsa AAAAB3NzaC1yc2EAAAABIwAAAQEA7..." useradd -m -s /bin/bash $username2 echo "$username2:$password2" | chpasswd -e usermod -aG sudo $username2 mkdir -p /home/$username2/.ssh echo $ssh_key2 > /home/$username2/.ssh/authorized_keys chown -R $username2:$username2 /home/$username2/.ssh chmod 700 /home/$username2/.ssh chmod 600 /home/$username2/.ssh/authorized_keys -
Script 4: Enables/installs SSH on Windows
PowerShell
Start-Transcript -path C:\postinstall.log -append #Activates the administrator account: net user Administrator /active:yes #Disables administrator password expiration: wmic UserAccount where Name='Administrator' set PasswordExpires=False Disable-NetAdapterBinding -Name "*" -ComponentID ms_tcpip6 # RDP switch port # https://learn.microsoft.com/en-us/windows-server/remote/remote-desktop-services/clients/change-listening-port $portvalue = 21337 Set-ItemProperty -Path 'HKLM:\SYSTEM\CurrentControlSet\Control\Terminal Server\WinStations\RDP-Tcp' -name "PortNumber" -Value $portvalue New-NetFirewallRule -DisplayName 'RDPPORTLatest-TCP-In' -Profile 'Public' -Direction Inbound -Action Allow -Protocol TCP -LocalPort $portvalue New-NetFirewallRule -DisplayName 'RDPPORTLatest-UDP-In' -Profile 'Public' -Direction Inbound -Action Allow -Protocol UDP -LocalPort $portvalue # RDP AccountLockout # https://learn.microsoft.com/en-us/troubleshoot/windows-server/networking/configure-remote-access-client-account-lockout Set-ItemProperty -Path "HKLM:\SYSTEM\CurrentControlSet\Services\RemoteAccess\Parameters\AccountLockout" -Name "ResetTime (mins)" -Value "0x05" Set-ItemProperty -Path "HKLM:\SYSTEM\CurrentControlSet\Services\RemoteAccess\Parameters\AccountLockout" -Name "MaxDenials" -Value "10" # wait for internet availability while (!(test-connection chocolatey.org -Quiet -Count 5)) { sleep 5 } # choco install/configuration Set-ExecutionPolicy Bypass -Scope Process -Force; [System.Net.ServicePointManager]::SecurityProtocol = [System.Net.ServicePointManager]::SecurityProtocol -bor 3072; iex ((New-Object System.Net.WebClient).DownloadString('https://community.chocolatey.org/install.ps1')) choco feature enable -n allowGlobalConfirmation choco allow-empty-checksums # sshd install/configuration net stop sshd taskkill /F /IM sshd.exe choco install openssh -params "/SSHServerFeature" --force wget "url_to_pub_key" -outfile $HOME\.ssh\authorized_keys wget "url_to_sshd_config_file" -outfile "%PROGRAMDATA%\ssh\sshd_config" Set-Service sshd -StartupType Automatic Restart-Service -name sshd Stop-Transcript -
Script 5: Replaces mirrors
Cloud-config
#cloud-config
#This script replaces mirrors with mirrors.servers.com
#for VMs operating in gp-only mode
apt:
  preserve_sources_list: false
  primary:
    - arches: [default]
      uri: http://mirror.servers.com/debian
  security:
    - arches: [default]
      uri: http://mirror.servers.com/debian-security
Bash script
#!/bin/bash #This script replaces mirrors with mirrors.servers.com #for VMs operating in gp-only mode# Backup the current sources list cp /etc/apt/sources.list /etc/apt/sources.list.bak # Replace the sources list with the new mirrors cat </etc/apt/sources.list deb http://mirror.servers.com/debian $(lsb_release -cs) main deb http://mirror.servers.com/debian-security $(lsb_release -cs)/updates main EOF # Update the package list apt-get update -
Script 6: Creates a directory and downloads files into it over the network
Cloud-config
#cloud-config

#Creates a directory
runcmd:
- mkdir -p /run/newdir

#Downloads files into it over the network
- [
    wget,
    "http://example.com",
    -O,
    /run/newdir/index.html
  ]

#Where
#http://example.com: The URL address of the file to be downloaded.
#-O /run/newdir/index.html: Specifies the path
#and filename where the content will be saved.
Bash script
#!/bin/bash # Creates a directory mkdir -p /run/newdir # Downloads a file into the created directory over the network wget "http://example.com" -O /run/newdir/index.html -
Script 7: Configures a new user with admin rights and sets up WinRM
Windows (Batch)
#Activates the administrator account echo 'Enable Administrator user' net user Administrator /active:yes echo 'Creating %Usertname% user' #Creates a new user and adds them to the administrators group: net user %Usertname% %Password% /add net localgroup Administrators %Usertname% /add #Configures WinRM echo 'Starting to configure winrm' winrm quickconfig -q winrm set winrm/config/winrs '@{MaxMemoryPerShellMB="300"}' winrm set winrm/config '@{MaxTimeoutms="1800000"}' winrm set winrm/config/service '@{AllowUnencrypted="true"}' winrm set winrm/config/service/auth '@{Basic="true"}' echo 'Starting to configure firewall rules' netsh advfirewall firewall add rule name="WinRM 5985" protocol=TCP dir=in localport=5985 action=allow netsh advfirewall firewall add rule name="WinRM 5986" protocol=TCP dir=in localport=5986 action=allow net stop winrm cmd /c sc config winrm start=auto net start winrm echo "setting ExecutionPolicy" Set-ExecutionPolicy -ExecutionPolicy Bypass -Scope LocalMachine -Force -
Script 8: Changes the boot order
Cloud-config
#cloud-config
runcmd:
- efibootmgr -o $(efibootmgr | grep BootCurrent | cut -d' ' -f2),$(efibootmgr | grep BootOrder | cut -d' ' -f2 | cut -d',' -f1)
Bash script
#!/bin/sh
efibootmgr -o $(efibootmgr | grep BootCurrent | cut -d' ' -f2),$(efibootmgr | grep BootOrder | cut -d' ' -f2 | cut -d',' -f1)
Setting user data
In the customer portal, there is a "User data" field where you can enter the script.
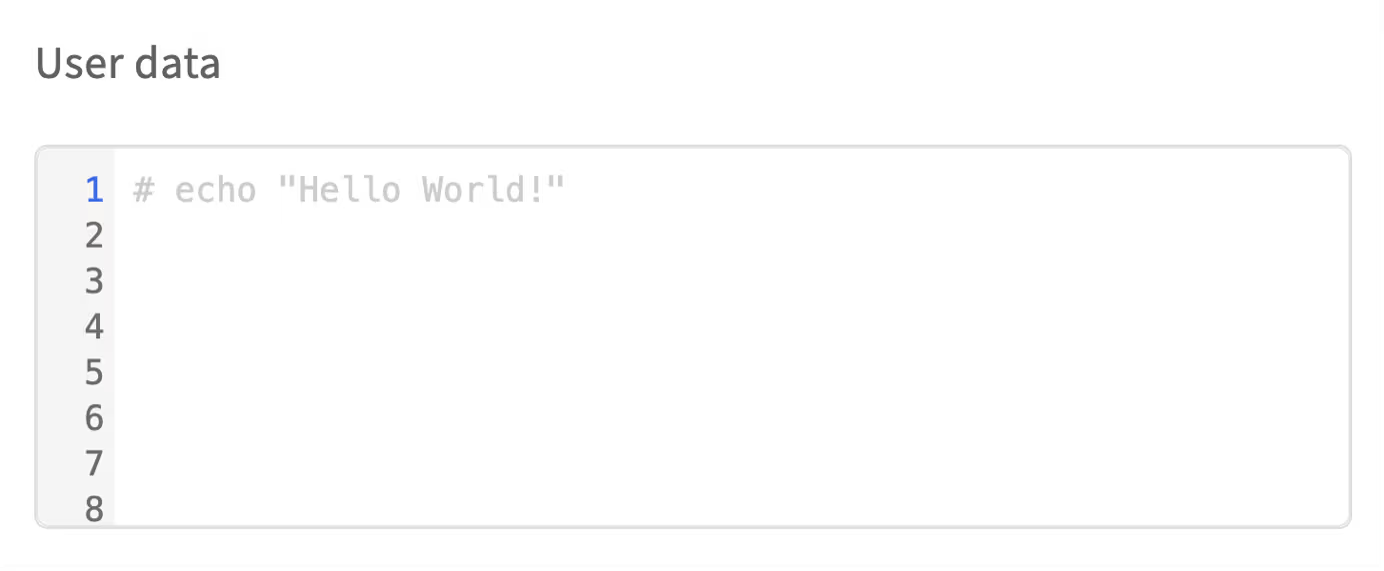
After the automatic installation is complete, it will no longer be possible to change the text in this field. The maximum script size without Base64 encoding is 16 KB.
Disks management
What is a disk controller?
A disk controller is a hardware device that manages the operation of hard drives and solid-state drives in a server. It facilitates communication between the server's central processing unit (CPU) and the drives, controls data reading and writing, and is responsible for RAID (Redundant Array of Independent Disks) management functions.
Why are there different number of disk and possible RAID levels?
Entry-level servers, such as the Dell PowerEdge R210, typically come with fewer disks and support less memory, which is sufficient for small business solutions. On the other hand, models like the Dell PowerEdge R730xd support a larger number of disks and greater memory capacity, offering extensive scalability for large corporate tasks.
We offer server models that support building RAID arrays at various levels. The most commonly used are RAID 0 and RAID 1.
-
RAID 0: significantly boosts performance by writing data in parallel across multiple disks but does not provide data protection. Requires a minimum of 2 disks
-
RAID 1: ensures data mirroring, significantly enhancing reliability but losing half of the available capacity. Requires a minimum of 2 disks
How to configure RAID
The customer portal provides the ability to configure server disks using RAID technology both when ordering a dedicated server and after provisioning one. This functionality becomes available when:
-
The server chassis and the selected operating system support RAID technologies
-
More than one disk of the same size is selected in the server slots
To configure RAID, complete the following steps:
-
Select the server where RAID needs to be configured
-
On the server configuration page:
-
Scroll to the Operating system section if the server is being ordered
-
Scroll to the Disk upgrade section and click Upgrade if the server is already ordered
-
Select the operating system if the server does not have one
-
In the RAID section:
-
Automatic settings: select the RAID level for creating an array with automatic settings and proceed to step 8
-
Advanced settings: leave the Advanced settings (More HDDs, custom partitioning & more) selected and scroll to the slots section
-
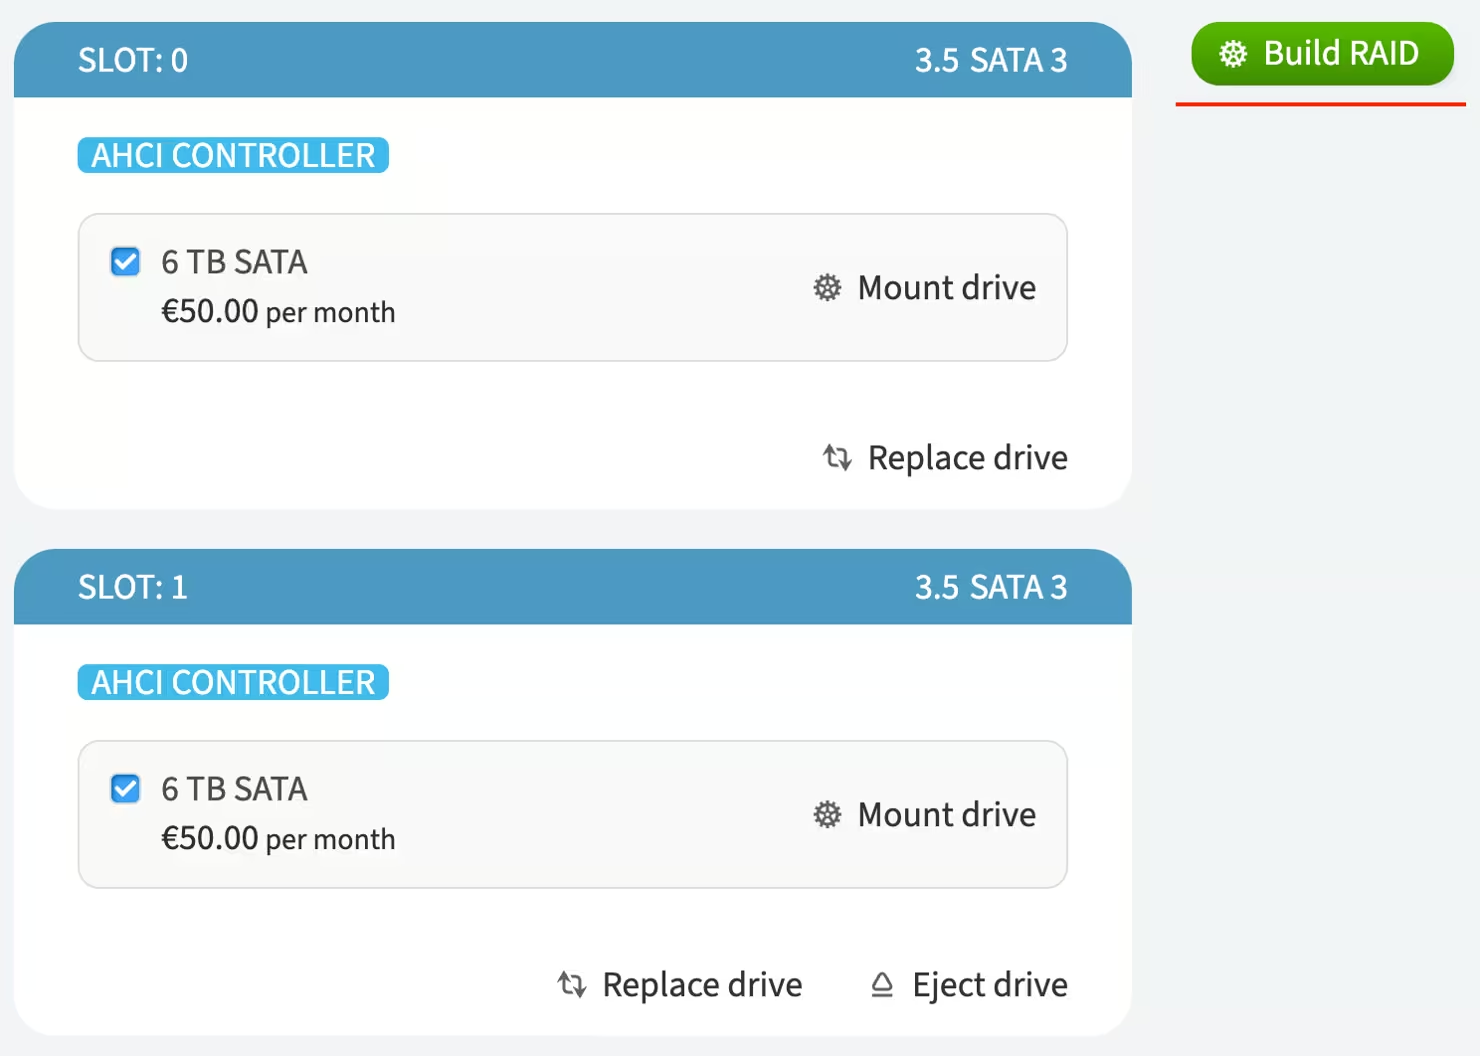
In the slots section, assign at least two free slots with drives of the same size and mark the checkbox next to each disk
-
Click the Build RAID button that appears
-
In the pop-up window, select the RAID level
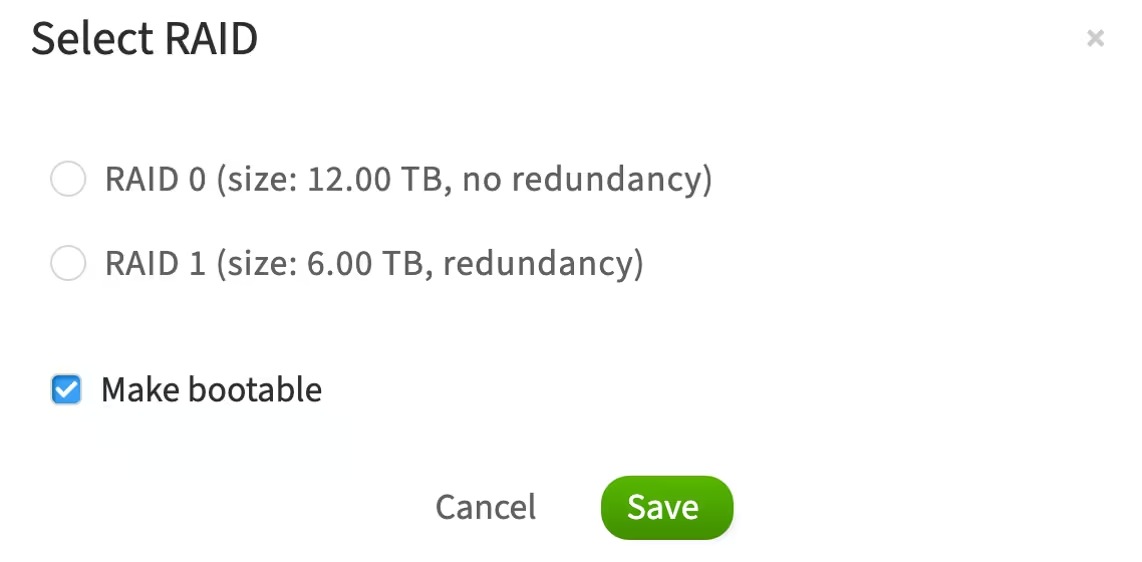
The Make bootable option means that the operating system will be installed and boot from this RAID array
-
Click Save
-
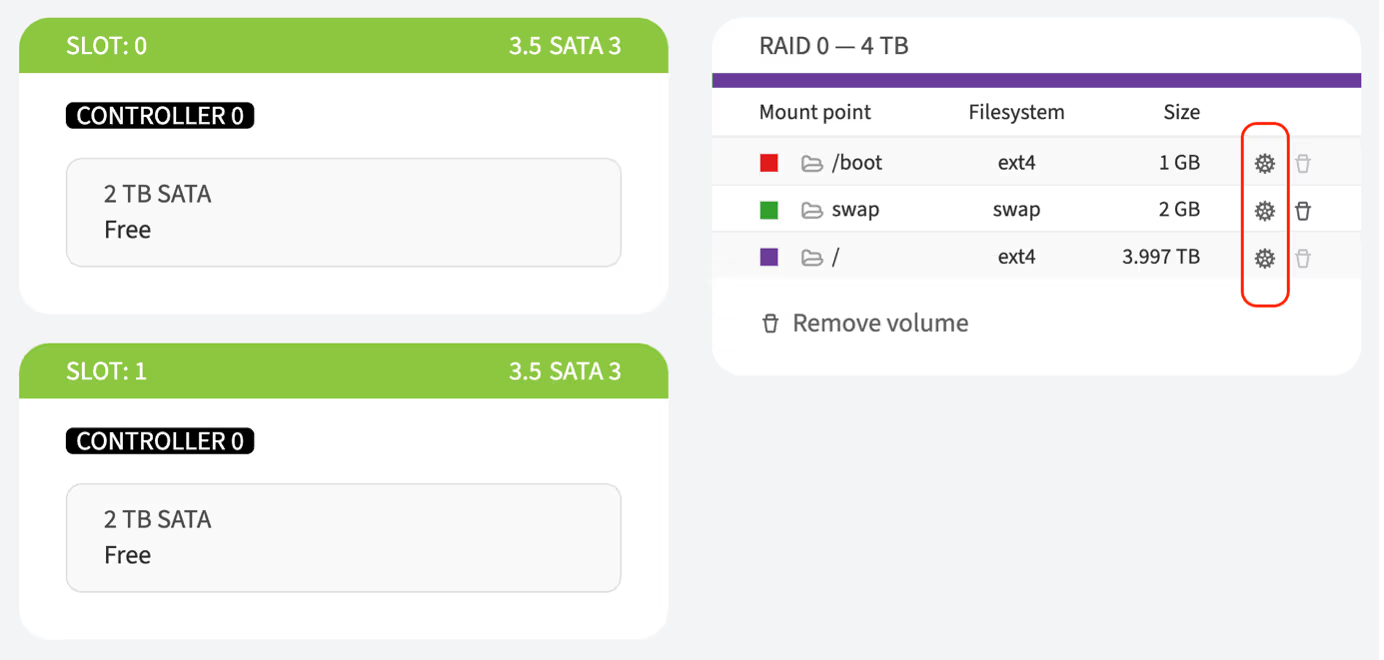
Configure partitions if required. More details can be found here
-
Complete the server configuration by clicking the Order upgrade or Save button
-
Confirm the action in the pop-up window by clicking the I'm sure, reinstall OS button
-
Enter your account password in the pop-up window and click Continue
How to mount a disk drive
-
In the left-hand menu, navigate to Dedicated Servers → Manage
-
Choose the server and click Details
-
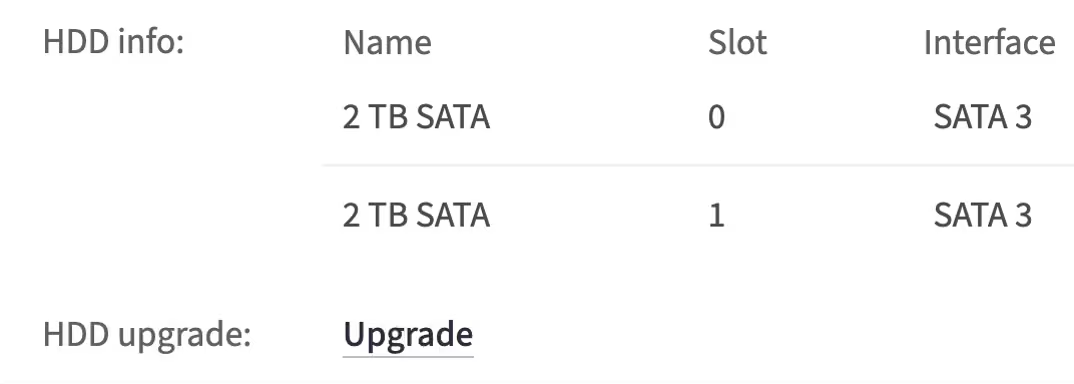
Next to the Disk upgrade item, click Upgrade
-
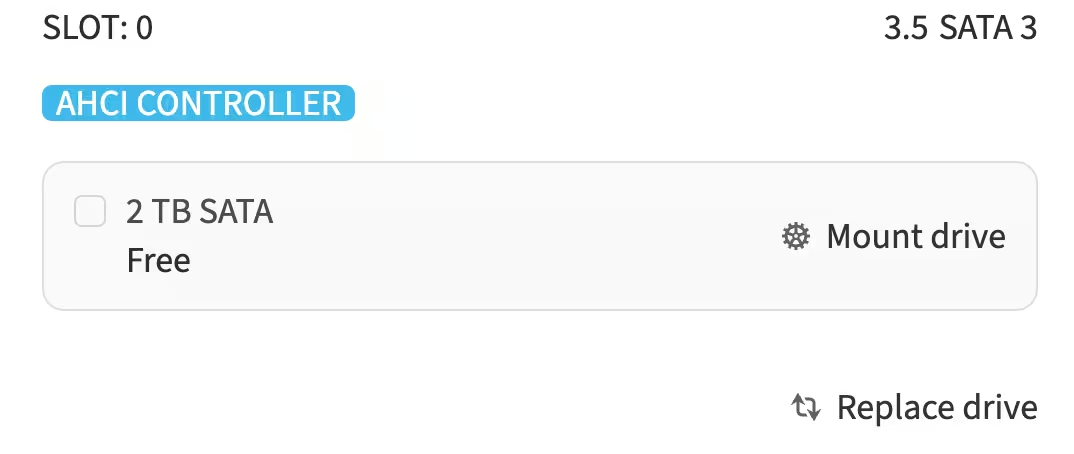
To choose a disk for mounting, find an available slot on the page and click Replace drive or choose the default disk provided by the customer portal.
-
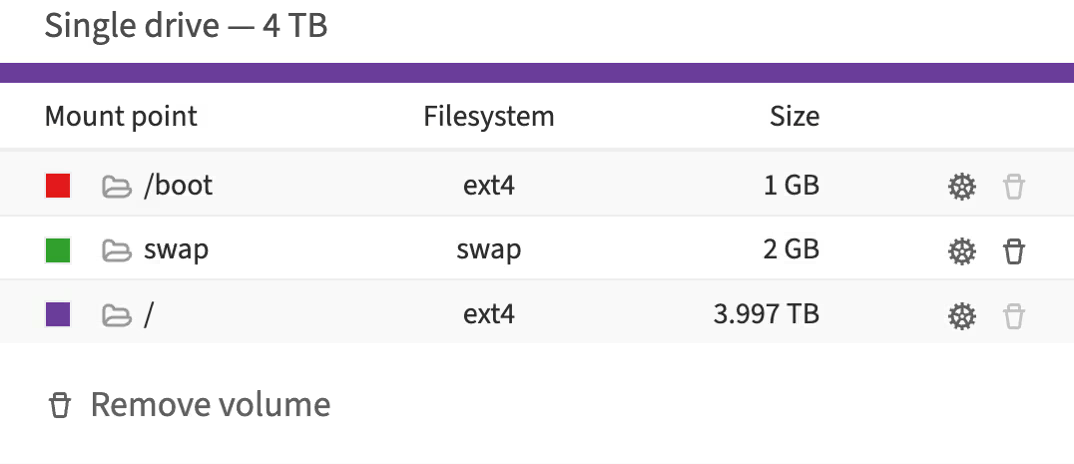
Click Mount drive. A Disk Mount Overview section will appear, allowing you to manage the disk partitions
-
Choose a preferred date and time slot for the upgrade
-
To apply the mounting, click Order upgrade
About the disk partitions
Linux/Unix based systems
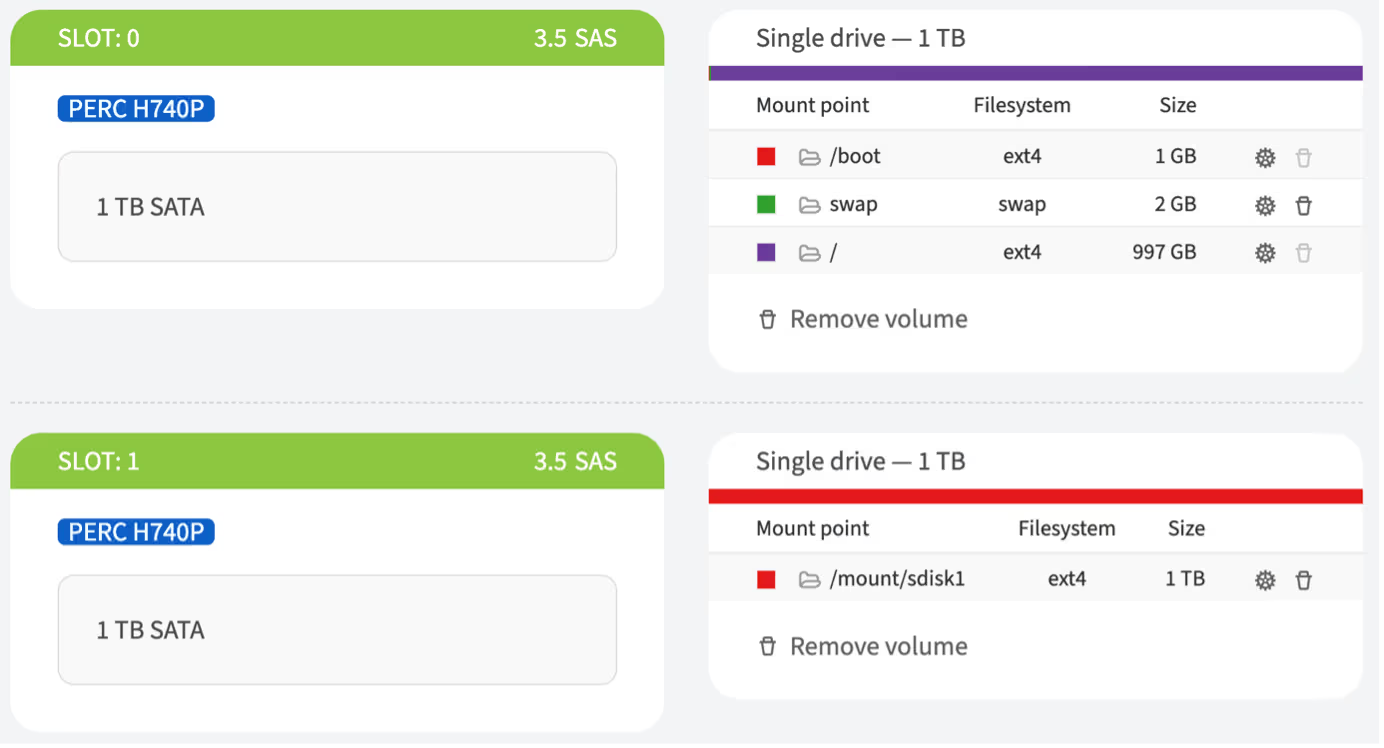
These settings show the disk space allocation on the main boot disk, including the allocation for boot files, virtual memory, and the main file system.
A mount point (target) is a location in the file system where a file system or storage device is attached.
When a drive is mounted, the operating system links its contents to a specific directory in the file system tree. This allows users and applications to interact with the data on the device as if it were part of the main file system.
Examples of mount points:
-
/boot– the mount point for the partition containing boot files. This is usually a separate small partition necessary for booting the operating system. The ext4 file system is commonly used for Linux -
/– the root mount point where the entire Linux file system resides. All other files and directories are located within this hierarchical tree -
/home– often used as a mount point for a separate partition containing user home directories -
/mnt/usb– can be used for mounting USB devices such as flash drives
Mount points allow for the organization and management of access to different file systems and devices within a unified namespace.
What is a Target?
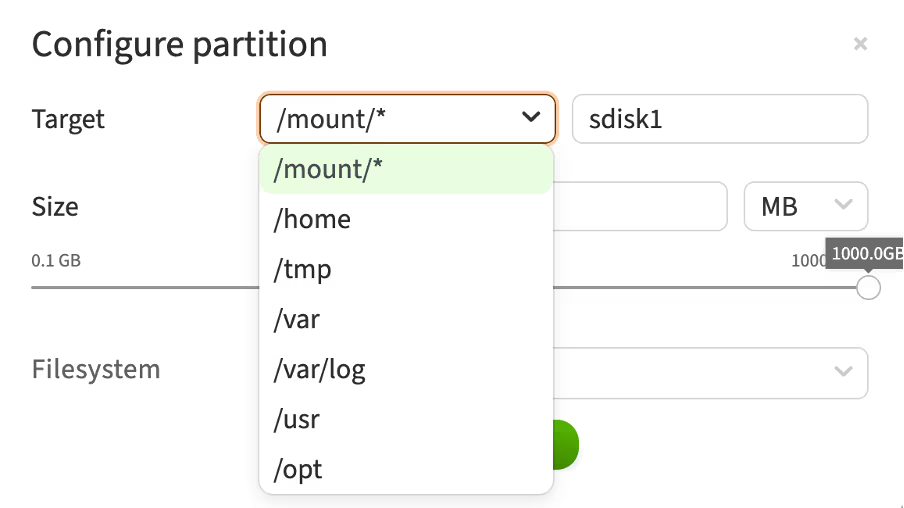
This configuration window displays the interface for setting up partitions in Linux, where you can select the mount point (target) for a new partition on a non-boot disk.
Here is a brief description of the available mount points:
-
/mount/*– a general folder for mounting additional file systems or devices on a non-boot disk. Used for temporary or permanent attachment of various devices -
/home– the directory where user home directories are located. Typically used for storing user data, settings, and files -
/tmp– the directory for temporary files. The system and applications use it for temporary data storage, which can be deleted after a reboot -
/var– the directory for variable data. This includes log files, mail spools, databases, and other frequently changing files -
/var/log– a subdirectory in /var, specifically designed for storing log files. System and application logs are recorded here -
/usr– the directory for installing software and user utilities. It houses most of the system's applications and utilities -
/opt– the directory for additional software packages and applications that are not included in the standard distribution packages. Used for installing third-party software
These mount points allow you to organize and structure the file system on a non-boot disk, distributing various types of data across the appropriate directories.
When do I need to change it?
Changing the target (mount point) for a new partition may be necessary in the following cases:
-
Separating user data: mount to
/hometo keep user data separate from system files -
Improving performance: mount to
/varor/var/logto isolate logs and variable data, reducing load on the main system -
Security and stability: mount
/tmpon a separate partition to prevent attacks and avoid filling up the main partition -
Disk space management: mount to
/usror/optfor additional software and applications -
Custom storage requirements: mount to
/mnt/for applications needing dedicated storage space -
Backup and restore: separate partitions simplify backup and restore processes
-
Multi-disk configurations: distribute data across multiple disks by mounting partitions on secondary disks, such as
/mnt/data
Changing the mount point helps optimize performance, enhance security, and simplify system management.
What is swap?
Swap is a designated area on the disk that the operating system uses as additional virtual memory. This allows the server to continue operating even if the physical RAM is exhausted.
How does swap work?
When the RAM is full, the operating system moves less frequently used data from the RAM to the swap space on the disk. This frees up RAM for more critical tasks. When this data is needed again, it is moved back to the RAM.
Windows OS
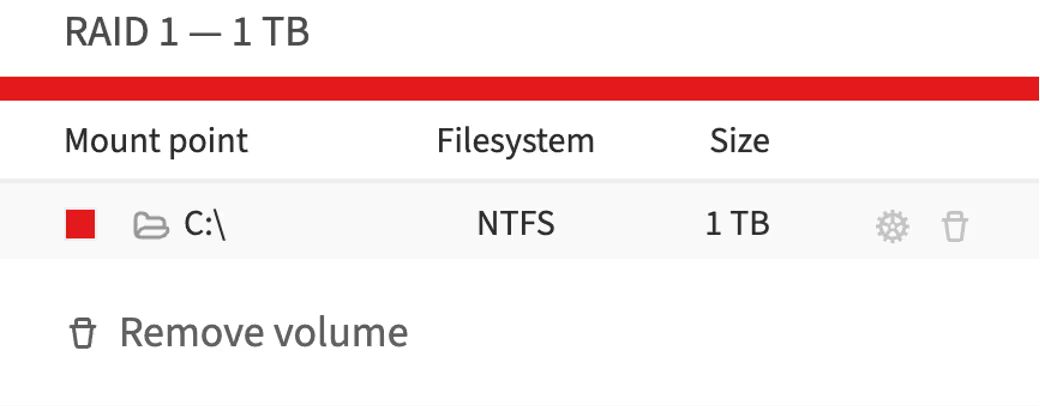
In Windows, mount points perform a similar function but are organized somewhat differently compared to UNIX/Linux systems. Here are the main concepts regarding mount points in Windows:
-
Drive letters: mount points are typically represented by drive letters, such as C:, D:, E:, etc. Each storage device or partition usually receives its own drive letter. For example, the main disk where the operating system is installed is often designated as C:
-
Mount points: you can also use mount points to attach a new partition or disk to an existing directory in the file system. This is similar to the method used in Linux. For instance, a new disk can be attached to the directory C:\Data instead of being assigned a separate drive letter
-
C:\Boot Folder: boot files are typically stored in the C:\Boot folder or other system directories such as C:\Windows\Boot
-
Virtual memory (pagefile): the equivalent of the swap partition is called pagefile. It is located in the root directory of the main disk, usually as C:\pagefile.sys, and is used for virtual memory
Key points:
-
Drive letters (e.g., C:, D:) are used to access main partitions and devices
-
Mount points can be used to attach partitions to existing directories
-
Boot files are stored in system folders (e.g., C:\Boot)
-
Virtual memory is stored in the pagefile on the main disk
Thus, mount points in Windows and Linux serve similar functions but are organized and represented in different ways.
Out-of-band management (OOB)
OOB (Out-of-Band) is a method of remote server management and monitoring conducted via a separate and independent communication channel. This method provides access to the hardware integrated into the server's motherboard.
In the customer portal, there is a page where you can view and manage the OOB. It is accessible through the following steps:
-
Open the customer portal and navigate to Dedicated Servers → Manage
-
Select the server and click Details
-
Scroll to the OOB section
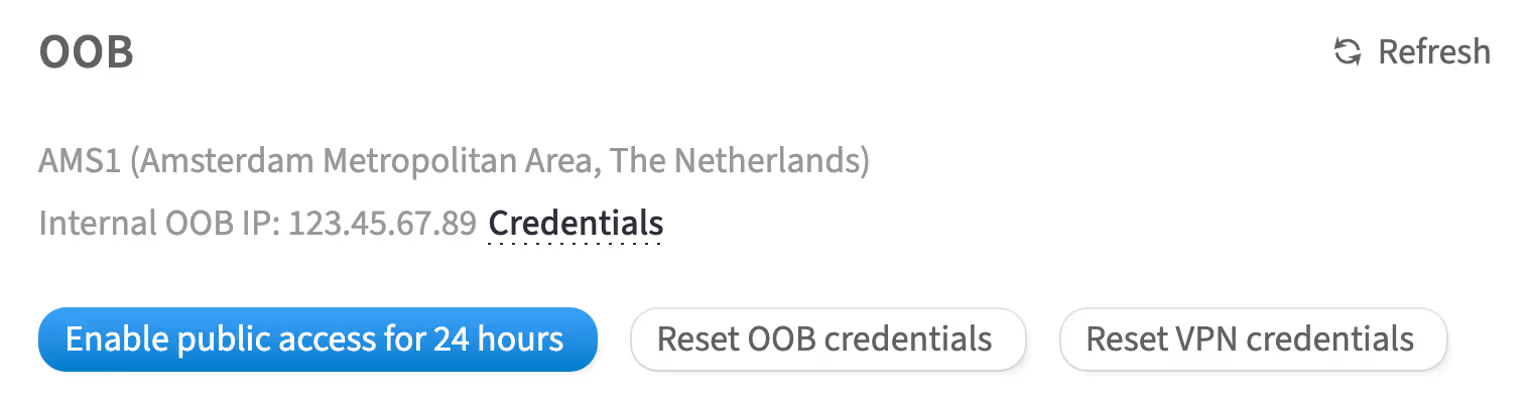
This section contains the configurations and credentials related to OOB.
How to access the OOB management of a Dell server
For Dell servers, OOB management is performed using iDRAC (Integrated Dell Remote Access Controller).
iDRAC offers hardware-level access to the server, allowing administrative tasks to be performed even if the primary network fails, the operating system is down, or the server is powered off. iDRAC management is available through both a web interface and a command-line interface. Key features include:
-
Server power management
-
Hardware sensor monitoring
-
Remote console capabilities
-
Access to virtual media
-
Remote OS installation, including custom images
To access iDRAC, you will need the iDRAC IP address and the corresponding credentials.
Authentication in iDRAC
Authentication can be done in two ways:
-
Using OOB and VPN credentialsFor security purposes, the OOB management network for your servers is isolated and accessible via VPN. Use the provided VPN credentials to connect to the OOB network, then access the iDRAC interface with the iDRAC IP address and local credentials
-
Temporary 4-hour accessFor your convenience, you can temporarily enable access to the iDRAC interface of a specific server over the internet without needing to connect to the VPN. This temporary access will be active for four hours, but you can disable it earlier if needed
OOB and VPN credentials
To get access to iDRAC with OOB and VPN credentials, complete the following steps:
-
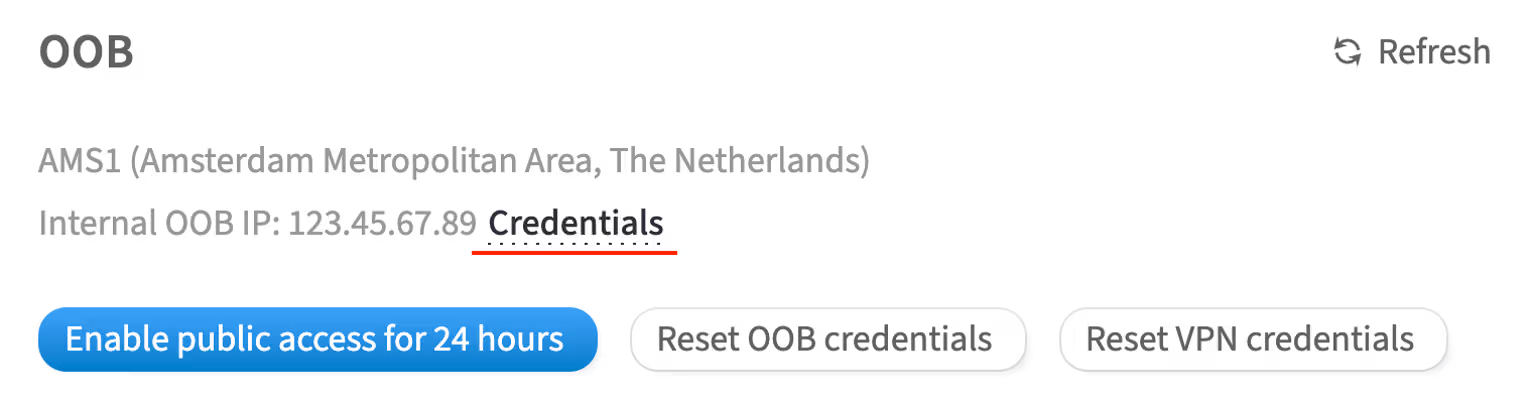
In the OOB section, click Credentials
-
Enter your account password and click Continue
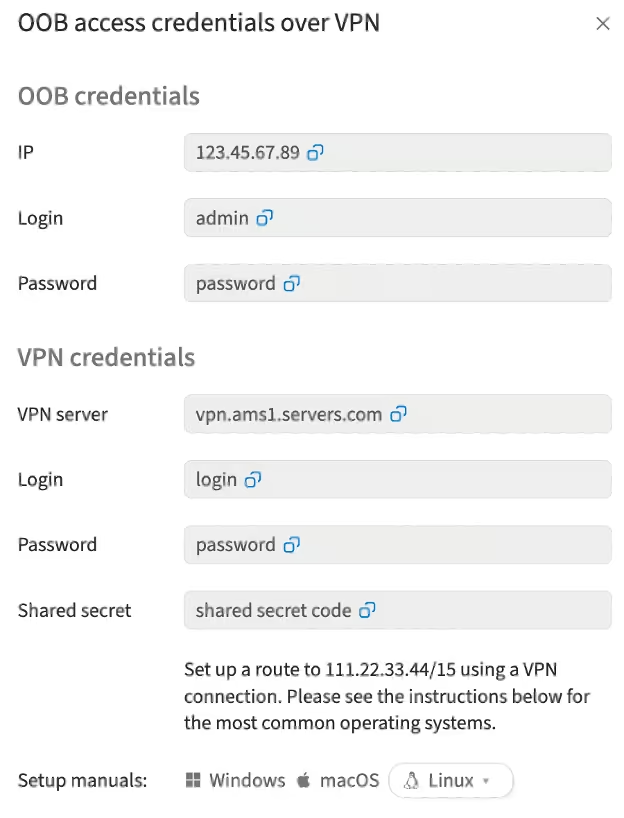
In the opened window, you will see the access details
-
Launch VPN on your computer using the provided credentials. In the Setup manuals section, you will find instructions for popular operating systems on how to set up and launch the VPN:
-
VPN server: the access point for connecting to the VPN. The server address and credentials are entered in the VPN client software settings. After successful connection, all data transmitted between the user's device and the VPN server will be encrypted, and the user will receive an IP address associated with this VPN server
-
Shared secret: a key used to authenticate both parties (client and server) when establishing a VPN connection. This authentication method is often used in VPN protocols such as L2TP/IPsec and IKEv2. The shared secret is usually specified in the configuration files or settings of the VPN client and server
-
-
Open your browser and enter the IP address for accessing the iDRAC interface of a specific server
-
Authenticate using the credentials from the OOB credentials section
Temporary 4-hour access
To get temporary access to iDRAC with OOB credentials, complete the following steps:
-
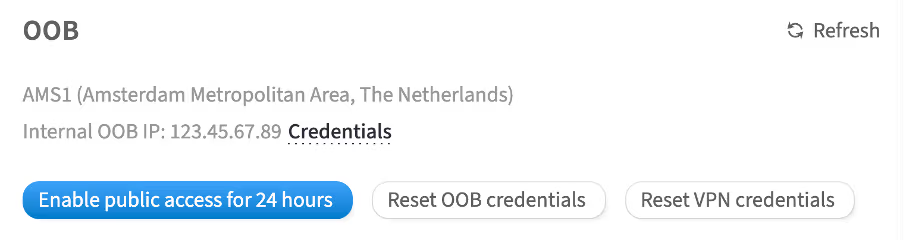
In the OOB section, click Enable public access for 4 hours
-
In the opened window, click Enable
-
To confirm this action, enter your account password in the pop-up window and click Continue
How to disable temporary access
When the work with iDRAC is complete, you can disable temporary access to the OOB network by clicking the Disable public access button.
How to reset OOB credentials
-
In the OOB section click Reset OOB credentials
-
Click Reset to confirm
-
In the opened window, enter your account password and click Continue
OOB credentials will be reset.
How to reset VPN credentials
-
In the OOB section, click Reset VPN credentials
-
Click Reset to confirm
-
In the opened window, enter your account password and click Continue
The VPN credentials will be reset.
How to access iDRAC
To access iDRAC, complete the following steps:
-
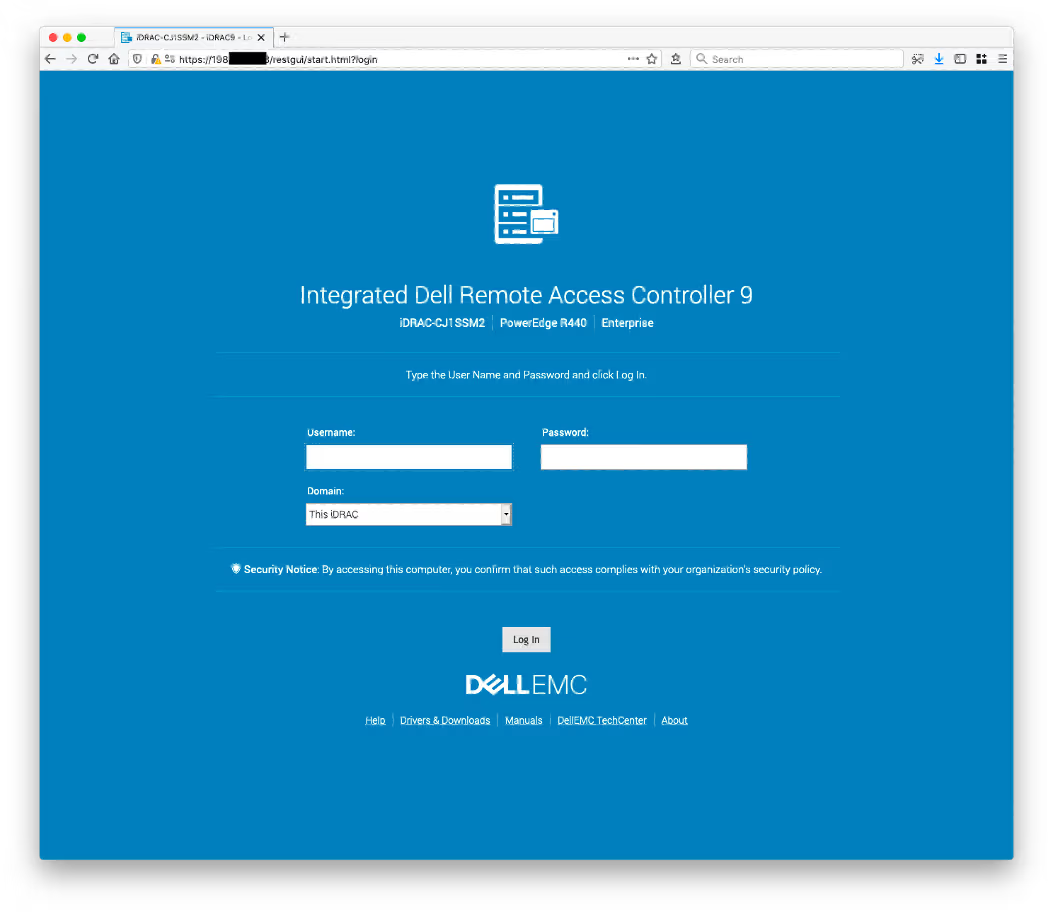
Type the IP address of your server's iDRAC interface into your browser's address bar. The browser will warn you about an insecure connection due to the self-signed HTTPS certificate
-
Add an exception
-
Enter the previously obtained iDRAC credentials on the iDRAC authentication page
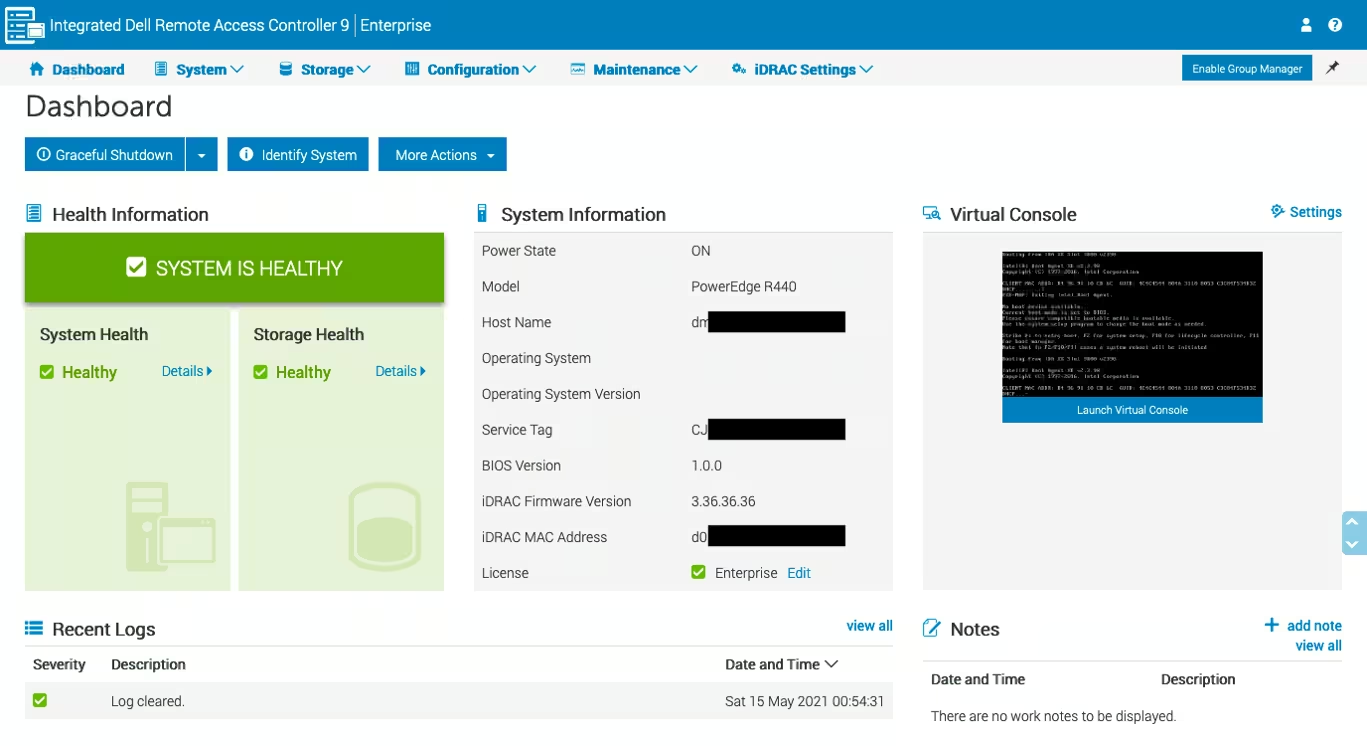
After logging in, you will be able to manage server settings, view the service tag, use the virtual console, and mount virtual media from local or remote (SMB) images.
How to configure iDRAC to use the HTML5 plug-in for virtual console
iDRAC versions and virtual console plug-in types
iDRAC allows you to switch between Java, ActiveX and HTML5-based plugins for virtual console capabilities and virtual media access. The HTML5 plug-in is the default plug-in in iDRAC 9. IDRAC versions 7 and 8 initially had support for Java and ActiveX. HTML5 support was added in the firmware version 2.30.30.30.
Most of our DELL PowerEdge servers are of the 14th, 13th, and 12th generations, meaning iDRAC versions vary from iDRAC 9 to iDRAC 7.
|
Server Model Number |
Server Generation |
iDRAC Version |
HTML5 Plug-in Support |
Launching Console |
|
Rx4x |
14th |
iDRAC 9 |
Out of the box |
|
|
Rx3x |
13th |
iDRAC 8 |
Since FW 2.30.30.30 |
|
|
Rx2x |
12th |
iDRAC 7 |
Since FW 2.30.30.30 |
How to determine the iDRAC version can be found here.
A detailed guide on how to update the iDRAC firmware can be found here.
Server maintenance
Power management via customer portal
In the customer portal, you can initiate a reboot or shutdown of the server. Special commands are sent to the PDU (Power Distribution Unit) automation, which triggers the power to the outlet connected to the server to be turned off or restored. Both the PDU and the server have built-in protection, significantly reducing the risk of software malfunctions, file system issues, or hardware failures during power outages.
When the protection is triggered, the PDU will prevent the server from rebooting or shutting down, and the notification will appear on the customer portal page:
"Power management is currently unavailable because of a running operation on the server. Please try again later."
This occurs when there is an ongoing automation task on the server or the server is in maintenance mode. This could be due to operations performed by the servers.com team or tasks initiated by the server users, such as firmware updates or failure diagnostics.
How to reboot a dedicated server
Rebooting a server may be required to resolve accumulated system errors, apply software updates or other purposes.
The server can be rebooted in two ways: via the customer portal and via the VNC console.
Customer portal
To reboot the server via the customer portal, complete the following steps:
-
In the left-hand menu, navigate to Dedicated Servers → Manage
-
Select the server and click Details
-
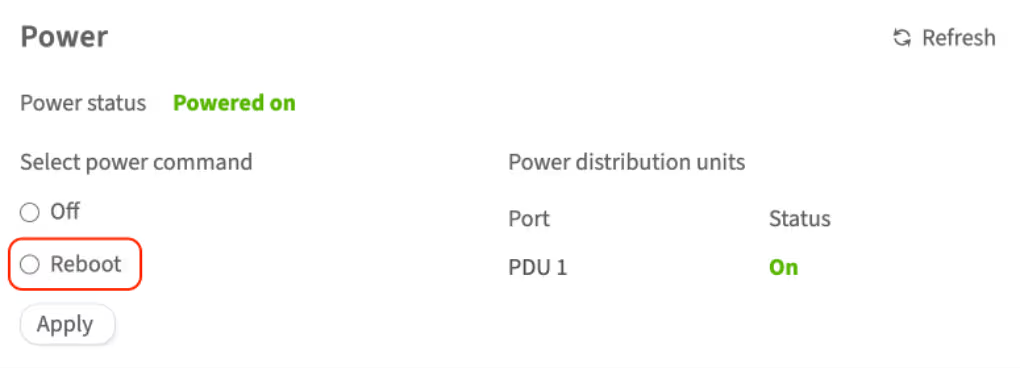
Scroll to the Power section and select Reboot
-
To confirm this action, enter your account password in the pop-up window and click Continue
The server will be rebooted. You can check the server status in the Status field in this section. If the status does not change, try using the Refresh button.
VNC console
To reboot the server via the VNC console, complete the following steps:
-
Open the customer portal and navigate to Dedicated Servers → Manage
-
Select the server and click Details
-
In the Details section, click VNC console and confirm your action by entering your account password in the opened window
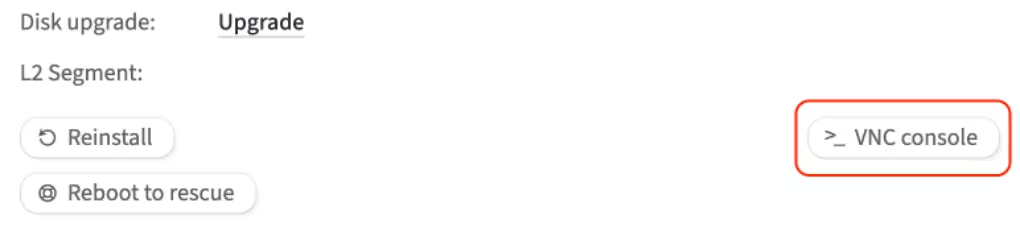
-
In the opened console, click ▹ to open the control bar → Show Extra keys → Send Ctrl+Alt+Delete
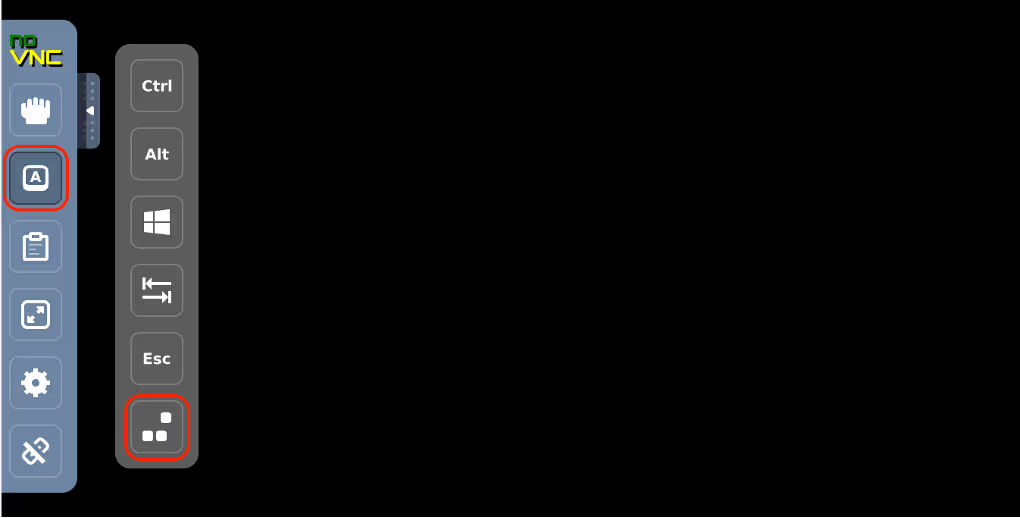
The server will be rebooted.
How to switch off the dedicated server
Temporarily shutting the server down allows for scheduled maintenance, equipment replacement, or upgrades without risking data corruption.
The server can be switched off in two ways: via the customer portal and via the VNC console.
Customer portal
To switch off the server via the customer portal, complete the following steps:
-
Open the customer portal and navigate to Dedicated Servers → Manage
-
Select the server and click Details
-
Scroll to the Power section and select Off
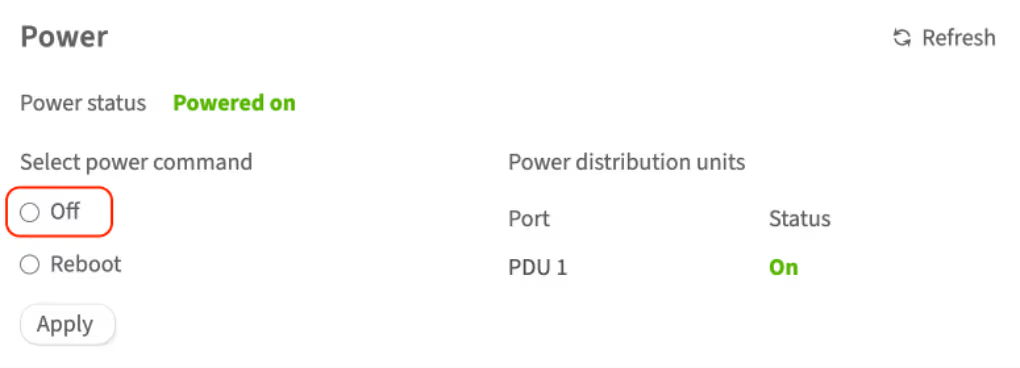
- To confirm this action, enter your account password in the pop-up window and click Continue
The server will be switched off. You can check the server status in the Status field in this section. If the status does not change, try using the Refresh button.
VNC console
To switch off the server via the VNC console, complete the following steps:
-
Open the customer portal and navigate to Dedicated Servers → Manage
-
Select the server and click Details
-
In the Details section, click VNC console and confirm your action by entering your account password in the opened window
-
In the opened console:
-
For Linux-based systems, execute the following command:
shutdown -h -
For Windows systems, click ▹ to open the control bar → show extra keys → click the Windows icon → shutdown
-
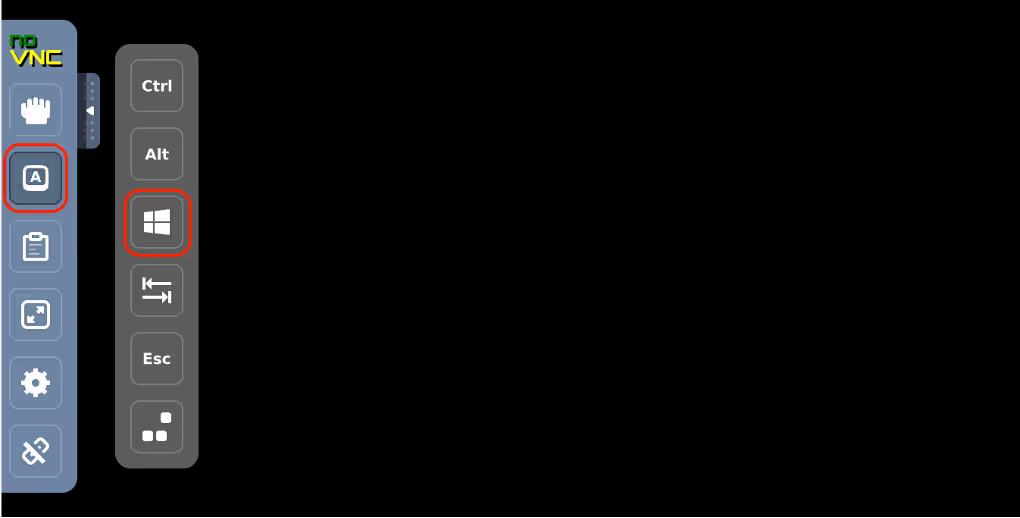
The server will be switched off.
What is rescue mode?
Rescue mode is a useful feature for dedicated and cloud servers, allowing you to diagnose, fix problems and restore server functionality in case of failures. This feature is accessible to users via the customer portal control panel.
Imagine that something went wrong with the OS configuration; for example, the GRUB loader configuration file is corrupted, and the server shows a black screen and is unable to boot:
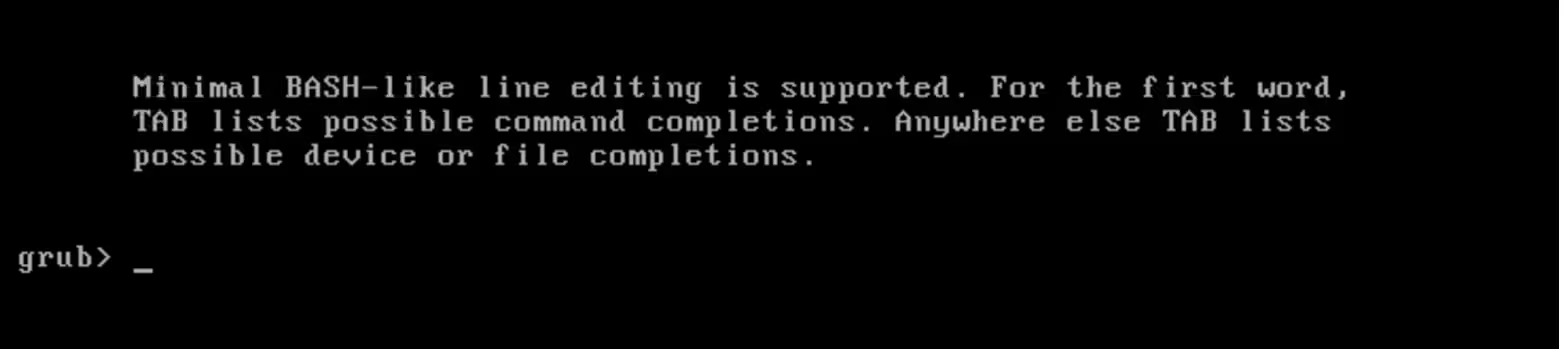
In cases where the OS is affected by critical system errors or the server is unable to boot properly, rescue mode may come in handy.
This issue can be solved in a number of ways, one of which is using rescue mode.
How to restore a dedicated server using rescue mode
In rescue mode, the server connection occurs via a public IP address, so it's essential that the server has a configured public network to utilize this function.
To enter rescue mode, complete the following steps:
-
In the left-hand menu, navigate to Dedicated Servers → Manage
-
In the My servers section, choose the server and click Details
-
Click the Reboot to rescue button and wait for an email with temporary login credentials (this usually takes up to 10 minutes)
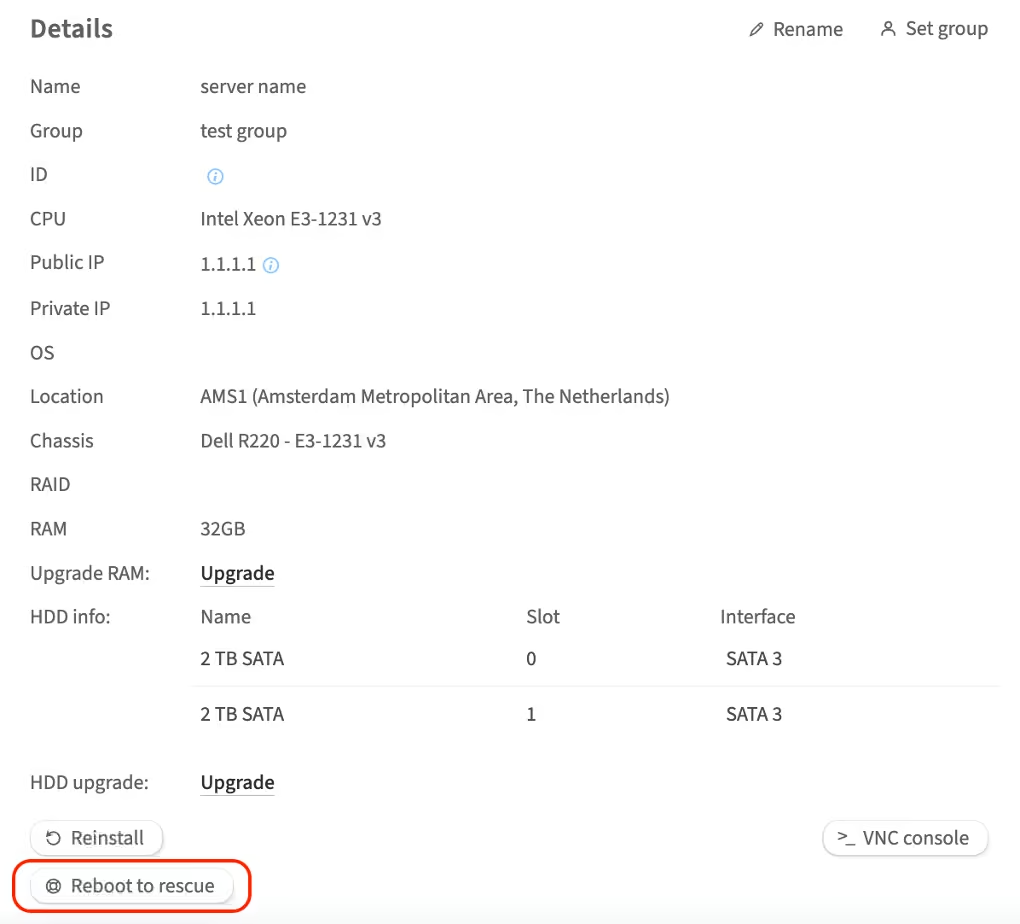
The email will be sent to Contacts with primary and technical roles
-
Use credentials to access the server via SSH:
ssh 123.45.67.89 -l root
Warning: Permanently added '123.45.67.89' (RSA) to the list of known hosts.
root@123.45.67.89's password:
* Welcome to DMGMTSrvInit 1.0 x86_64 [based on CentOS 6 x86_64]

Dell OpenManage Deployment Toolkit:
- RAID:    raidcfg
- DRAC:    racadm4, racadm5, idracadm7
- BIOS:    syscfg
- SYSTEM:  omconfig, omreport, dsu

Additional utils:
- RAID:    mdadm
- FS:      lvm, xfs, jfs, e2fs, nfs, ntfs, dosfs, parted, fdisk, cfdisk, sfdisk, grub
- EDITORS: vi, nano, joe
- SYSTEM:  dmidecode, smartmontools, testdisk, hddtemp, lshw, memtester, ipmitool
- NETWORK: ethtool, tcpdump, mtr, traceroute, tcptraceroute, nmap, dstat
- TOOLS:   rsync, lftp, curl, wget, nc, screen, mc, chkrootkit

You can check speedtest files in your browser, url: http://<server ip>/
A list of useful commands is displayed upon login
To recover the GRUB configuration file, complete the following steps:
-
Get the list of available disks and partitions using the
lsblkcommand[root@dmgmtsrvinit.pxe ~]# lsblk NAME MAJ:MIN RM SIZE RO TYPE MOUNTPOINT sdb 8:16 0 1.8T 0 disk ├─sdb1 8:17 0 1M 0 part ├─sdb2 8:18 0 500M 0 part │ └─md127 9:127 0 500M 0 raid1 └─sdb3 8:19 0 1.8T 0 part └─md126 9:126 0 1.8T 0 raid1 ├─C1500302784I0-home (dm-0) 253:0 0 1.8T 0 lvm ├─C1500302784I0-rootfs (dm-1) 253:1 0 10G 0 lvm └─C1500302784I0-swap (dm-2) 253:2 0 2G 0 lvm sda 8:0 0 1.8T 0 disk ├─sda1 8:1 0 1M 0 part ├─sda2 8:2 0 500M 0 part │ └─md127 9:127 0 500M 0 raid1 └─sda3 8:3 0 1.8T 0 part └─md126 9:126 0 1.8T 0 raid1 ├─C1500302784I0-home (dm-0) 253:0 0 1.8T 0 lvm ├─C1500302784I0-rootfs (dm-1) 253:1 0 10G 0 lvm └─C1500302784I0-swap (dm-2) 253:2 0 2G 0 lvmSeems like disk
/dev/mapper/C1500302784I0-rootfscontains the root partition and disk/dev/md127contains/boot -
Mount these partitions
mkdir /mnt/root
mount /dev/mapper/C1500302784I0-rootfs /mnt/root
mount /dev/md127 /mnt/root/boot
You'll also need to mount several other partitions in order to make the
grub2-mkconfigcommand work properly:mount -o bind /dev /mnt/root/dev mount -o bind /sys /mnt/root/sys mount -t proc none /mnt/root/proc -
Change the root directory using the
chrootcommand:chroot /mnt/root -
Execute the
grub2-mkconfigcommand, which will generate new GRUB configuration file:[root@dmgmtsrvinit.pxe /]# grub2-mkconfig -o /boot/grub2/grub.cfg Generating grub configuration file ... WARNING: Failed to connect to lvmetad. Falling back to device scanning. WARNING: Failed to connect to lvmetad. Falling back to device scanning. Found linux image: /boot/vmlinuz-3.10.0-514.26.2.el7.x86_64 Found initrd image: /boot/initramfs-3.10.0-514.26.2.el7.x86_64.img Found linux image: /boot/vmlinuz-3.10.0-514.el7.x86_64 Found initrd image: /boot/initramfs-3.10.0-514.el7.x86_64.img Found linux image: /boot/vmlinuz-0-rescue-7dafe89409d74ef2a70c495f0148d7e3 Found initrd image: /boot/initramfs-0-rescue-7dafe89409d74ef2a70c495f0148d7e3.img WARNING: Failed to connect to lvmetad. Falling back to device scanning. WARNING: Failed to connect to lvmetad. Falling back to device scanning. doneThe command executed successfully, apart from a few warning messages
-
Exit the
chrootand shut down the server properly[root@dmgmtsrvinit.pxe /]# exit [root@dmgmtsrvinit.pxe ~]# shutdown -h now Broadcast message from root@dmgmtsrvinit.pxe (/dev/pts/0) at 18:29 ... The system is going down for halt NOW! [root@dmgmtsrvinit.pxe ~]# Connection to 123.45.67.89 closed by remote host. Connection to 123.45.67.89 closed.
How to exit rescue mode
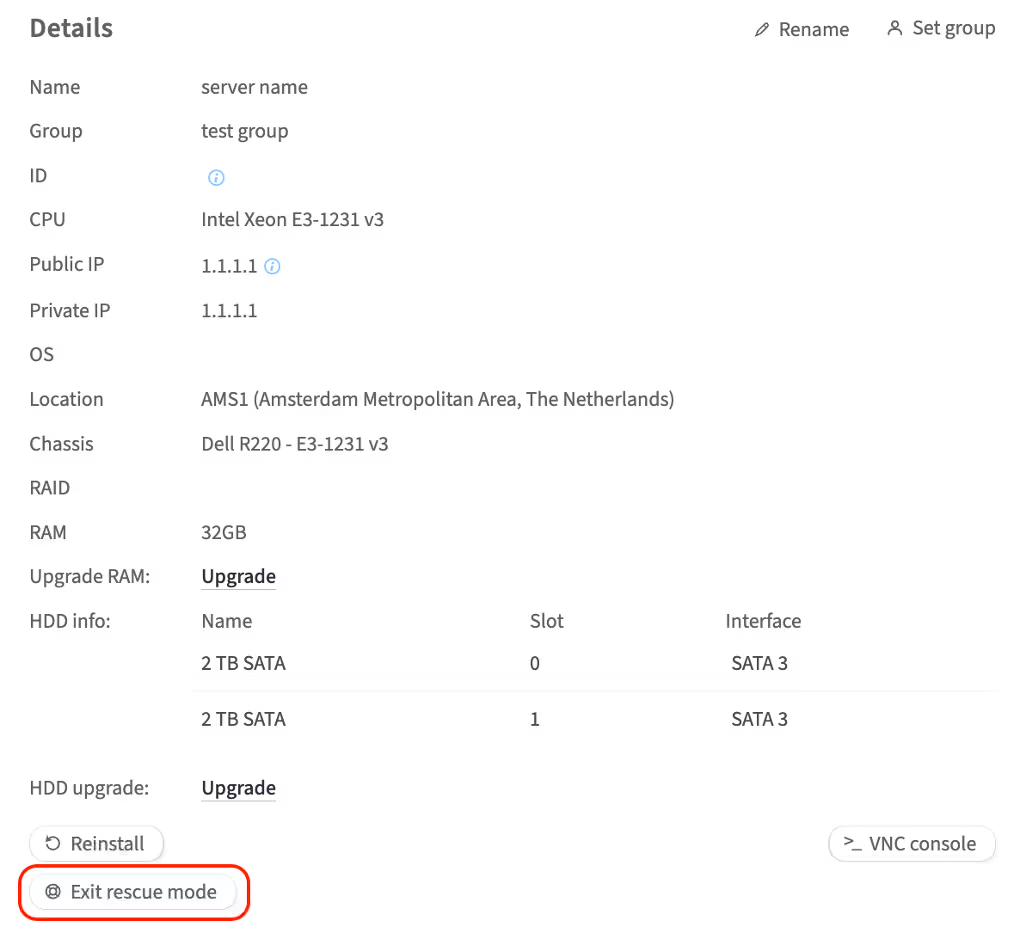
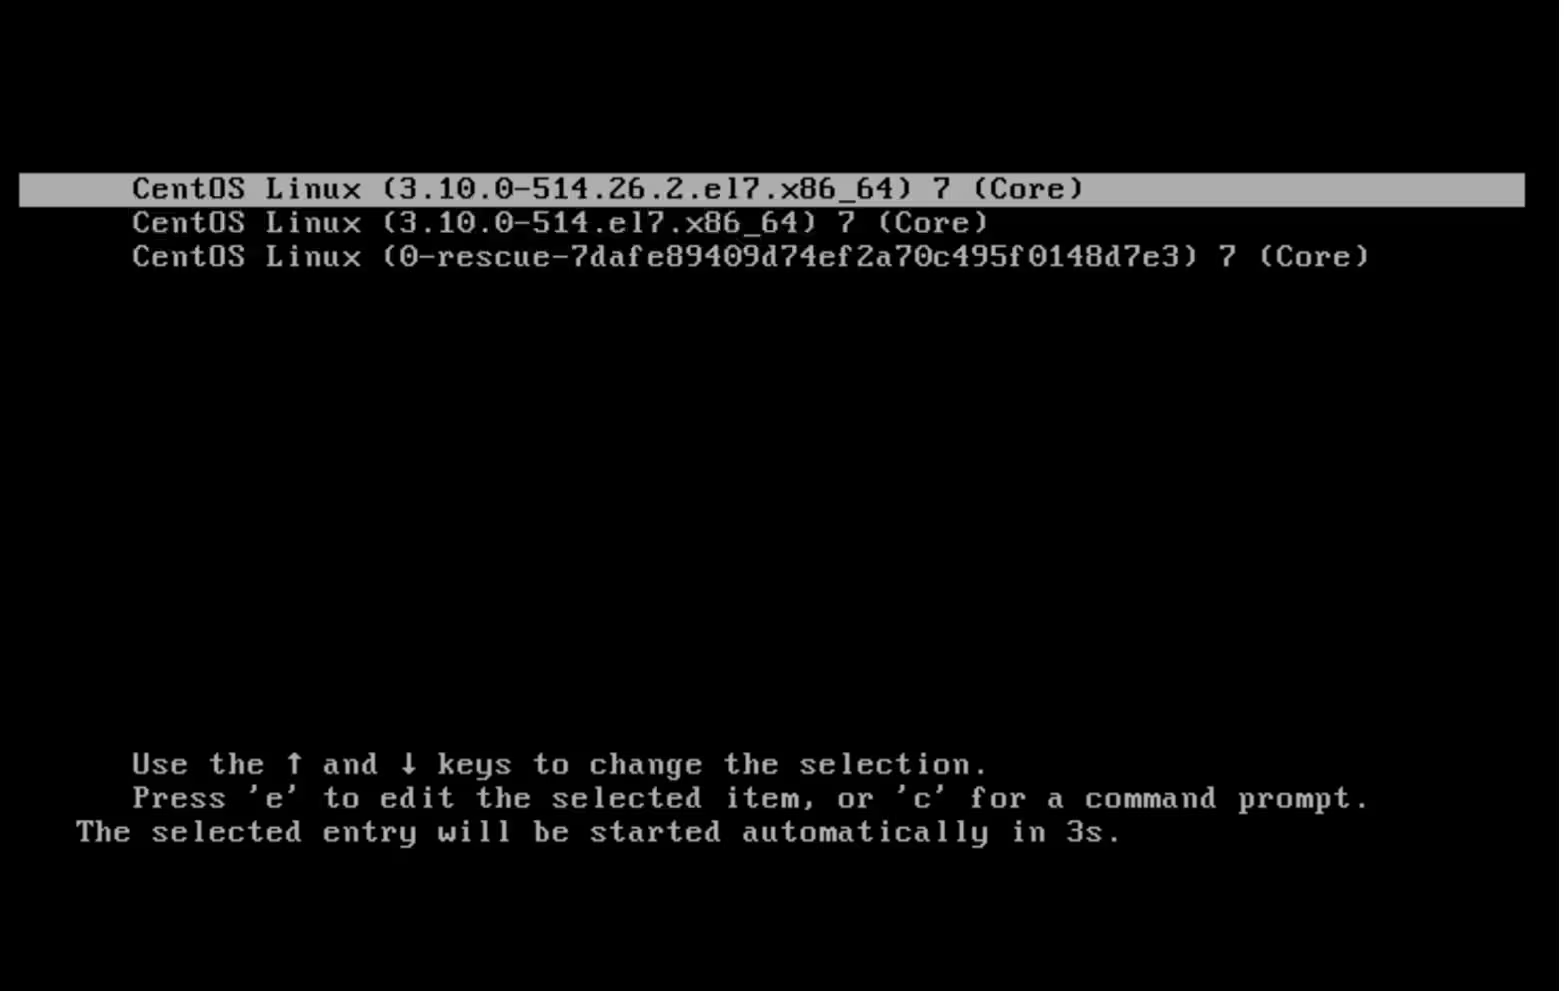
As soon as recovery work is finished, click the Exit rescue mode button in the customer portal. The server will exit rescue mode and boot normally the OS installed on its disks.
The loader is working again!
How to cancel the dedicated server service
If you decide to cancel one of your dedicated servers as a service, complete the following steps:
-
In the left-hand menu, navigate to Dedicated Servers → Manage
-
In the My servers section, choose the server you wish to cancel and click Details
-
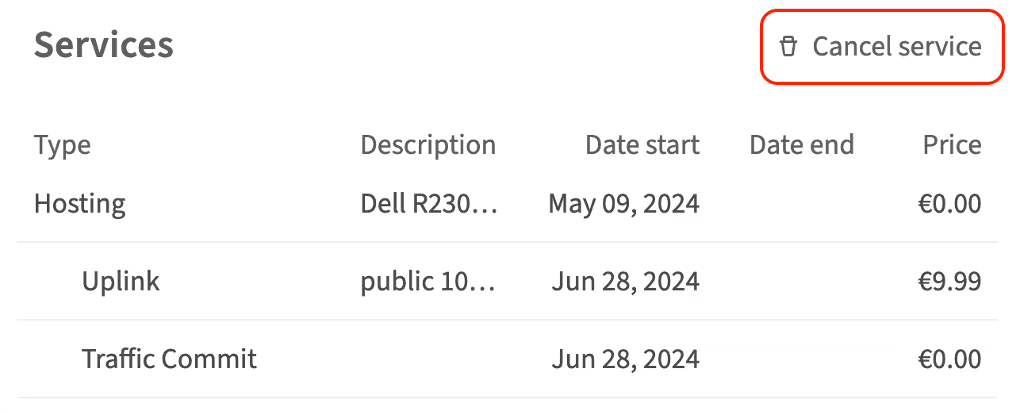
Scroll to the Services section
-
Click Cancel Service
-
Choose the date and time for the server to be unlinked from your account
Keep in mind that the service cancellation will take effect 30 days from the cancellation date. Since service termination is irreversible, it will be impossible to recover data after the expiration. Therefore, make sure to back up your data stored on the server. You will be billed up until the service termination date. To immediately remove the server, send an email to sales@servers.com. -
To confirm this action, click Cancel service and enter your account password in the pop-up window and click Continue
Documentation links
Please refer to the following articles for additional instructions. The instructions depend on the version of iDRAC on your server. How to determine the version of iDRAC is explained here.
iDRAC documentation references
iDRAC 7/8
iDRAC 7/8/9
-
Using the Virtual Media function on iDRAC6, iDRAC7, iDRAC8 and iDRAC9
-
How to install the operating system on a Dell PowerEdge Server?
iDRAC 9
Use your server's service tag to search for user manuals for other iDRAC versions on the Dell Support website.


