
A guide to iDRAC’s virtual media function
The iDRAC virtual media function facilitates remote access to software image files, otherwise known as ISO (identical storage image of optical media) images. This allows operating systems to be installed and servers updated without needing to physically visit a server room. In this guide we’ll provide a background into what iDRAC is, how the virtual media function works, and its various use cases.
What is iDRAC?
iDRAC stands for Integrated Dell Remote Access Controller. iDRAC is a piece of dedicated hardware that sits on a Dell server’s motherboard and forms the out-of-band (OOB) management platform for that server. iDRAC hardware gives system administrators remote access to the server console and the ability to attach virtual media.
Functions that can be conducted remotely using iDRAC include:
-
Troubleshooting
-
Monitoring temperature controls
-
Monitoring power consumption
-
Installing an operating system
-
Providing video, keyboard, and mouse over network (IPKVM)
-
Hard rebooting a server
-
Powering a server on and off
These remote access controls are important because it means servers can be accessed without having to physically travel to, and step foot in, the server facility. This is especially important when the servers you’re accessing are headless (without a monitor, keyboard, or mouse). iDRAC provides these remote capabilities even in instances when there is no operating system installed on the server, the operating system fails to boot, or access to the operating system is blocked as a result of an error in the network configuration.
In the case of a system crash, having iDRAC configured means you can view the console and reboot the server there and then. Your hosting provider can also provide a separate network link and separate switches for iDRAC management so that you can access iDRAC even if your public and/or private network is down.

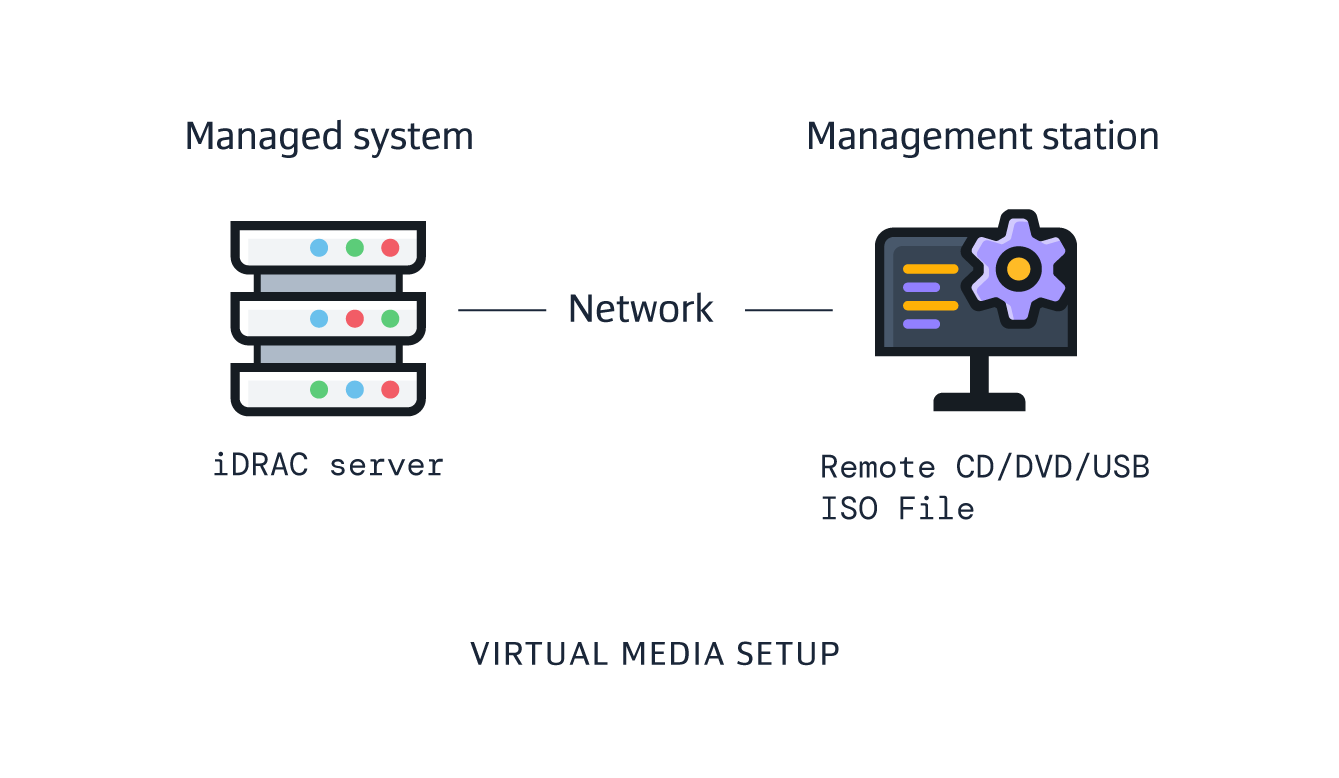
What is iDRAC’s virtual media function?
iDRAC’s virtual media feature allows system administrators remote access to media devices like virtual optical drives and USB flash drives located on the management station or ISO images on a network share - just as if they were devices on the managed server itself.
With this useful feature, system administrators can boot their servers into custom ISO images on a Server Message Block (SMB) share or administrator’s workstation. It gives administrators the ability to mount ISO images (essentially making the ISO available on the file system by making your computer think that the ISO image is a real disc) so you can use the ISO image just as if it were a physical CD or DVD. This can be used for installing operating systems or updating server drivers and firmware.
Using the virtual media feature you can:
-
Remotely access media over the network
-
Install applications
-
Update drivers
-
Install an operating system on the managed system
It’s worth noting here that, in order to access the virtual media function, you will need an enterprise license (aka iDRAC7, iDRAC8, or iDRAC9) or an enterprise module (iDRAC6). The SMB share should be accessible directly from the iDRAC.
How to enable iDRAC’s virtual media function
In most cases, the virtual media feature can be enabled from within the iDRAC web interface, under the Configuration section.
Configuration → Virtual Media → Enabled
How to start using the iDRAC virtual media function
This process may differ slightly depending on the version of iDRAC in operation. Follow the instructions below to use the virtual media function on iDRAC9, iDRAC7/8, and iDRAC6.
iDRAC9
To use the virtual media function on iDRAC9…
-
Obtain the IP address and login details for your server’s iDRAC
-
If not already, configure your iDRAC so that it is fully enabled
-
Log in to iDRAC using the IP on your browser
-
Select Launch Virtual Console on the iDRAC web interface
-
Select Connect Virtual Media to activate the function
-
Select Virtual Media and click Browse on the device you want to pass through
-
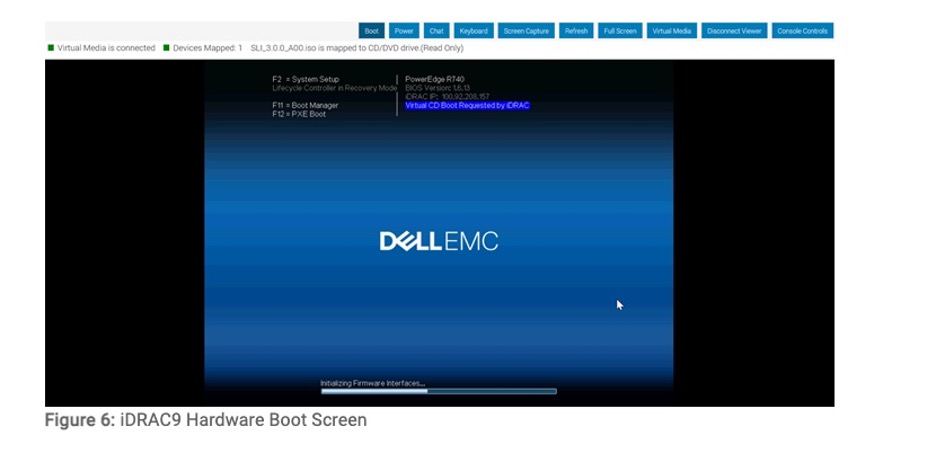
Select Boot and choose Virtual CD/DVD/ISO
-
Confirm the boot action by selecting Yes
-
The system will reboot and the installation interface will be displayed
Screenshot from DELL Technologies © Image source
iDRAC7/8
To use the virtual media function on iDRAC7/8, follow the system prompts and disconnect virtual media after installation. Then…
-
Open the Virtual Console from the iDRAC web interface
-
Click on Virtual Media
-
Choose Connect Virtual Media
-
Select Virtual Media
-
Select the device you want to pass through
-
Click Browse to choose local system or image file drive you want to pass through
-
To pass through an image, select and open the file
-
Select Map Device to complete the source selection
-
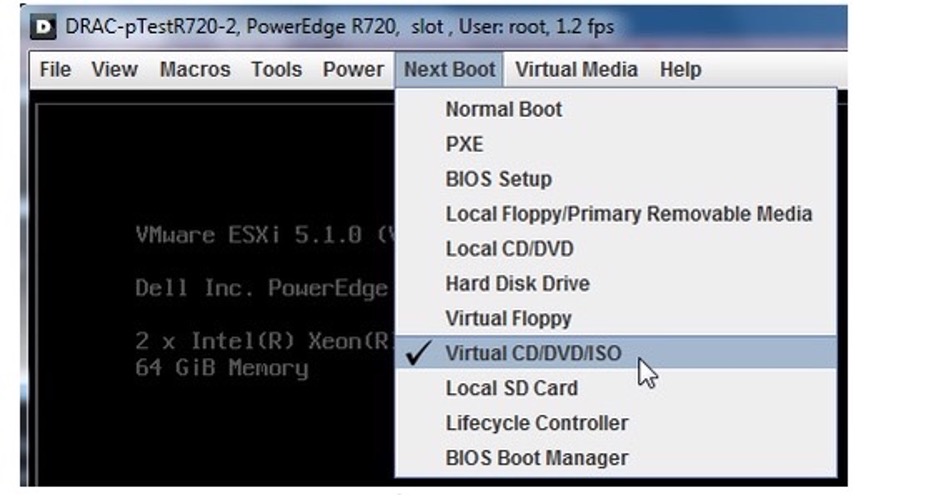
To boot from a selected device, select Next Boot and choose Virtual CD/DVD/ISO
Screenshot from DELL Technologies © Image source
iDRAC6
To use the virtual media function on iDRAC6…
-
Open the Virtual Console from the iDRAC web interface
-
Select Virtual Media then Launch Virtual Media
-
In the management window, select Add Image to open the selection window
-
Select the ISO image you want to use and select Open
Check the box under Mapped to associate the selected file as a virtual device and pass it through the server. The selected device will now appear in the operating system.
What you can do using iDRAC’s virtual media function
Beyond generally monitoring server health, iDRAC’s virtual media feature has multiple use cases. The following are three examples of how virtual media can be used to (a) install an operating system on your server from the ISO, (b) boot a server into a custom ISO image, and (c) mount and unmount driver packs.
Install an Operating System on your server directly from the ISO
Using iDRAC’s virtual media feature, you can install an operating system on your server directly from an ISO. Before a new operating system is installed, the server firmware must be updated and a source media with the installation files will need to be made available to the server via a mounted ISO image through the iDRAC virtual media feature.
There are then two ways to install the operating system. The preferred method involves using Lifecycle Controller since it comes with a dedicated OS deployment feature which simplifies the installation by preloading drivers before the installation process. However, if you’re using a 9G or 10G Dell server then this won’t be possible since the Lifecycle Controller was not released for these iterations. Instead it’s possible to use the Systems Management Tools and documentation DVD ISO file to deploy a supported operating system.
Boot a server into a custom ISO image
The iDRAC virtual media feature can also be used to boot a server into a custom ISO image located on an SMB share or administrator’s workstation. With the virtual media function enabled in iDRAC, you can use an ISO image from your workstation as virtual media on the server. Depending on the version, iDRAC on your server will support Common Internet File System (CIFS) shares or CIFS and HTTP/HTTPS.
There’s also another way to run an ISO against a server: to boot it over the network via a PXE server. However this doesn’t make use of the virtual media function.

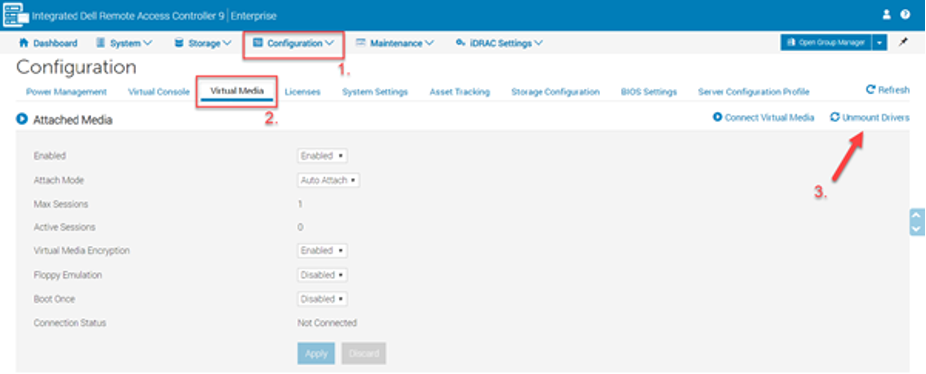
Mount and unmount driver packs
Sometimes when installing or deploying an operating system on a Dell PowerEdge server, you’ll need additional hardware drivers for that operating system to be successfully installed. These drivers can be extracted into a dynamic USB partition labeled OEMDRV. The operating system installer consumes these drivers from the partition during the installation process so that the operating system has the necessary drivers to complete the installation. System administrators can mount or unmount drivers using the virtual media feature within the iDRAC user interface.
For example, here’s how to mount drivers in iDRAC9:
-
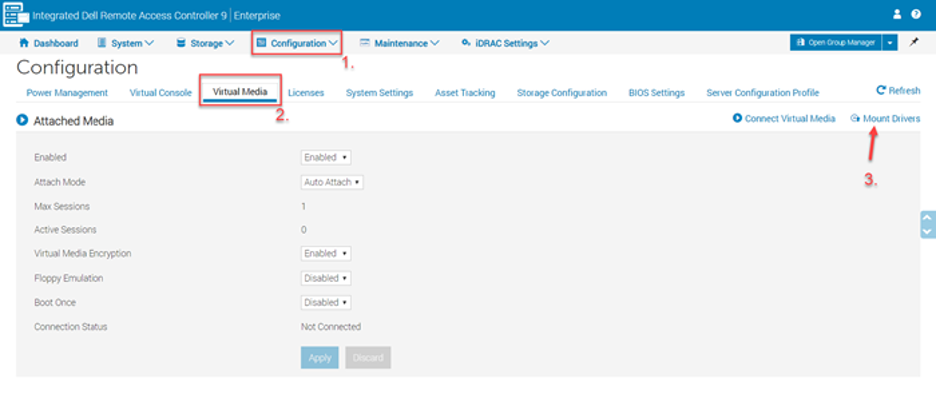
Log into iDRAC
-
Go to Configuration
-
Select Virtual Media
-
Select the Mount Drivers button
-
Select the operating system from the drop-down box
-
Select Job Queue and wait until the job is completed
-
Boot your operating system media using Virtual Media
-
Install the operating system
Screenshot from DELL Technologies © Image source
And here’s how to unmount drivers in iDRAC9:
-
Log into iDRAC
-
Go to Configuration
-
Select Virtual media
-
Select Unmount Drivers button
-
The drivers will be unmounted after the operating system is installed
Screenshot from DELL Technologies © Image source
Platform bootable ISO for firmware updates
One of the methods available to update a PowerEdge server is to update all system components simultaneously using a custom built platform bootable ISO. A platform specific bootable ISO is designed to perform firmware server component updates on Dell EMC PowerEdge servers in a pre-OS environment.
The ISO carries the firmware update packages needed to update the server. This can be achieved via a few different methods including network location, transferring an ISO on a bootable USB drive, CD-ROM, or through iDRAC virtual media. Via a configured iDRAC, the process can be carried out online within about an hour.
The round-up
The iDRAC out-of-band management platform is an extremely useful piece of hardware. This piece of kit, which sits on your server’s motherboard, facilitates remote access to your server consoles. Within iDRAC, the virtual media feature has multiple use cases, including installing operating systems from the ISO, booting servers into custom ISO images, and mounting and unmounting driver packs. For more product and service information, including detailed guides for our dedicated servers, check out our knowledge base.
This article may contain copyrighted material which may not otherwise by owned by us. This article is made available for educational commentary purposes and we make no claim of ownership to any such material and we acknowledge the copyright owner's rights.